Prerequisites
- You need a NetSuite account with:
- Integration User: This user must be a NetSuite Administrator user account.
- Note down your NetSuite ID, which is the numbers at the start of your URL.
- Log in with your NetSuite Administrator user account and check the Web Services configuration:
- First we check the "REST Web Services". To do this, go to: Setup > Company > Enable Features > SuiteCloud > SuiteTalk (Web Services): REST Web Services needs to be checked
- Then we check the "Authentication". Go to: Setup > Company > Enable Features > SuiteCloud > Manage Authentication: TOKEN-BASED AUTHENTICATION needs to be checked
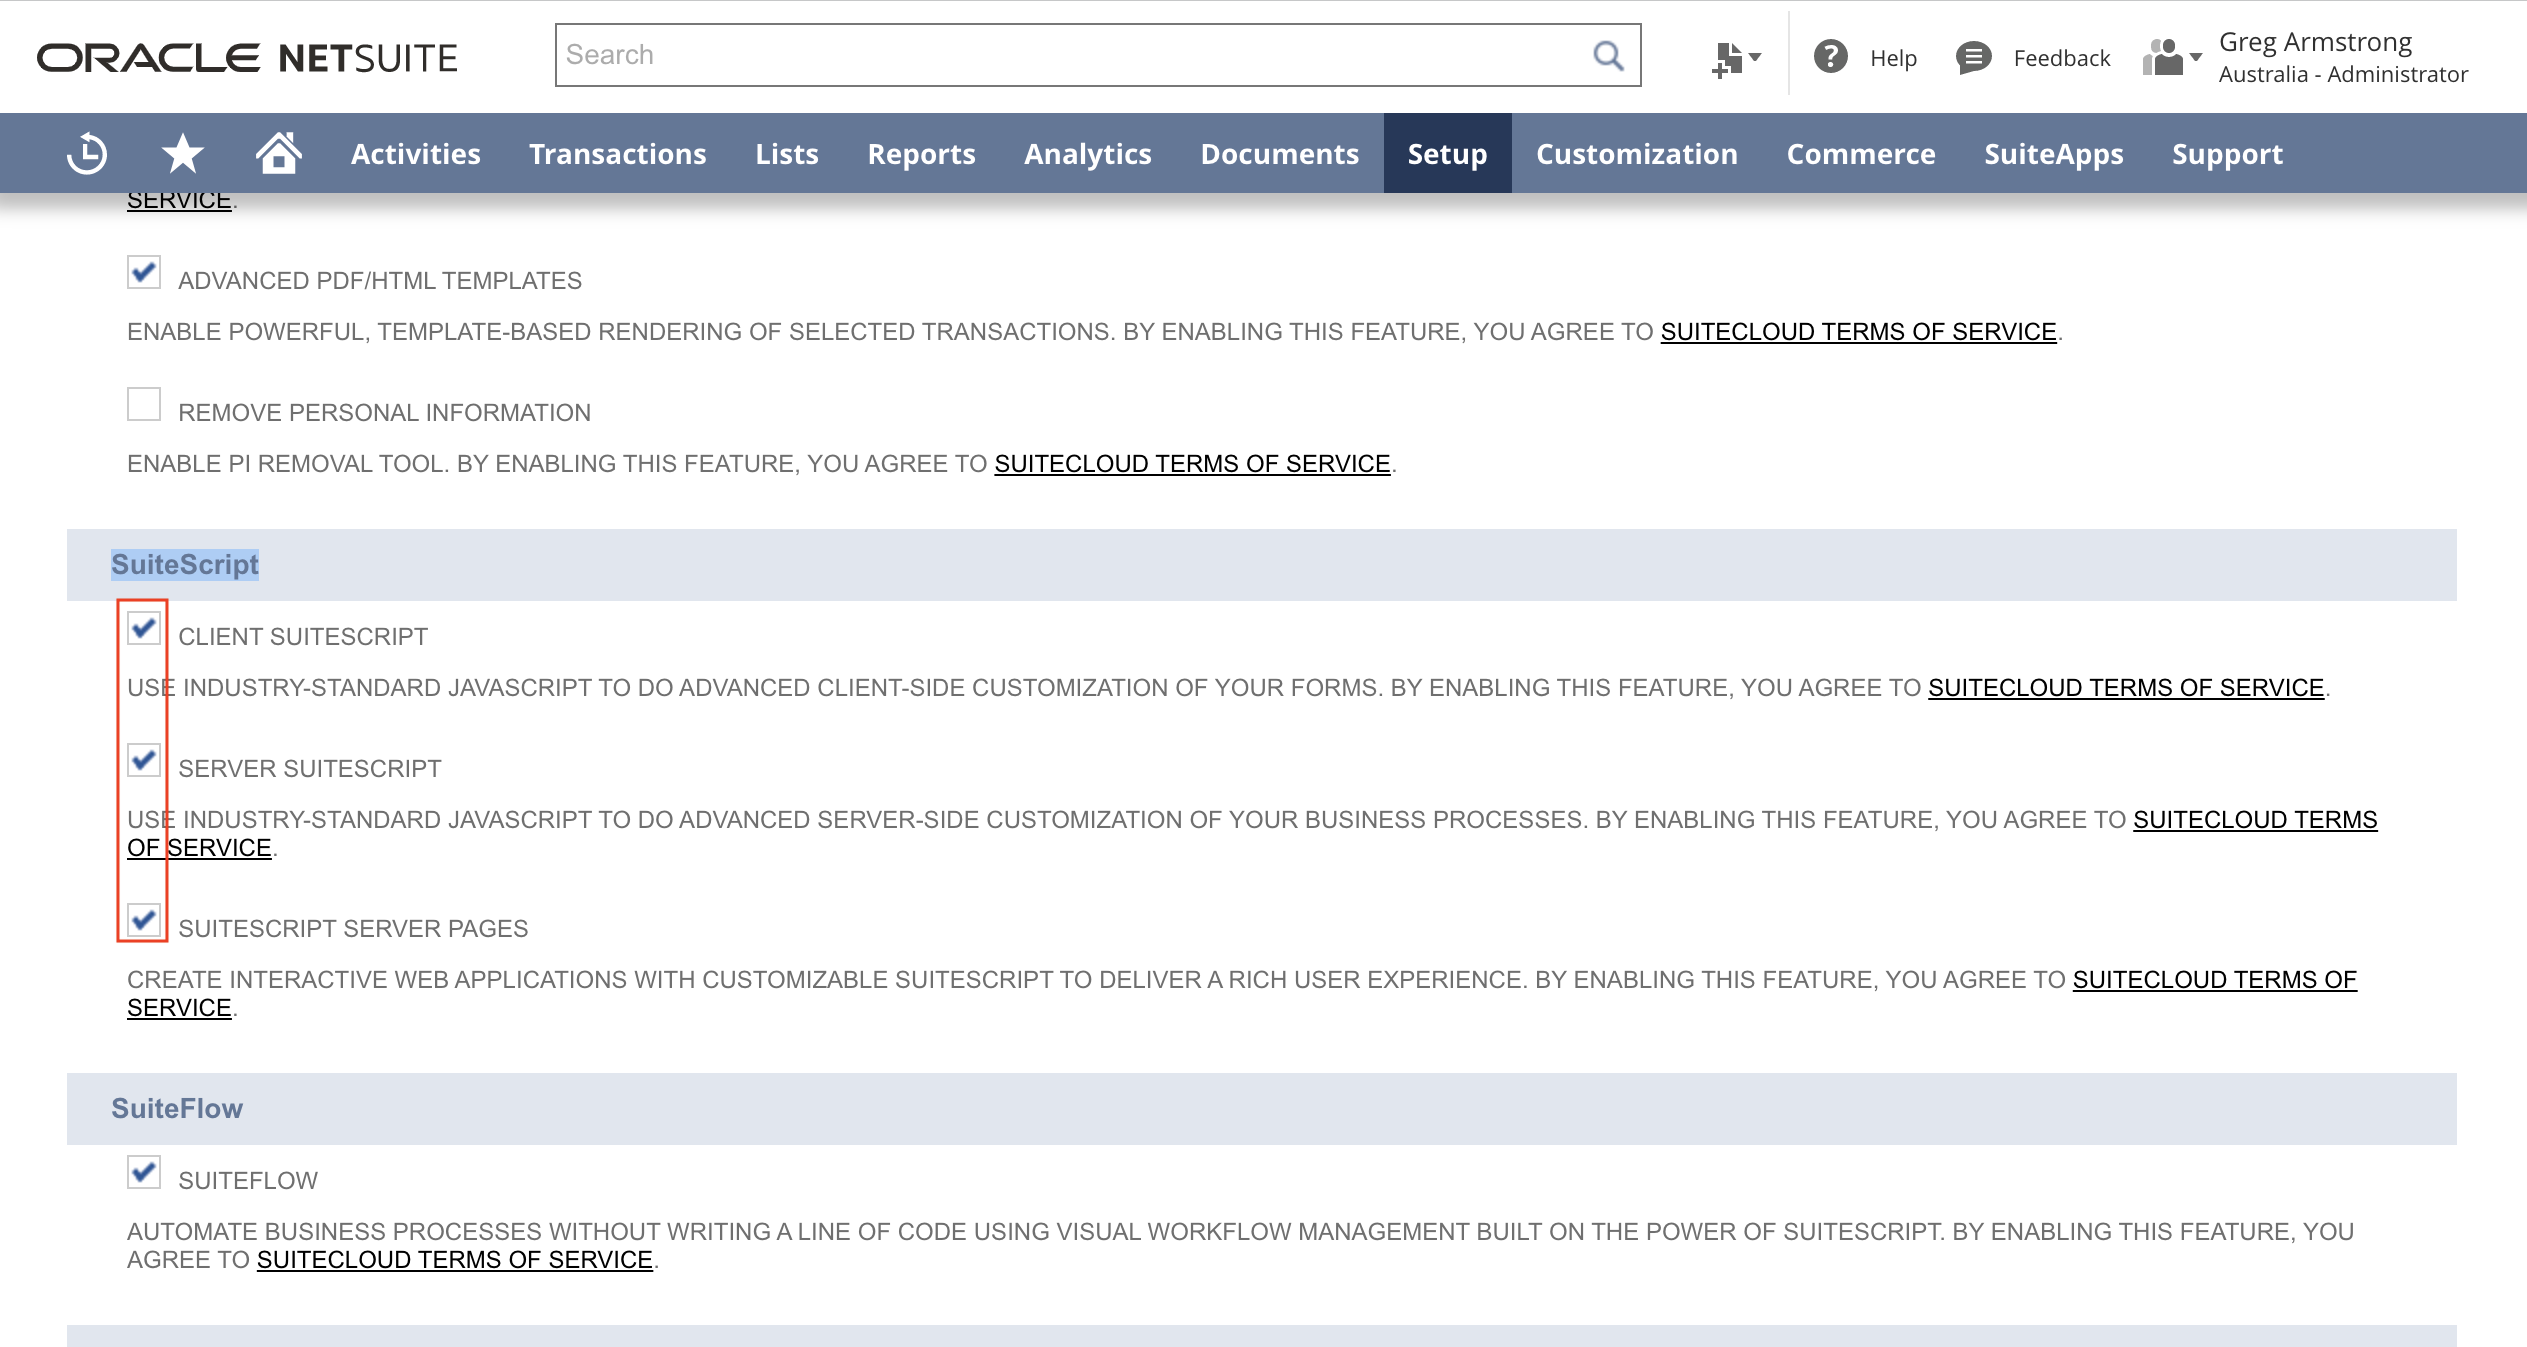
- Then check that "SuiteScript" is enabled. Go to Setup > Company > Enable Features > SuiteCloud > SuiteScript: check all 3 options.
- Next, create ‘PencilPay API’ role with the below permissions at 'Full' level. This role will be used for the PencilPay API user that will be created in step 4 below.
- Go to: Setup > Users/Roles > Manage Roles > New
- Enter Name: PencilPay API

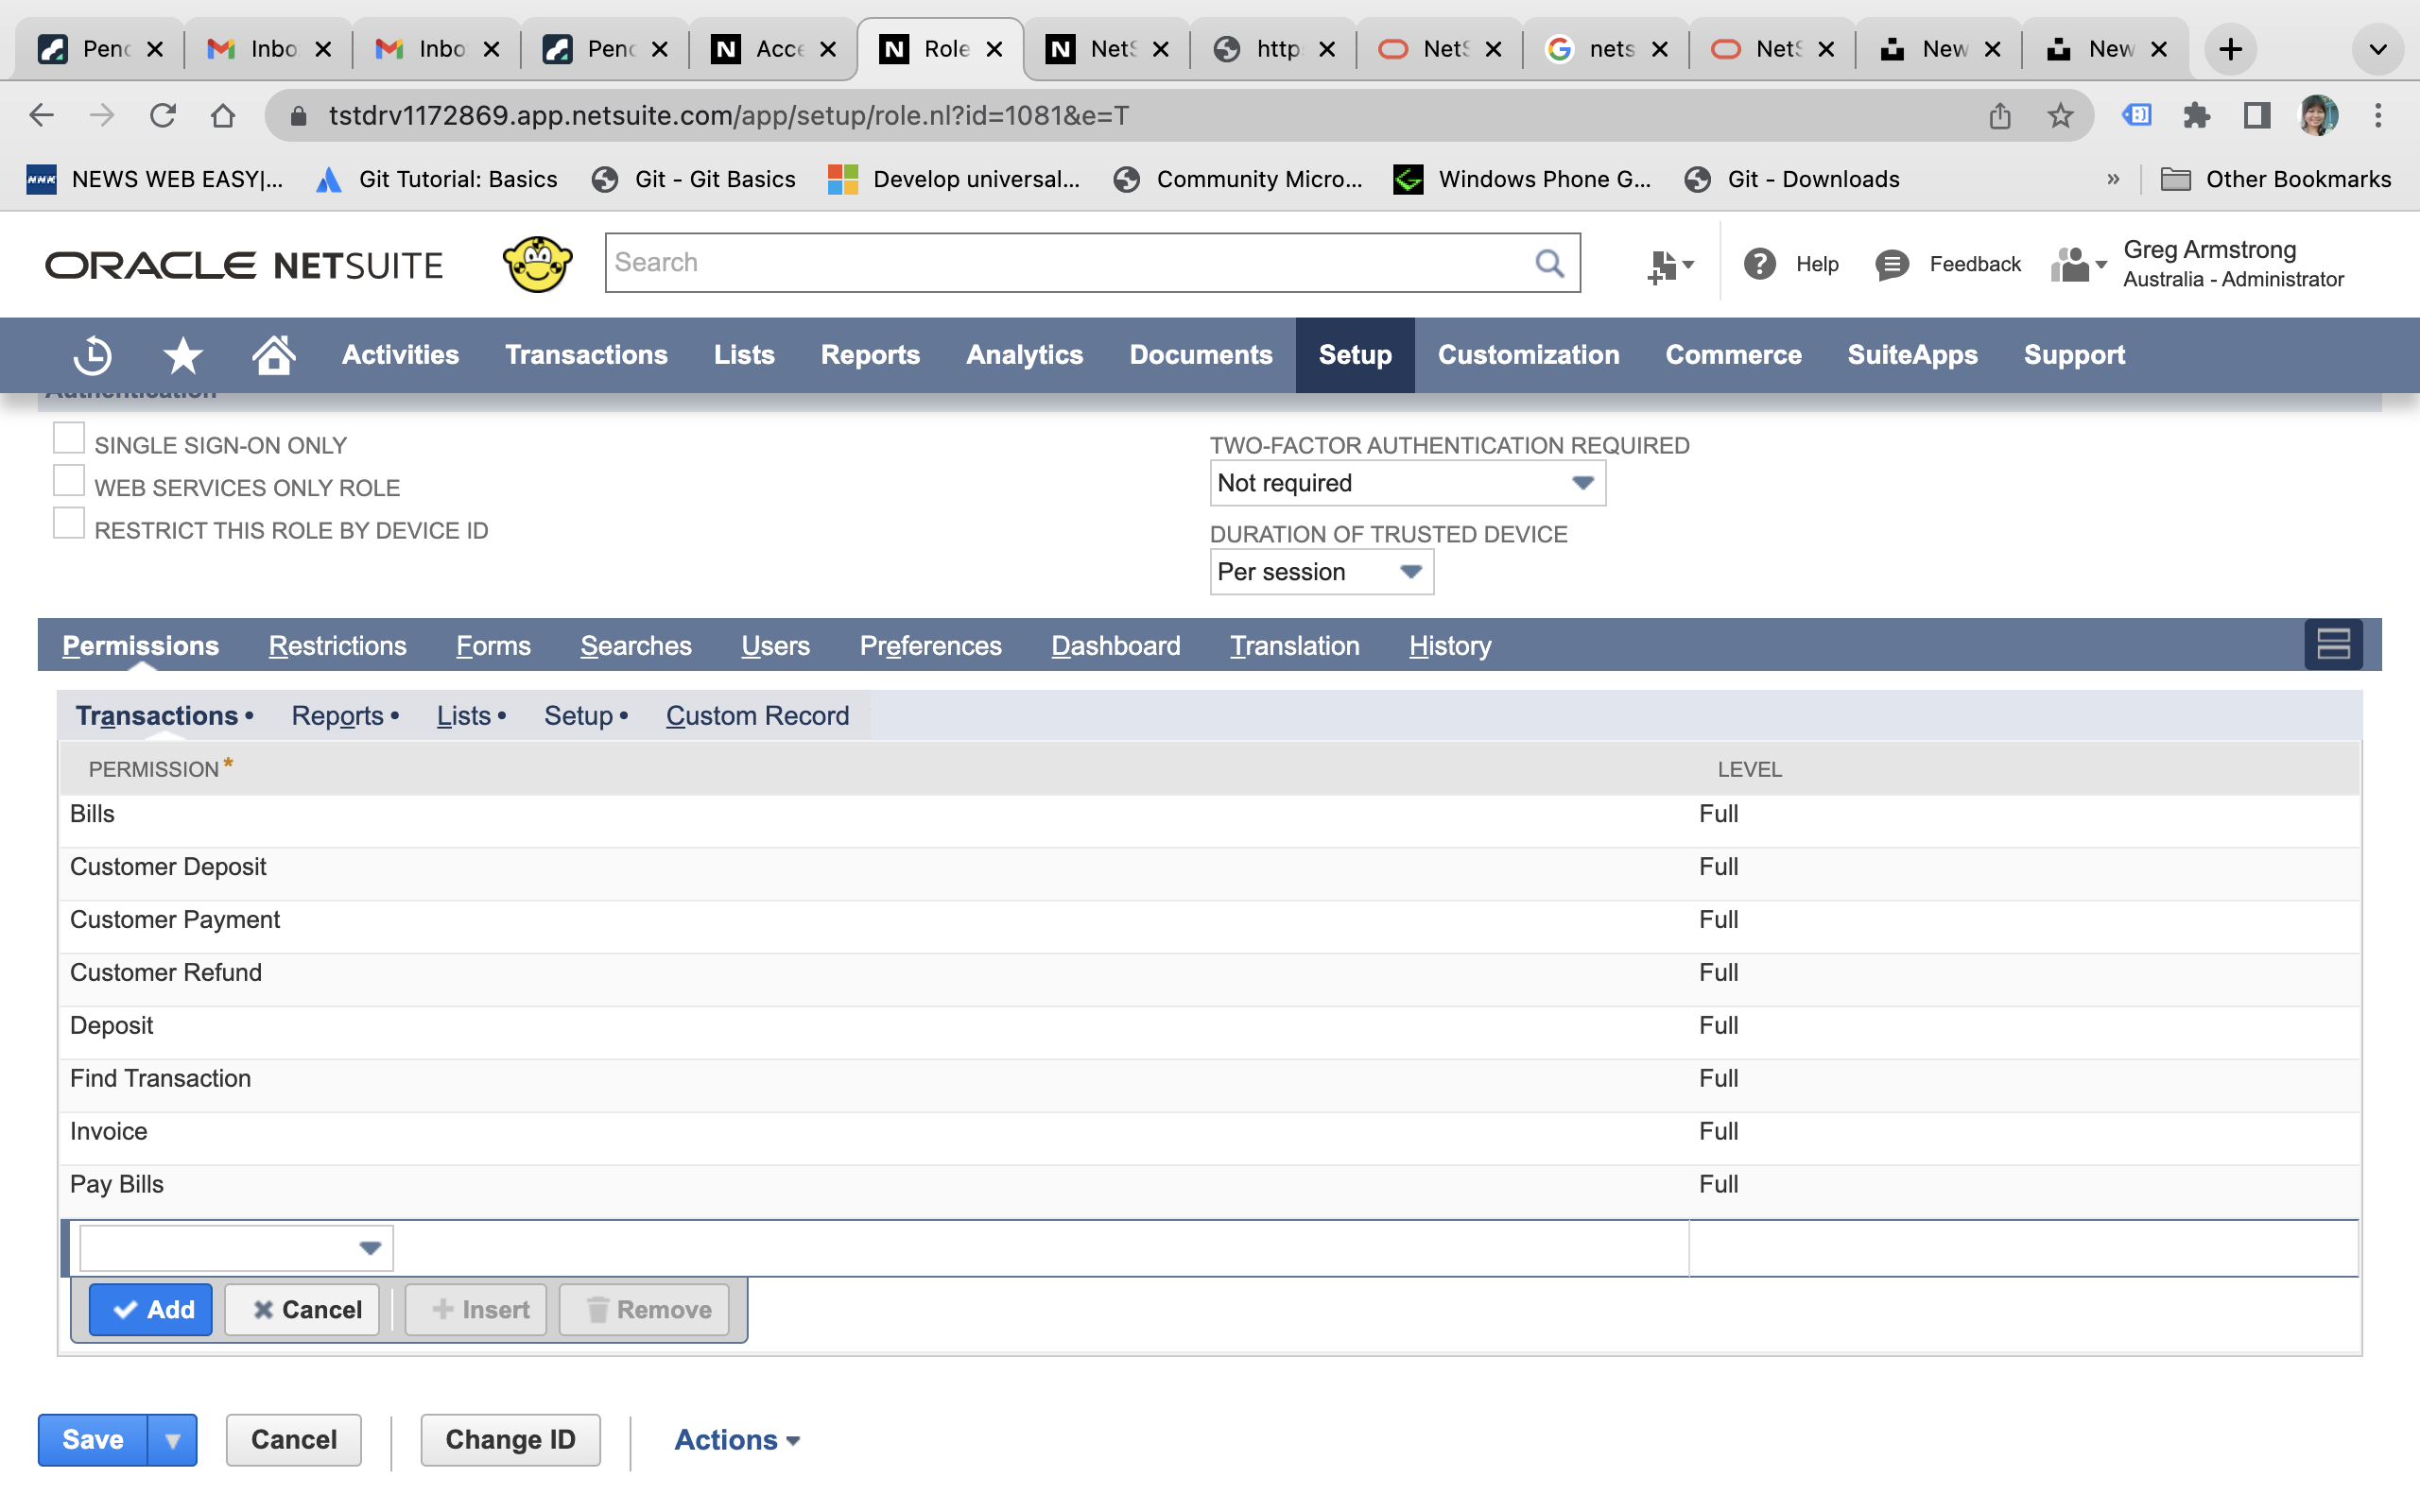
- In the Transactions tab select all the below options:
- Bills
- Credit Memo
- Customer Deposit
- Customer Payment
- Customer Refund
- Deposit
- Find Transaction
- Invoice
- Journal Approval
- Make Journal Entry
- Pay Bills
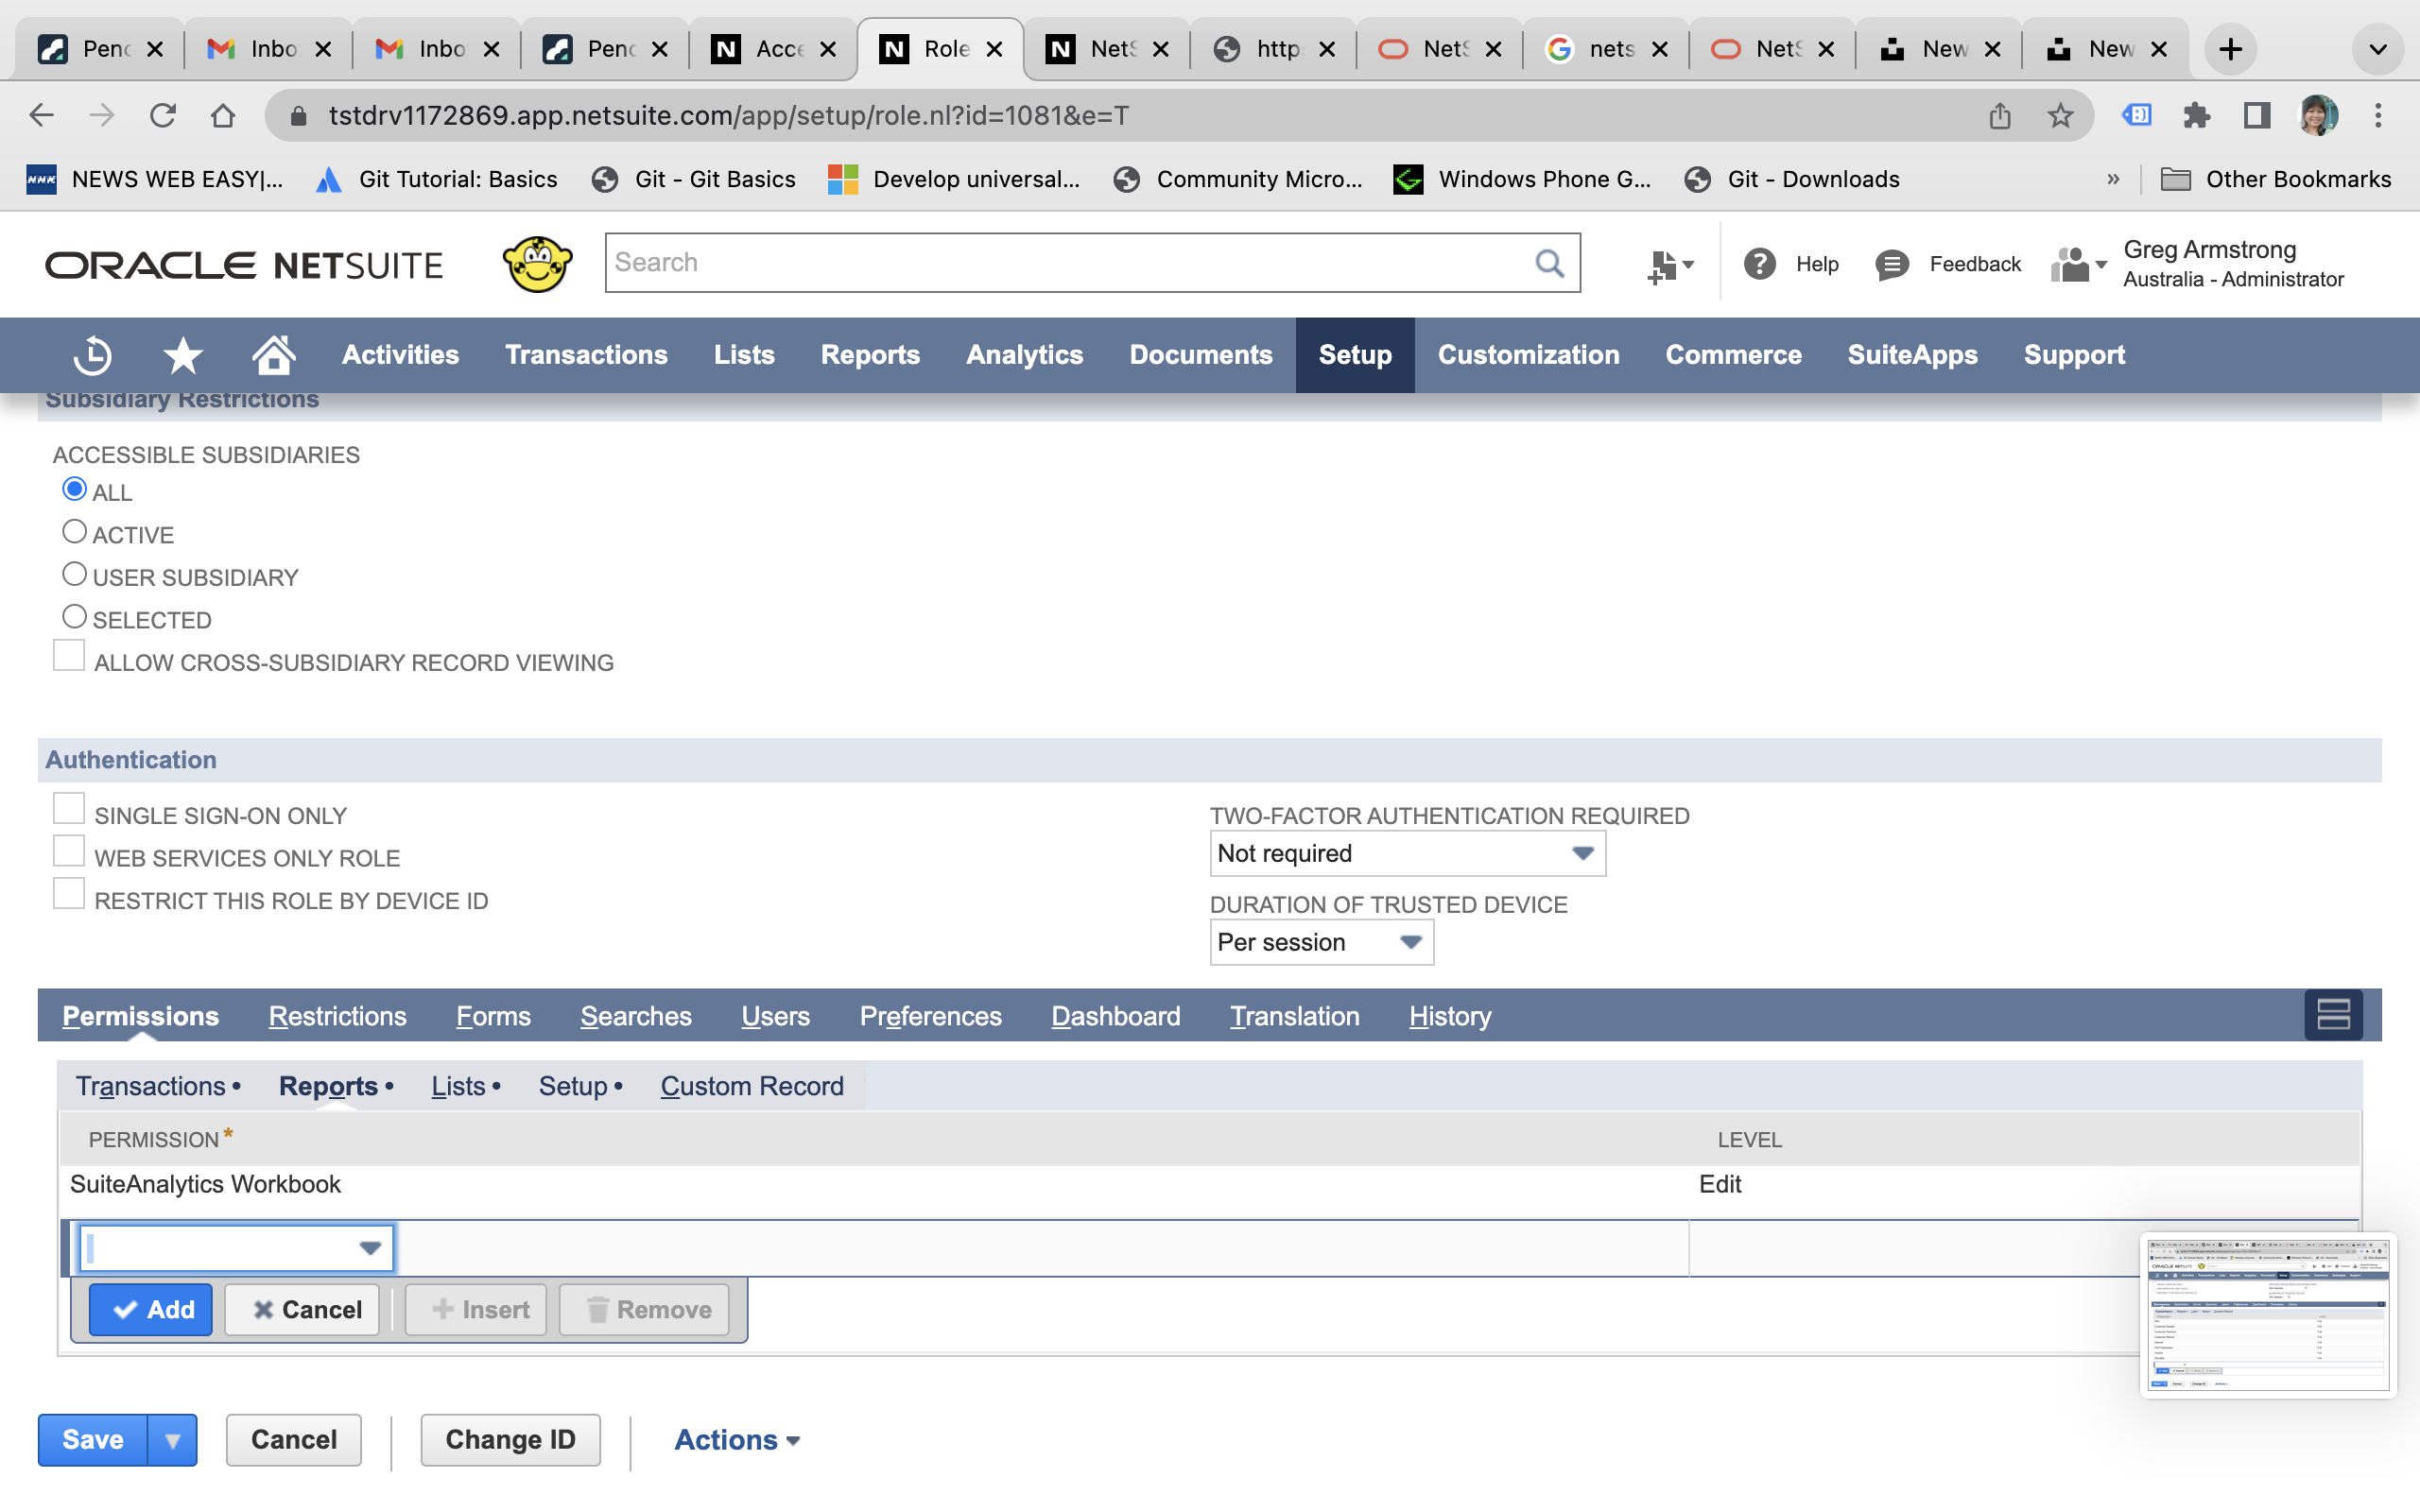
- Then click on Reports tab
- Select the "SuiteAnalytics Workbook" from the dropdown and click Add then Save.
- Select the "SuiteAnalytics Workbook" from the dropdown and click Add then Save.
- Click on the Lists tab and select all the below options:
- Accounts
- Contacts
- Currency
- Custom Record Entries
- Customers
-
Documents and Files
- Locations
- Record Custom Field
- Subsidiaries
- Tax Records
- Vendors

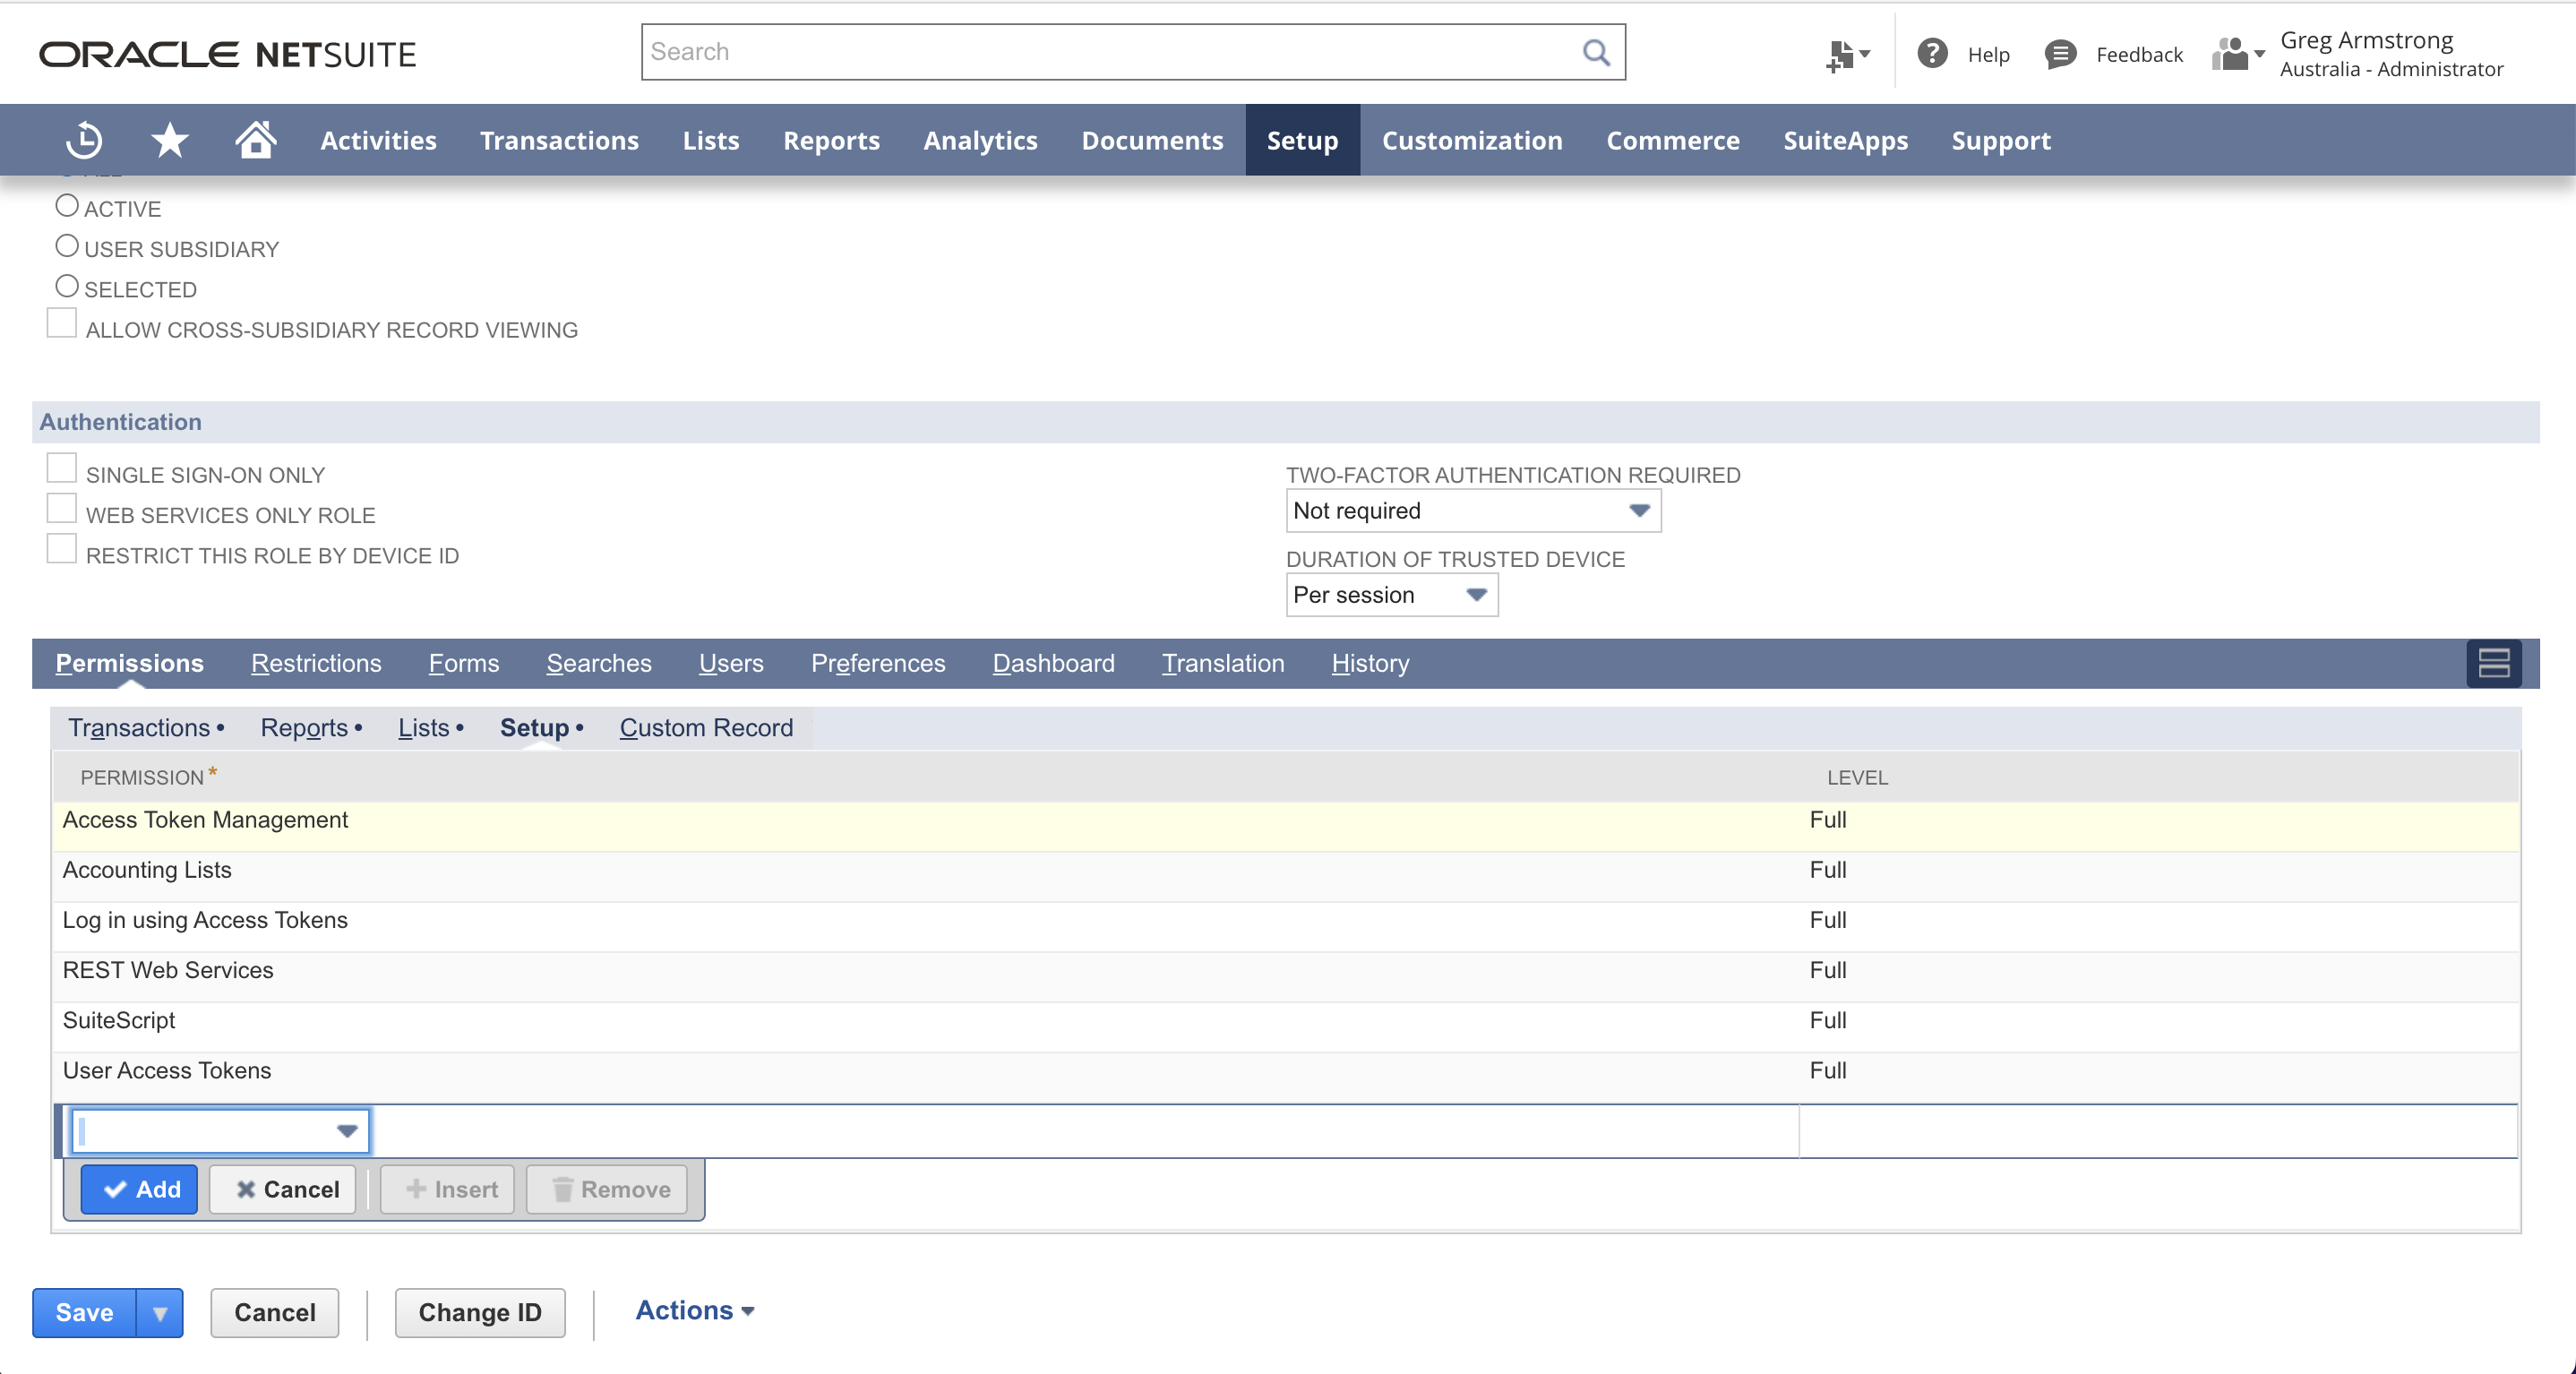
- Click on the Setup tab and select all the below options:
- Access Token Management
- Accounting Lists
- Log in using Access Tokens
- REST Web Services
-
SuiteScript
- User Access Tokens
- Click Save.
- Next we need to create the ‘PencilPay API’ account. If additional users will incur extra NetSuite licensing costs you can use an existing user that has Admin permissions and skip this step and go to Step 5 below.
- To do the go to: Lists > Employees > Employees > New
- In Name enter: PencilPay API
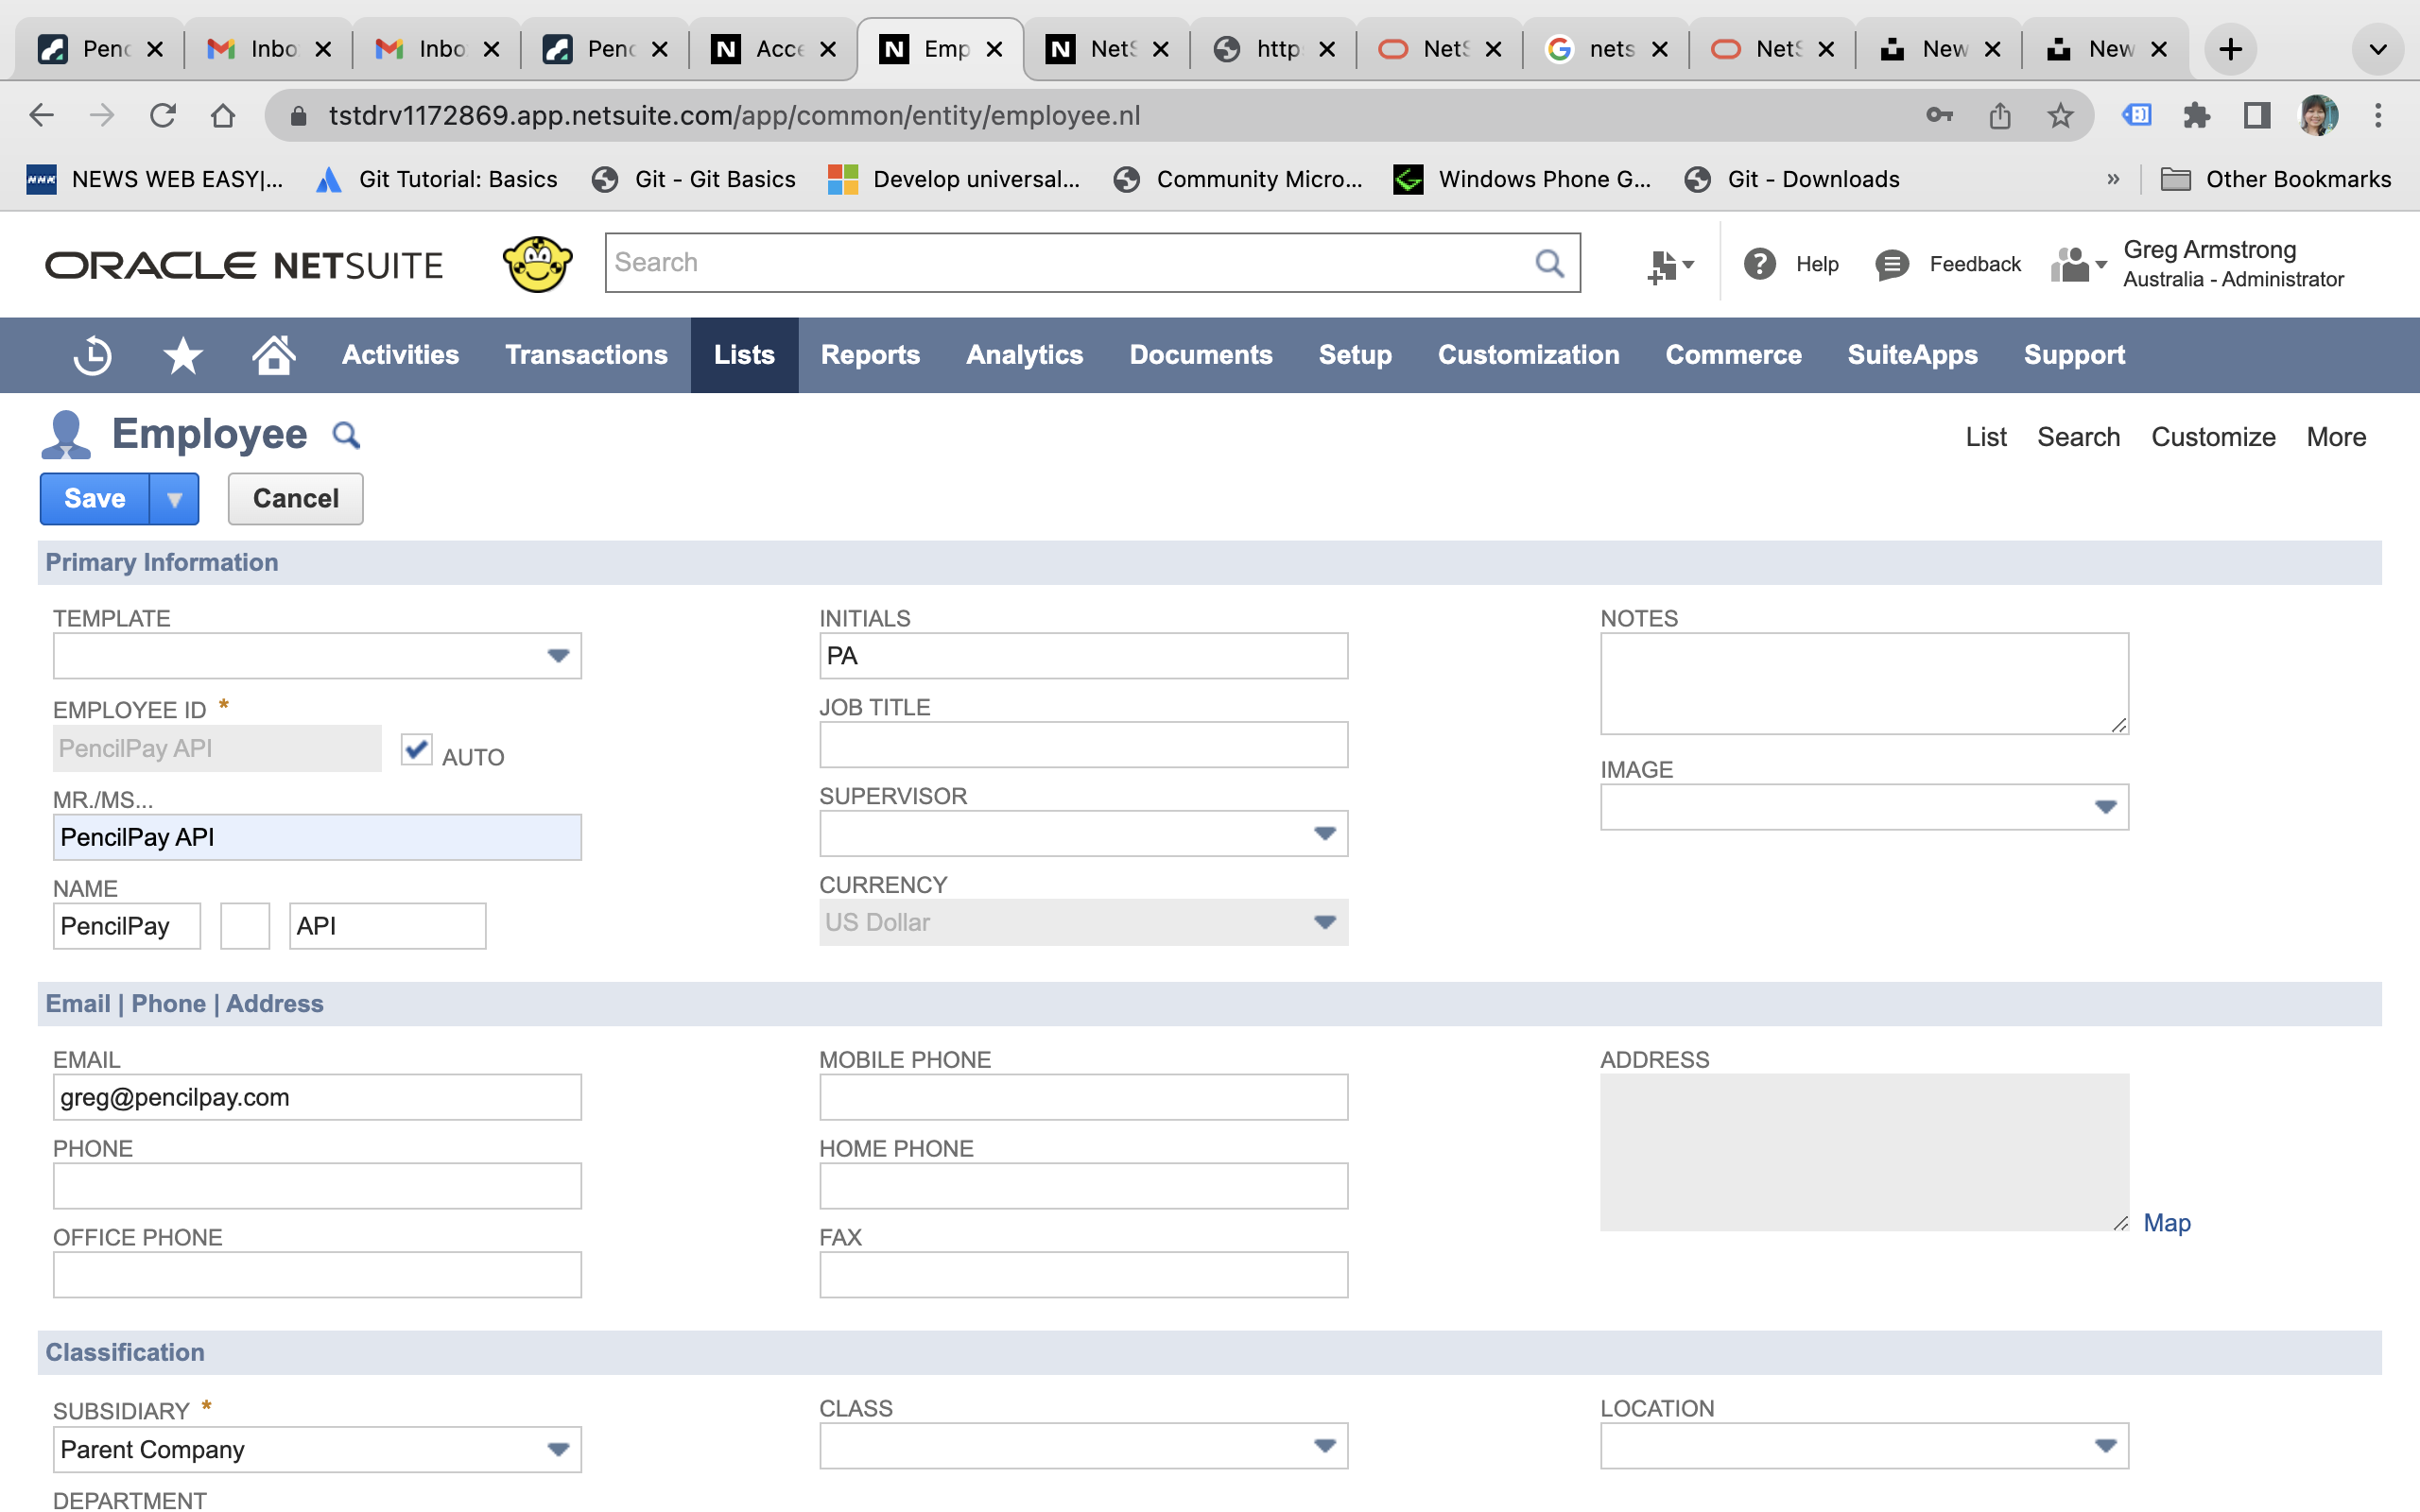
- Give access and Add the ‘PencilPay API’ role
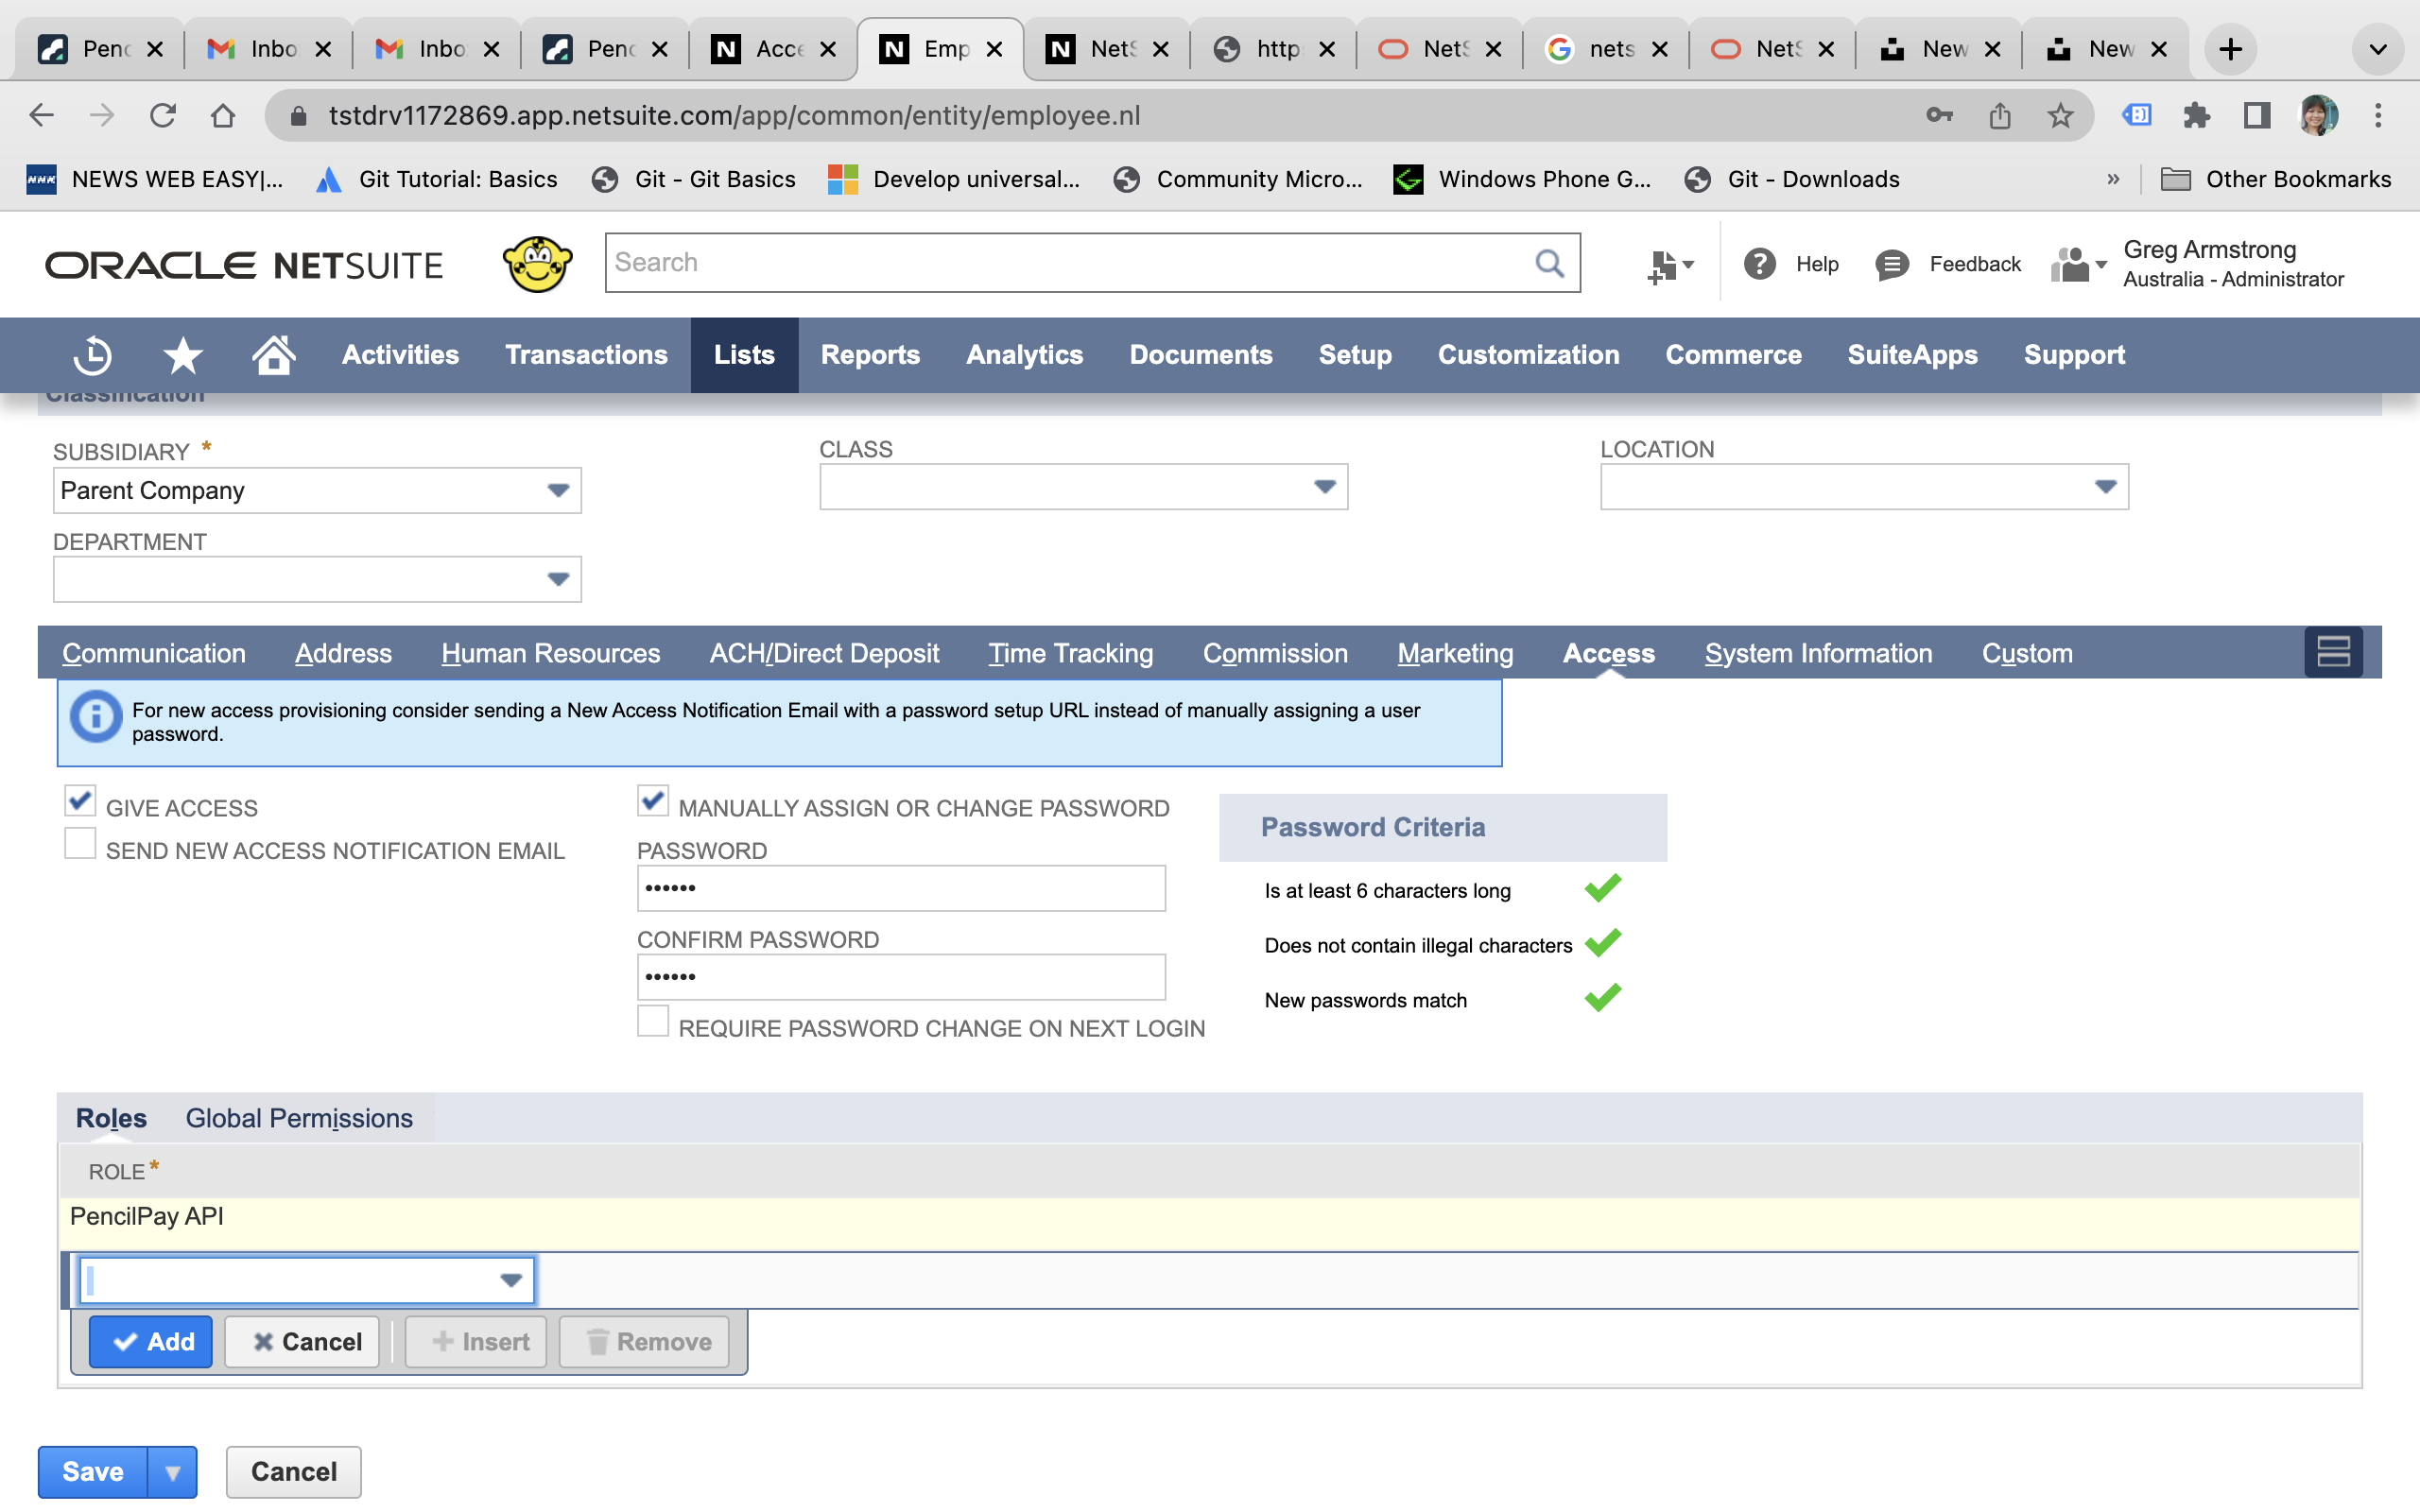
- Click Save.
- Now we need to register the ‘PencilPay API’ client in NetSuite.
- To do this, go to: Setup > Integration > Manage Integrations > New
- Enter Name: PencilPay API
- Under Token-based Authentication select: TOKEN-BASED AUTHENTICATION
- Please copy the CLIENT ID and CLIENT SECRET somewhere save as you will use this to enter into the PencilPay NetSuite integration page.
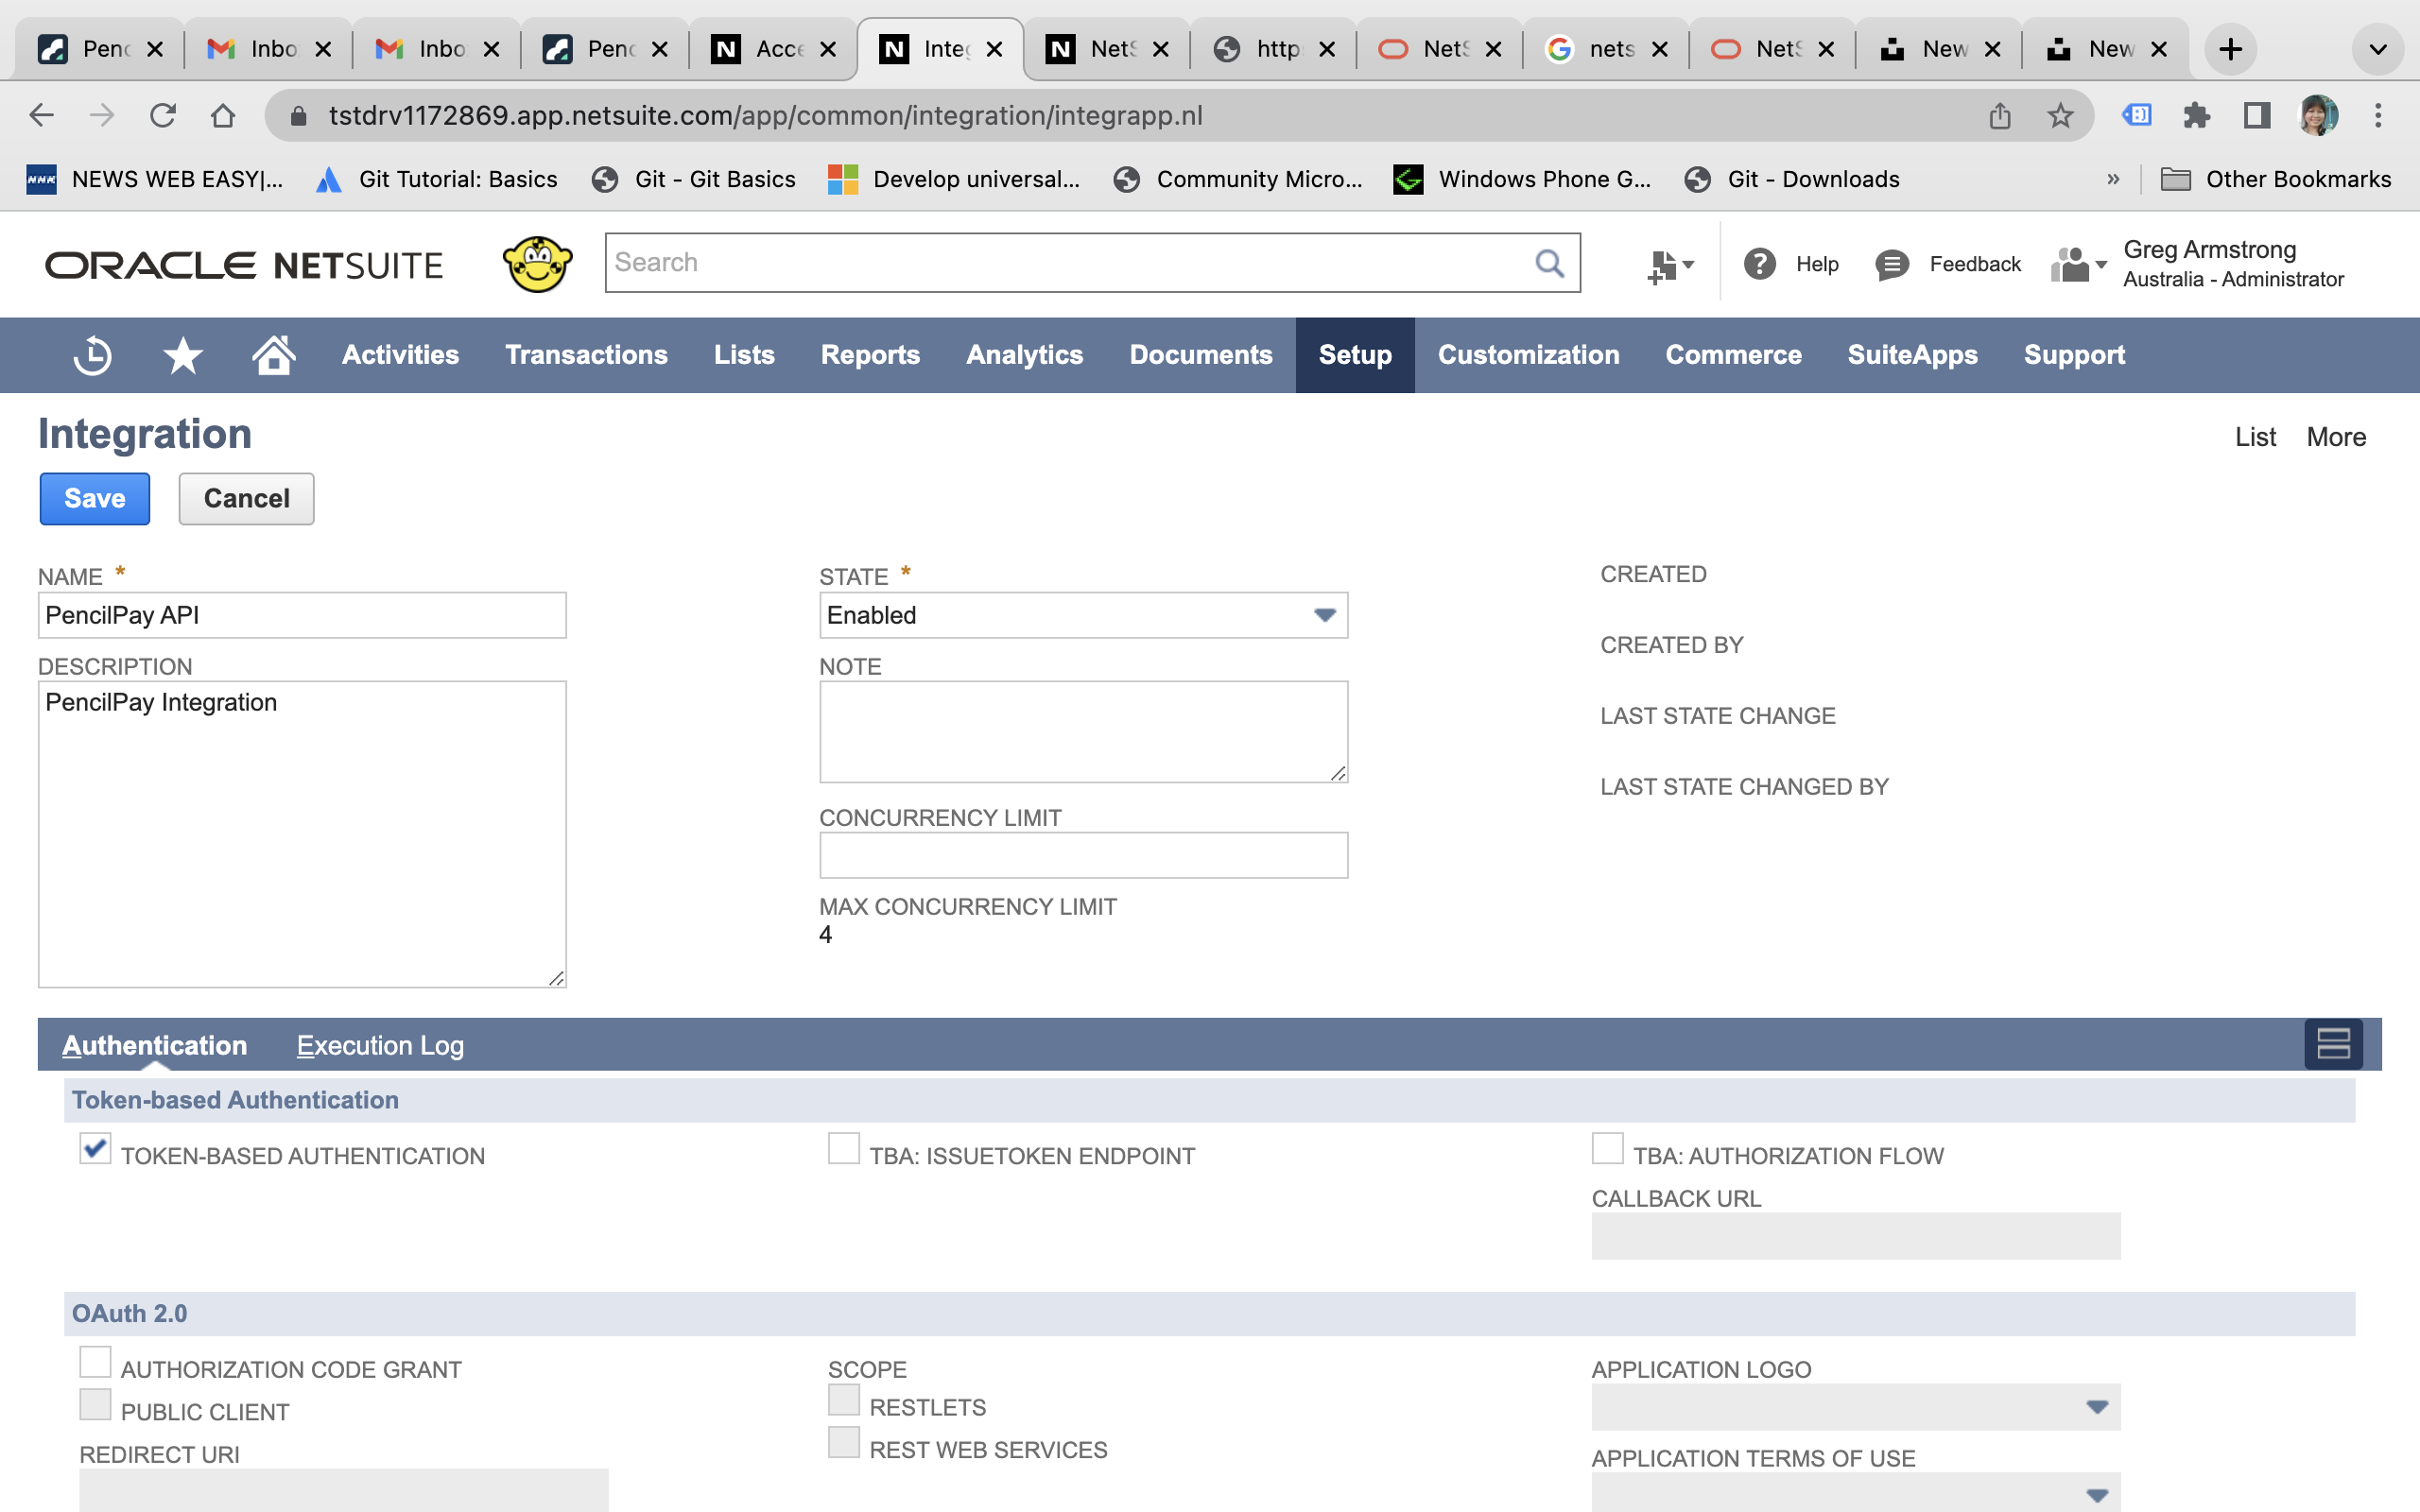
- Click Save.
- Now we need to create an Access Token
- To do this, go to: Setup > Users/Roles > Access Tokens > New
- Under APPLICATION NAME enter: 'PencilPay API'
- Select the USER: 'PencilPay API' user account
- Select the ROLE: 'PencilPay API' TOKEN-BASED AUTHENTICATION user role
- Please copy the TOKEN ID and TOKEN SECRET somewhere save as you will use this to enter into the PencilPay NetSuite integration page.
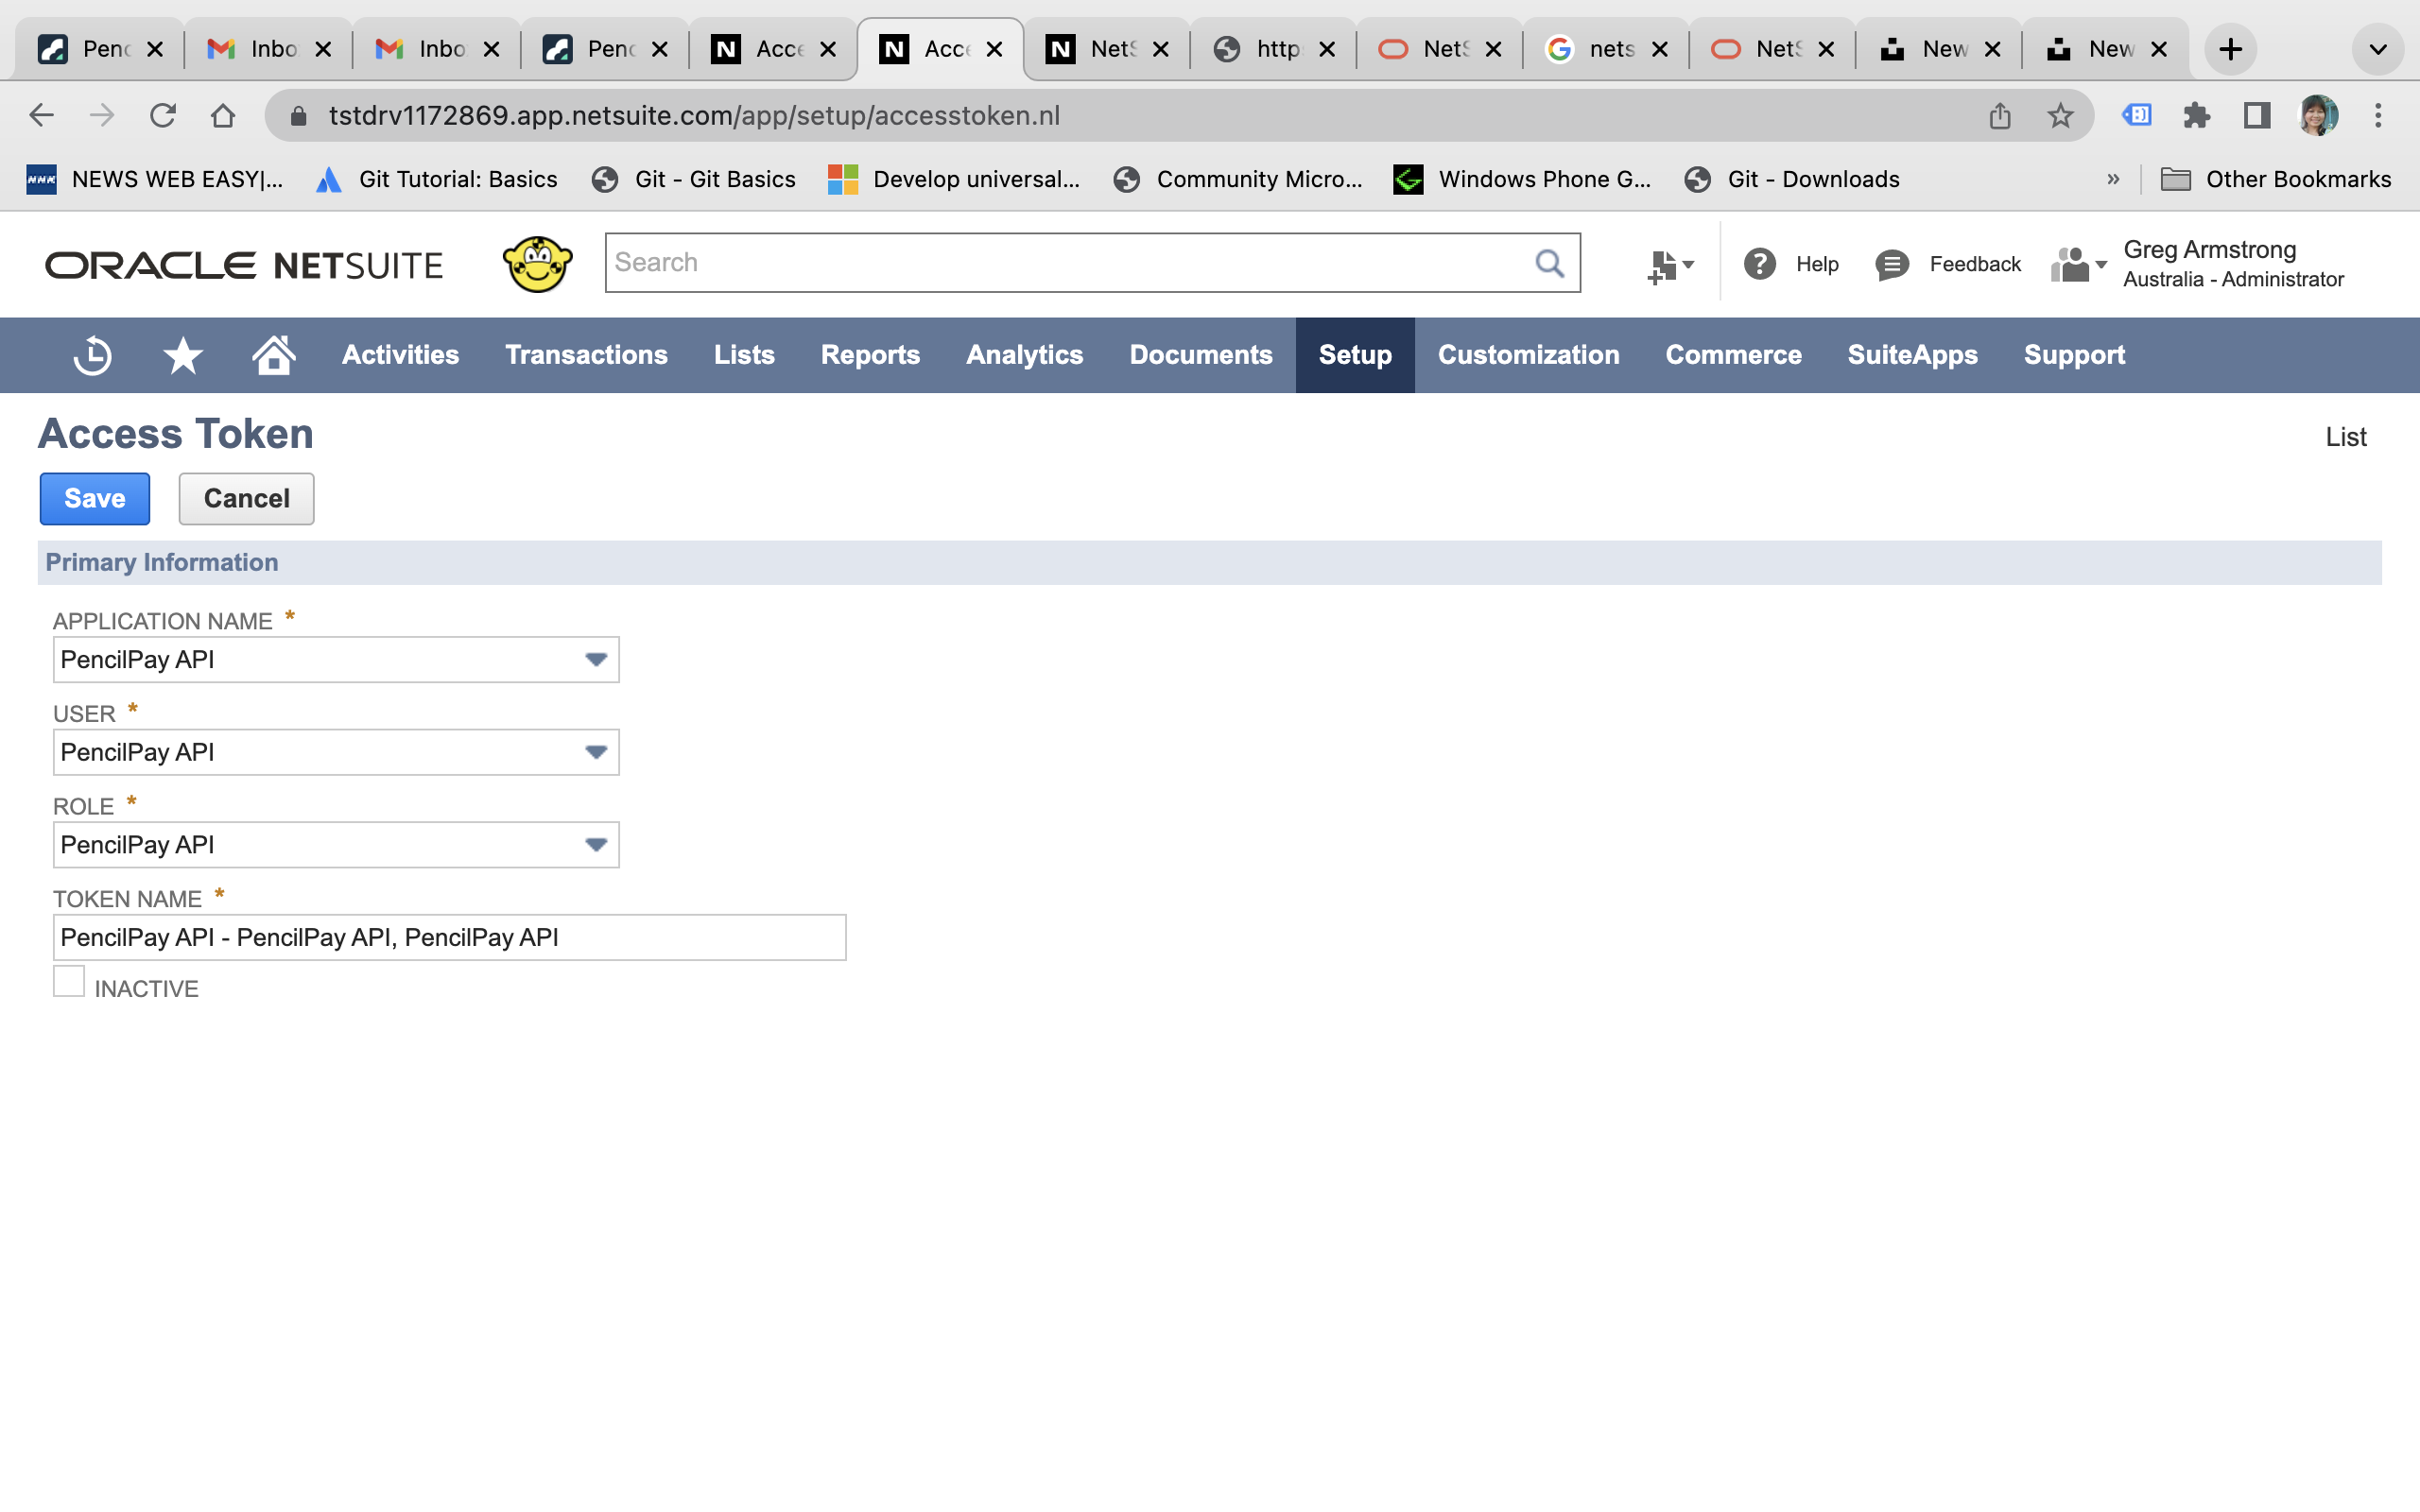
- Click Save.
- How to set up the Customisation Scripts.
There are two options:
- Option 1: Use Pencil's custom build script.
-
To install Pencil's already defined bundle to your NETSUITE account, please follow these steps:
-
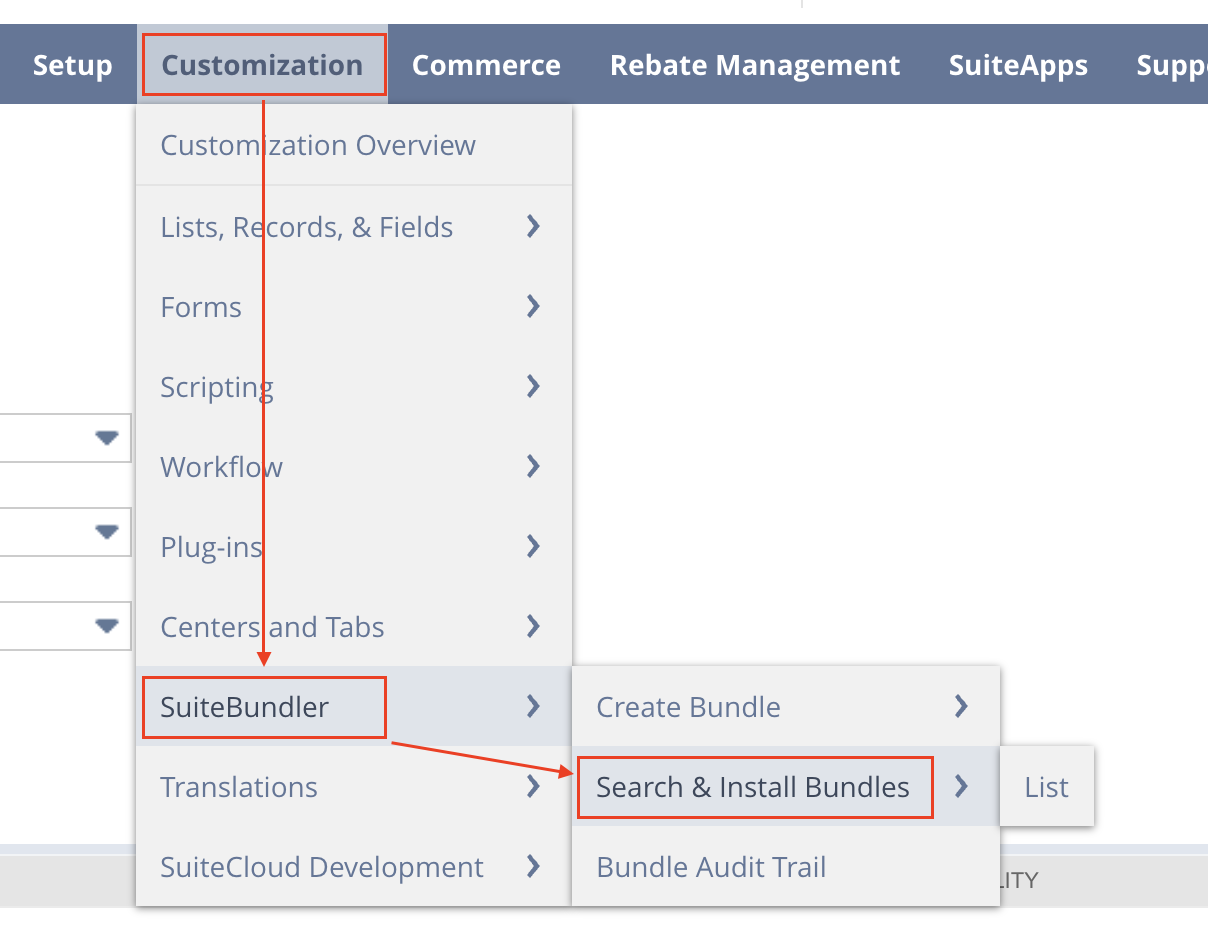
In NetSuite go to: Customisation > SuiteBundler > Search & Install Bundles
-
Click on 'Advanced' tab

-
In the search box search for the following bundle in the Production Account ID: Pencil
-
In the bundle: PencilPay Netsuite Bundle, click the "Install" button.
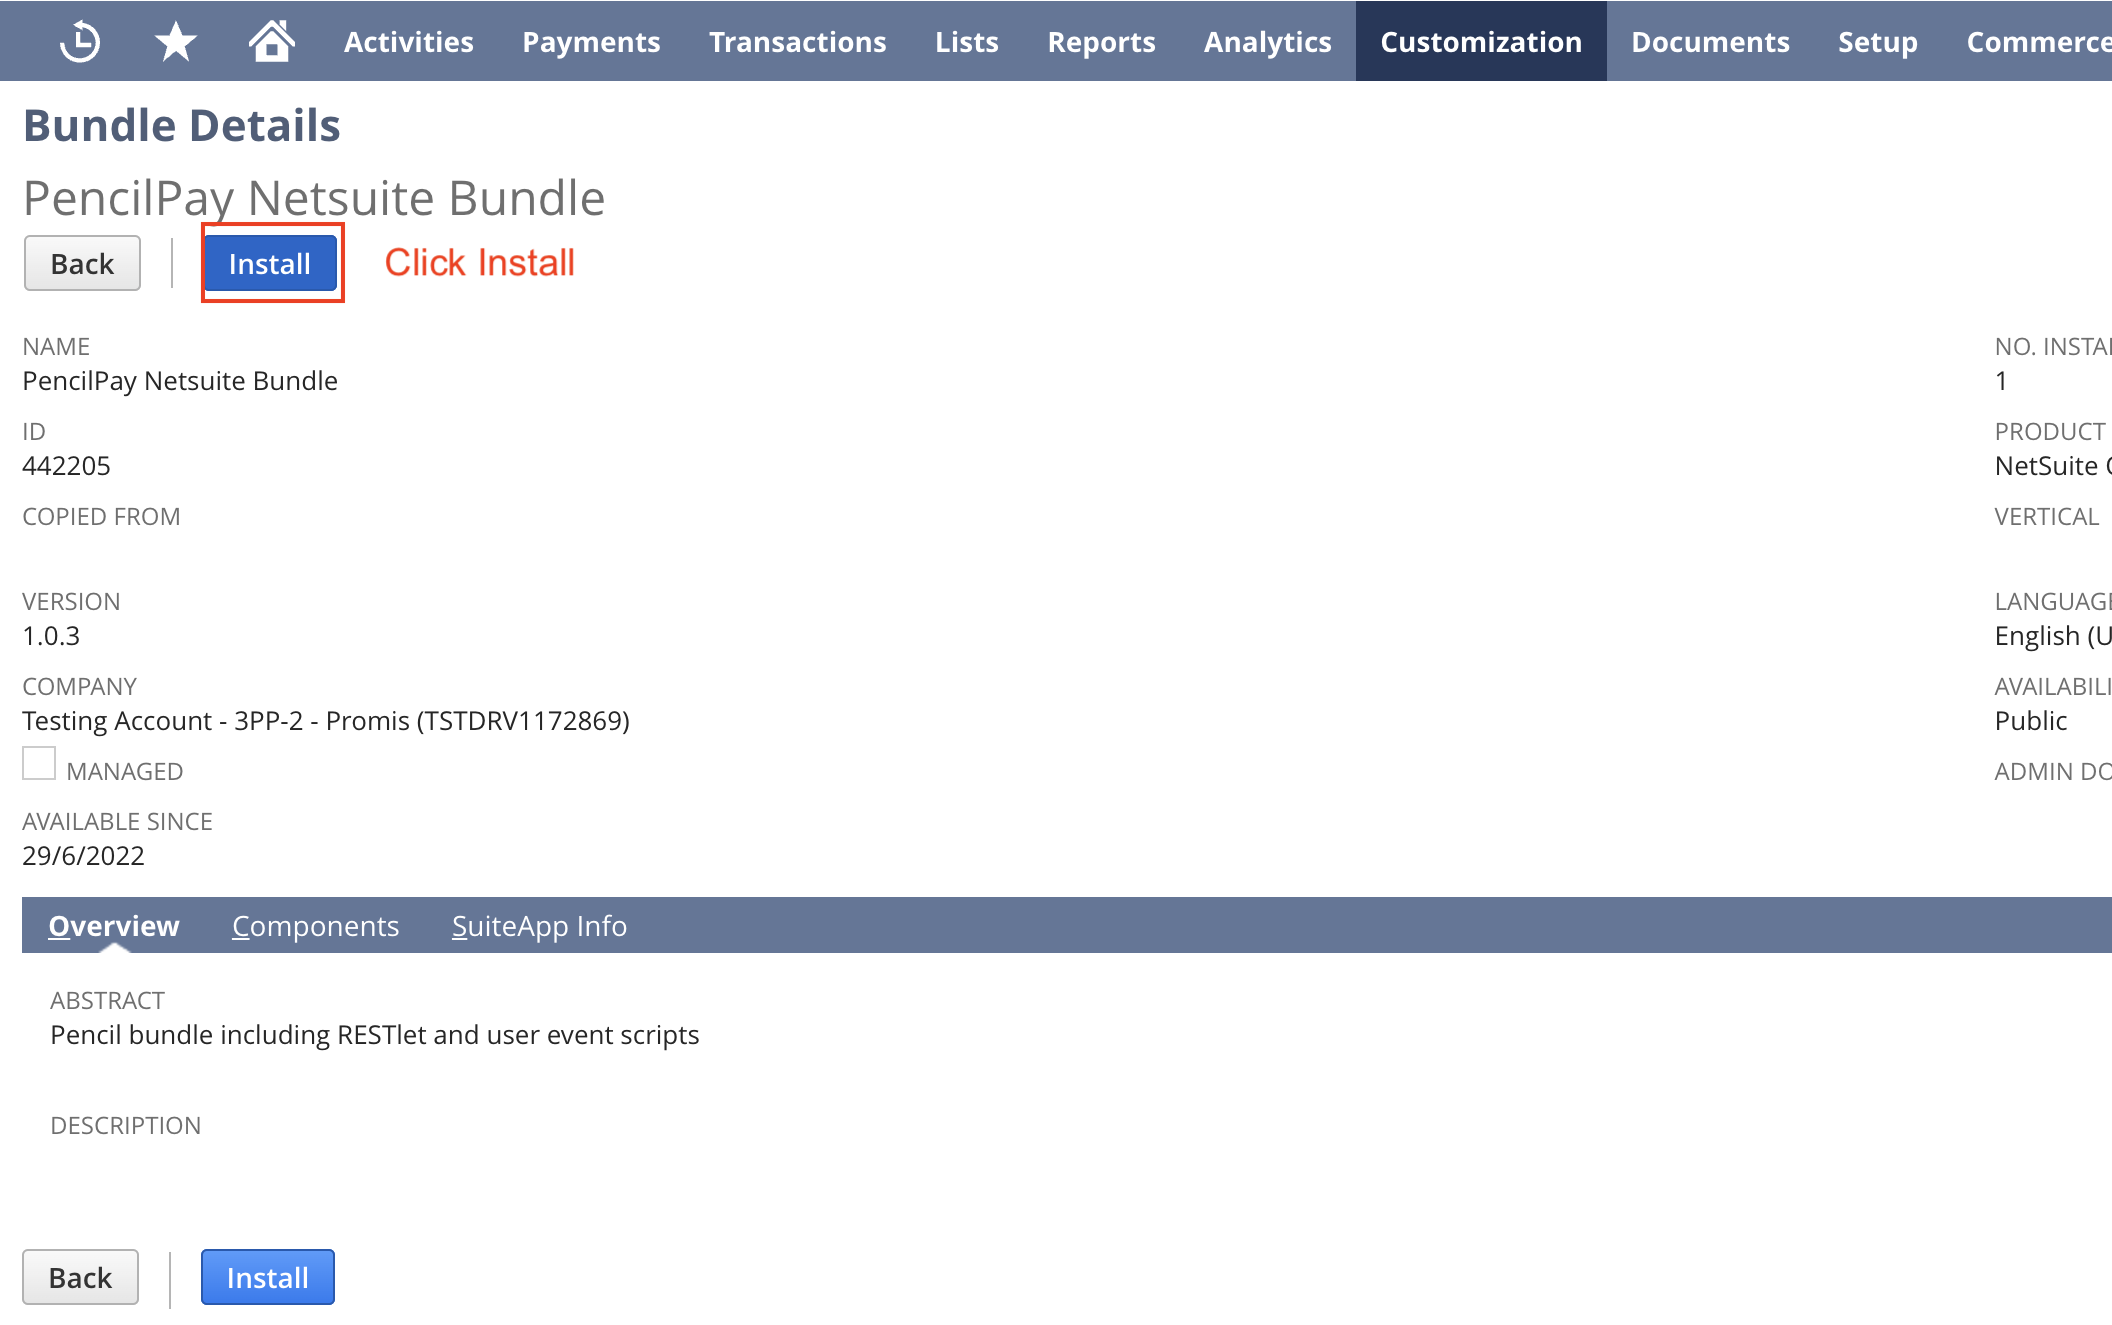
- Then click the "Install Bundle" button and Confirm
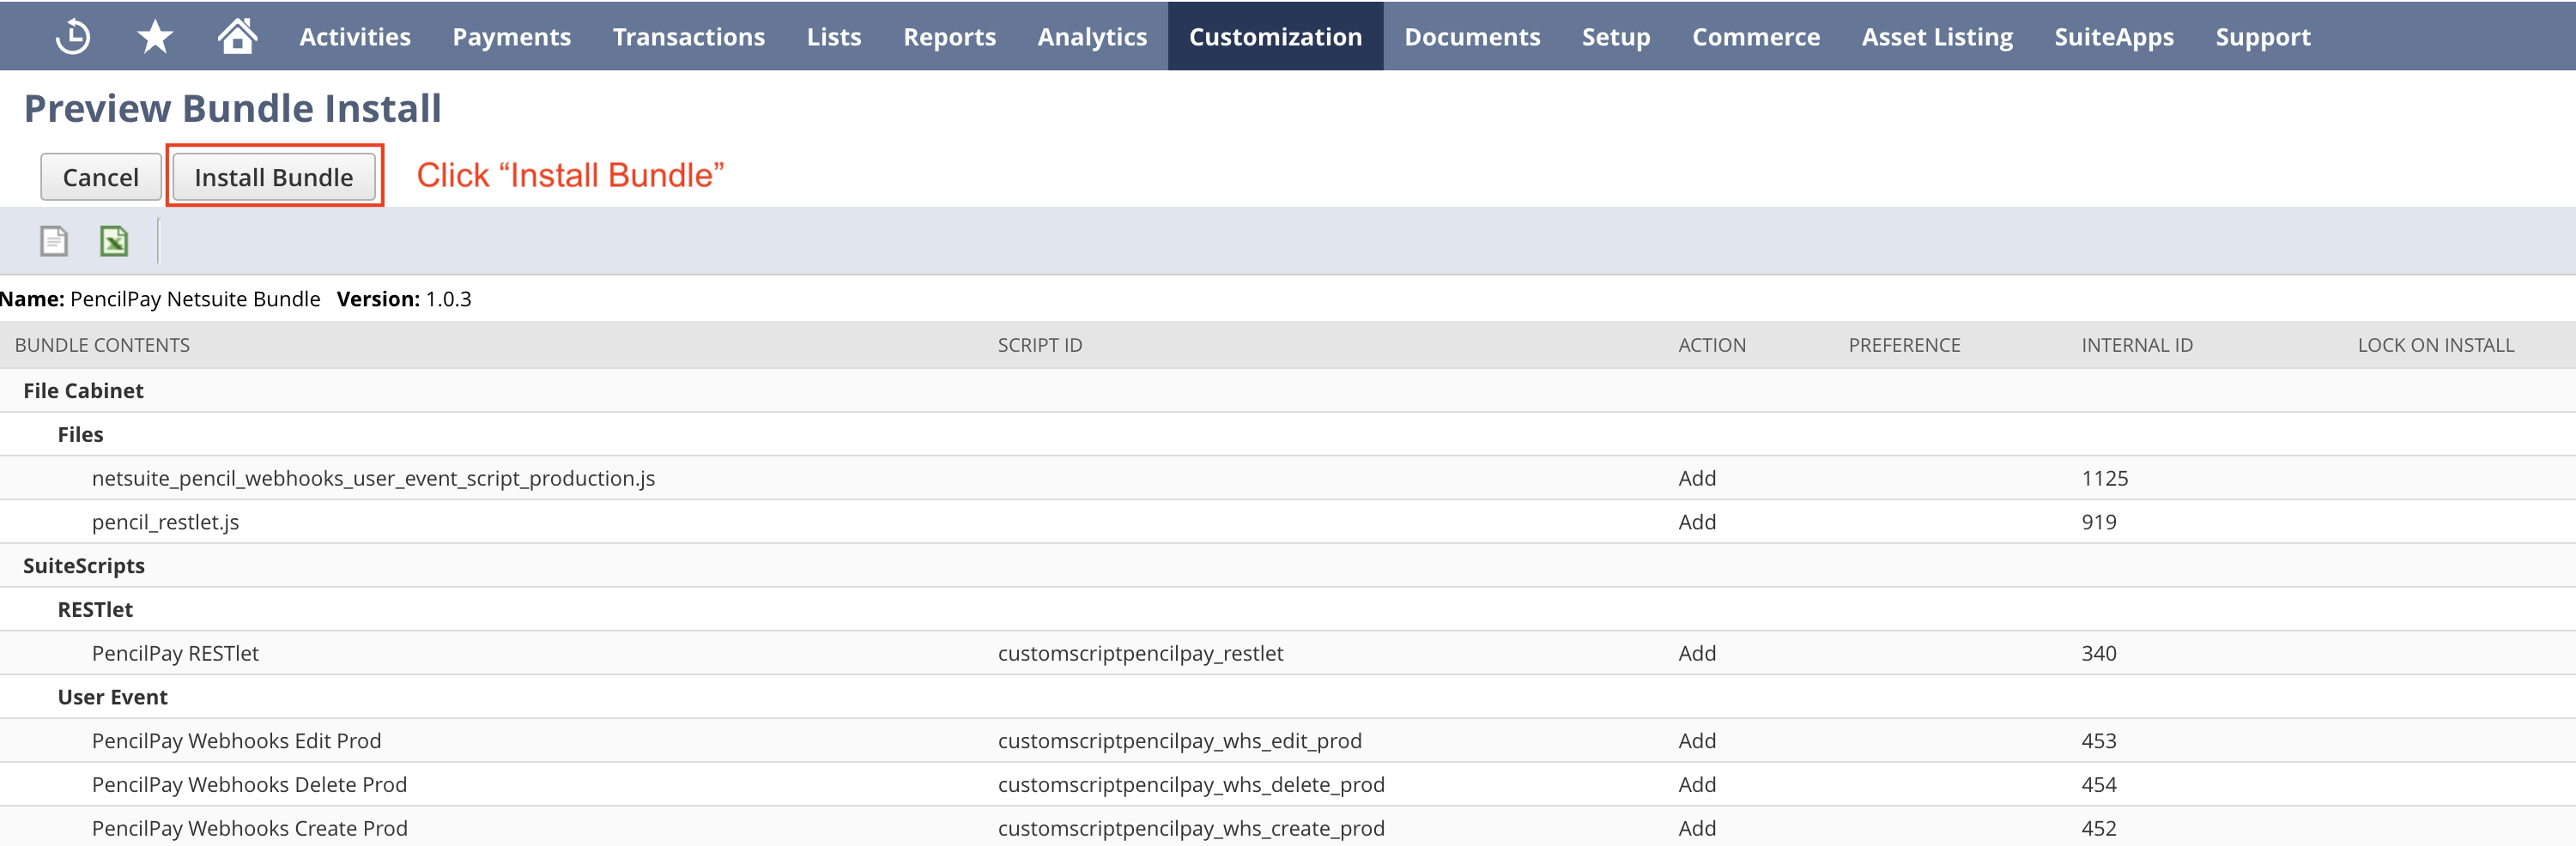
- Next scroll down to the very bottom of this page to "8. Final Steps to configure in PencilPay" and complete the last steps.
-
-
- Option 2: Manually create a RESTlet script.
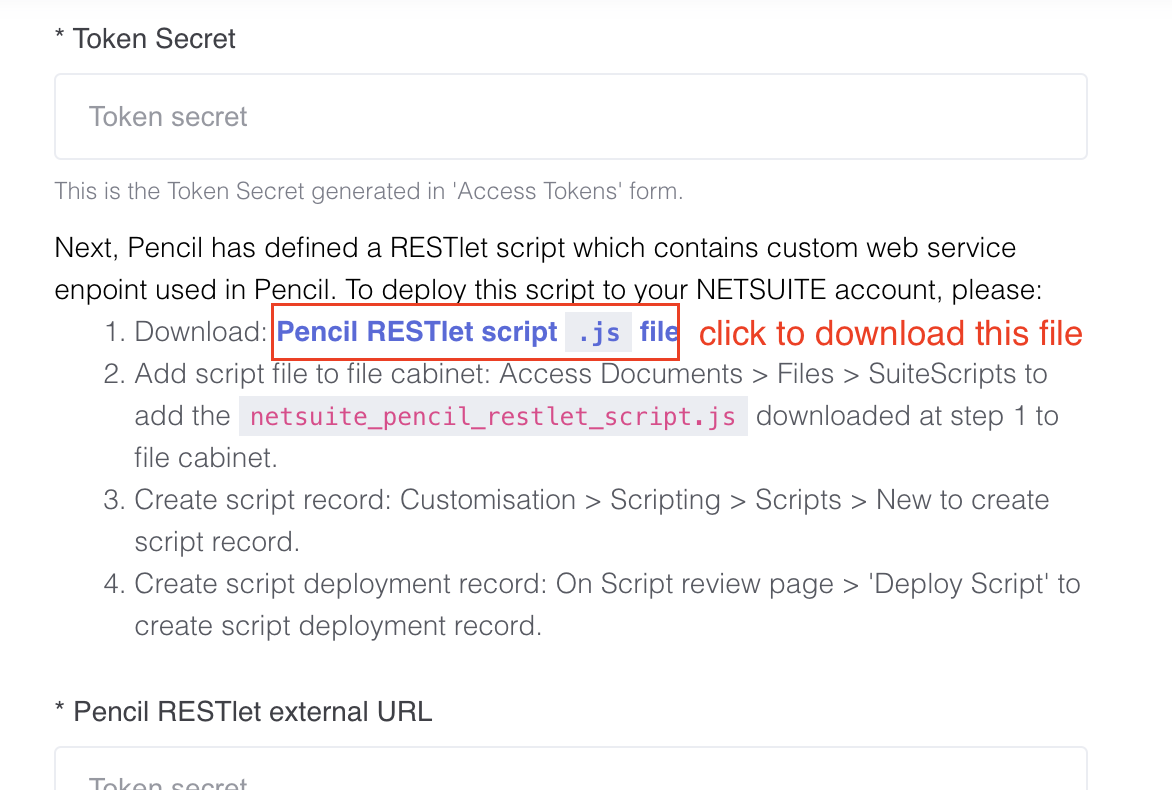
- To do this, log into PencilPay and go to Integrations -> NetSuite -> scroll down the bottom of the configuration page and download this JS file: netsuite_pencil_restlet_script.js file
- Add the script file to the file cabinet
- To do this go to: Documents > Files > SuiteScripts > New

- To do this go to: Documents > Files > SuiteScripts > New
- To do this, log into PencilPay and go to Integrations -> NetSuite -> scroll down the bottom of the configuration page and download this JS file: netsuite_pencil_restlet_script.js file
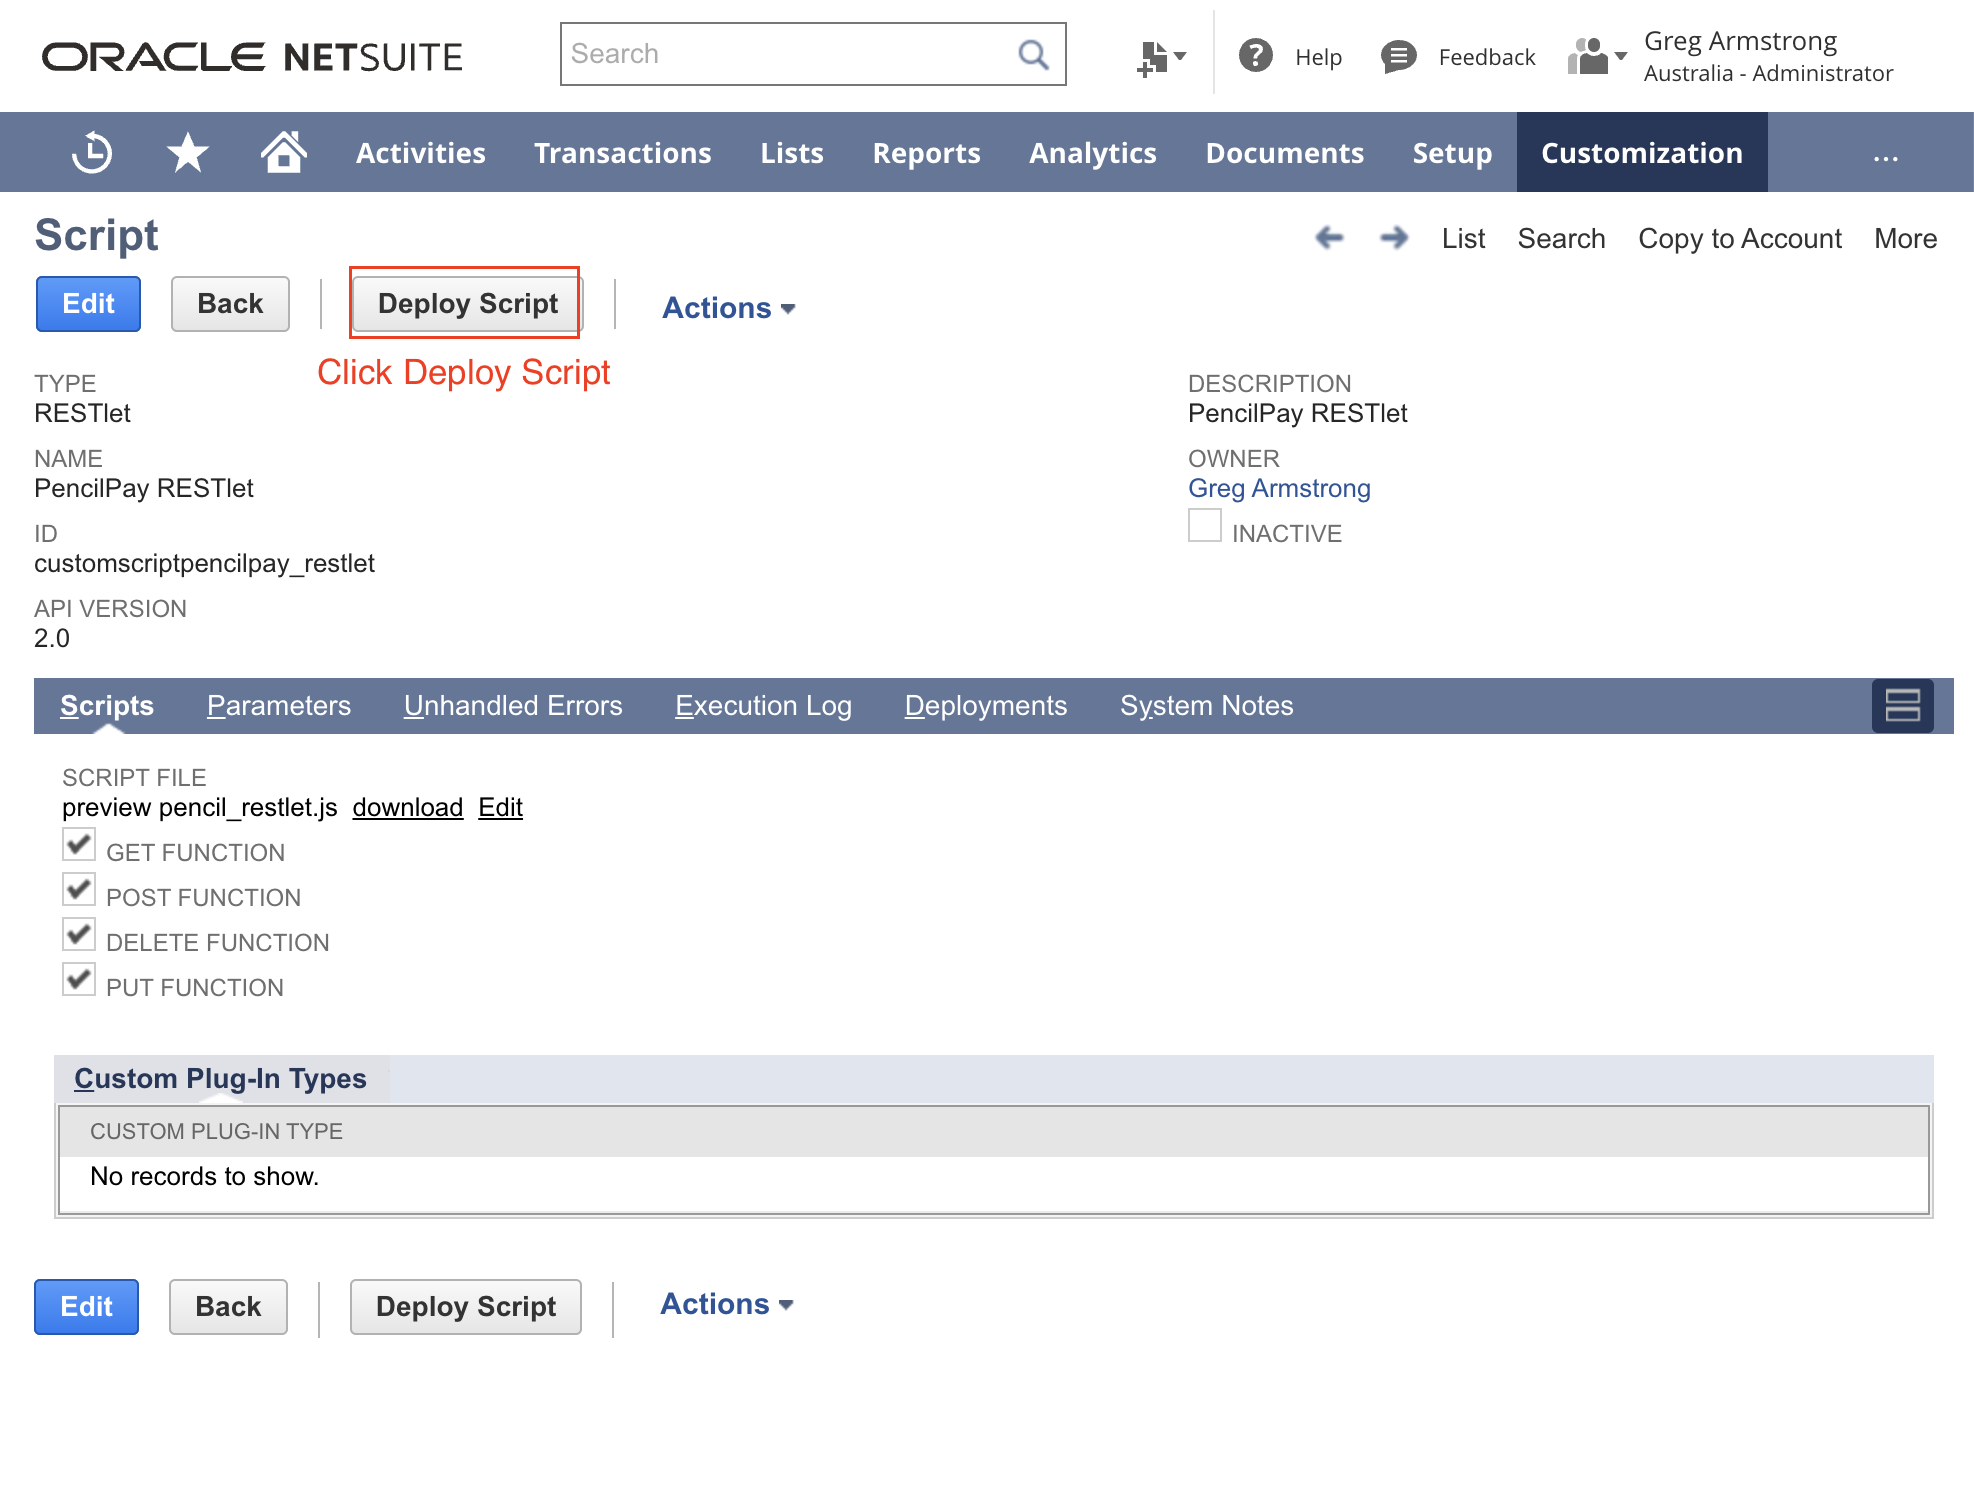
- Next you need to create the PencilPay RESTlet script record.
- To do this go to: Customisation > Scripting > Scripts > New

- Enter Name: PencilPay RESTlet
- ID: customscriptpencilpay_restlet
- Click Save.
- To do this go to: Customisation > Scripting > Scripts > New
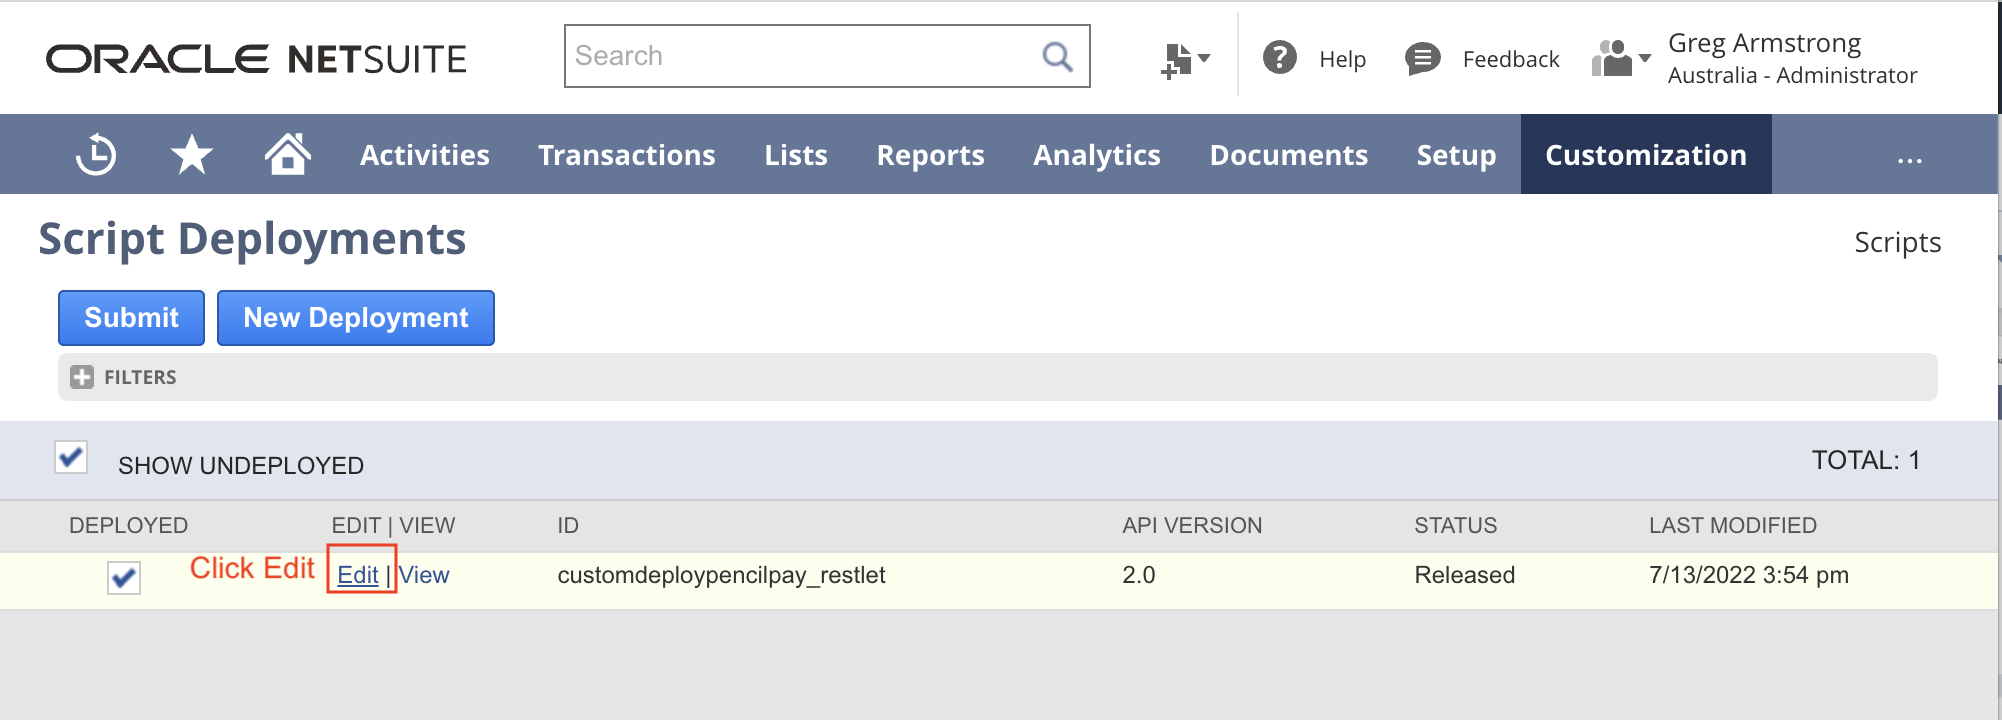
- Create the script deployment record. To do this, on the Script review page, click on 'Deploy Script' to create script deployment record.
- Check the details:
- Title: PencilPay RESTlet
- ID: customdeploypencilpay_restlet
- Status: Released
- Audience
- Roles: select All
- Employees: select All
- Click on Save.
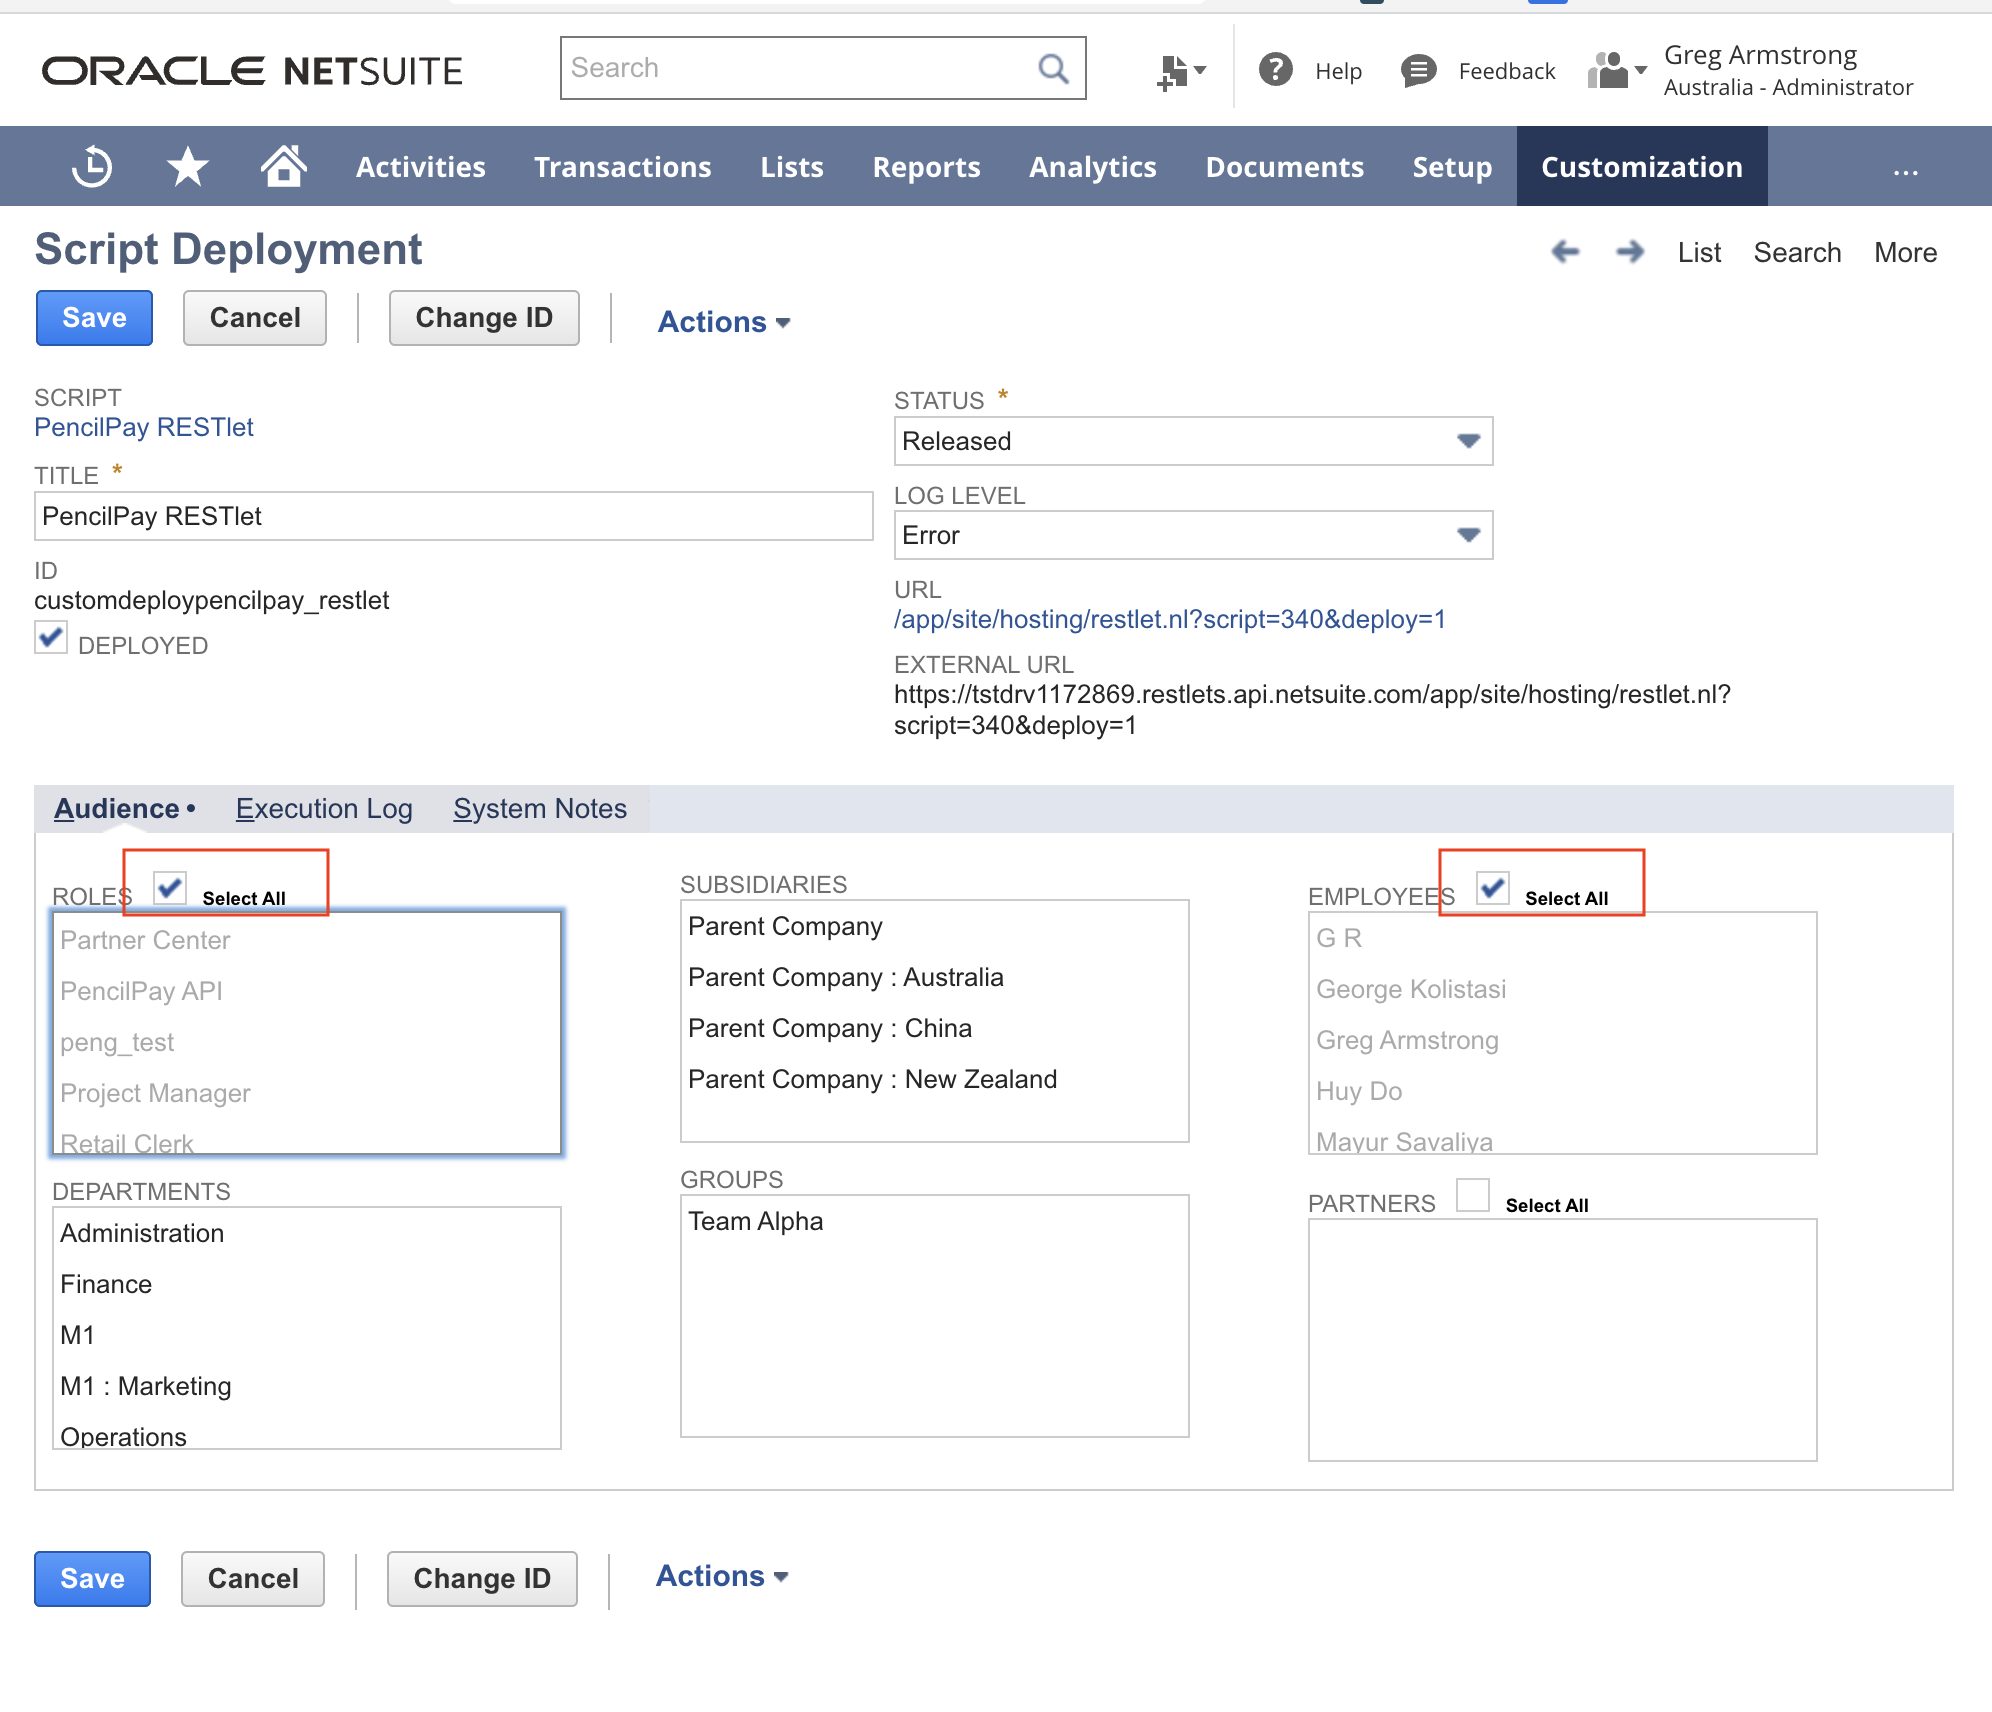
- Then we can update Deployments for this script: PencilPay RESTlet
- To do this go to: Customisation > Scripting > Scripts
- Search for: PencilPay RESTlet
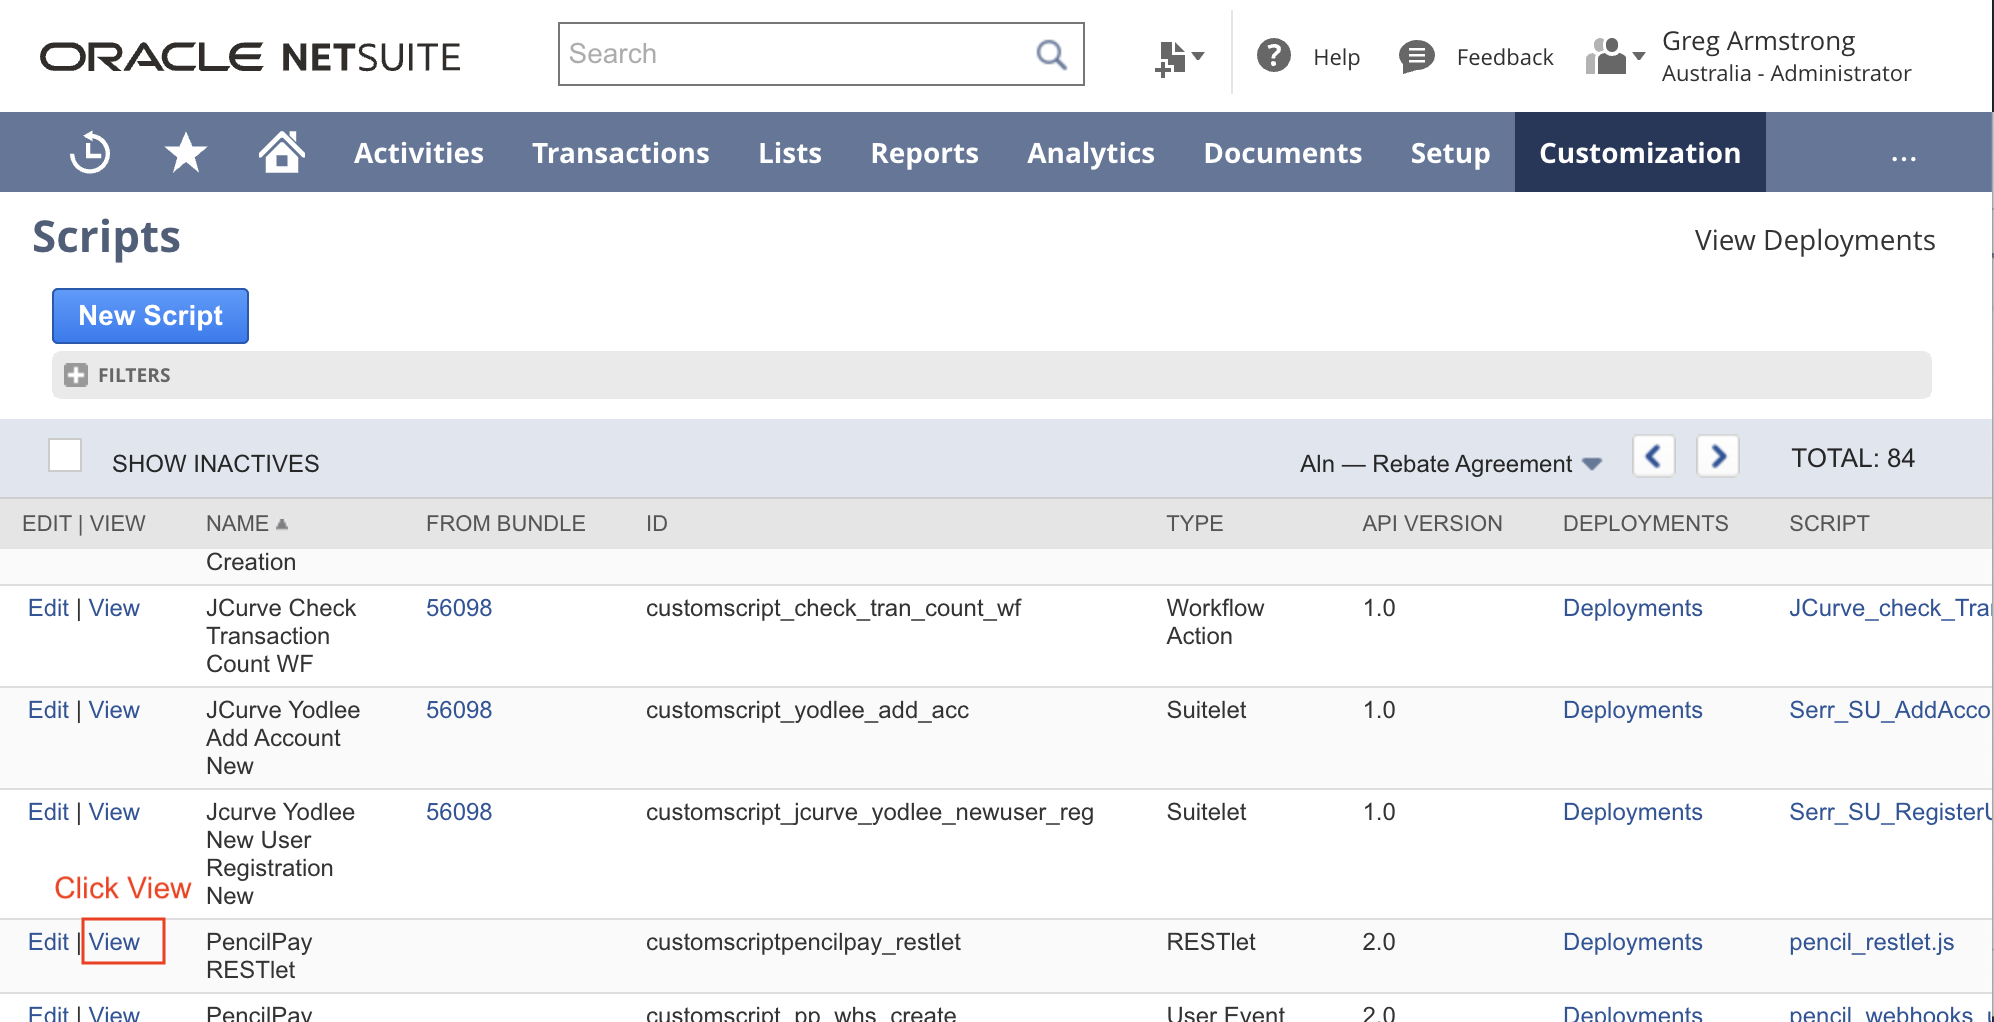
- Click on View.
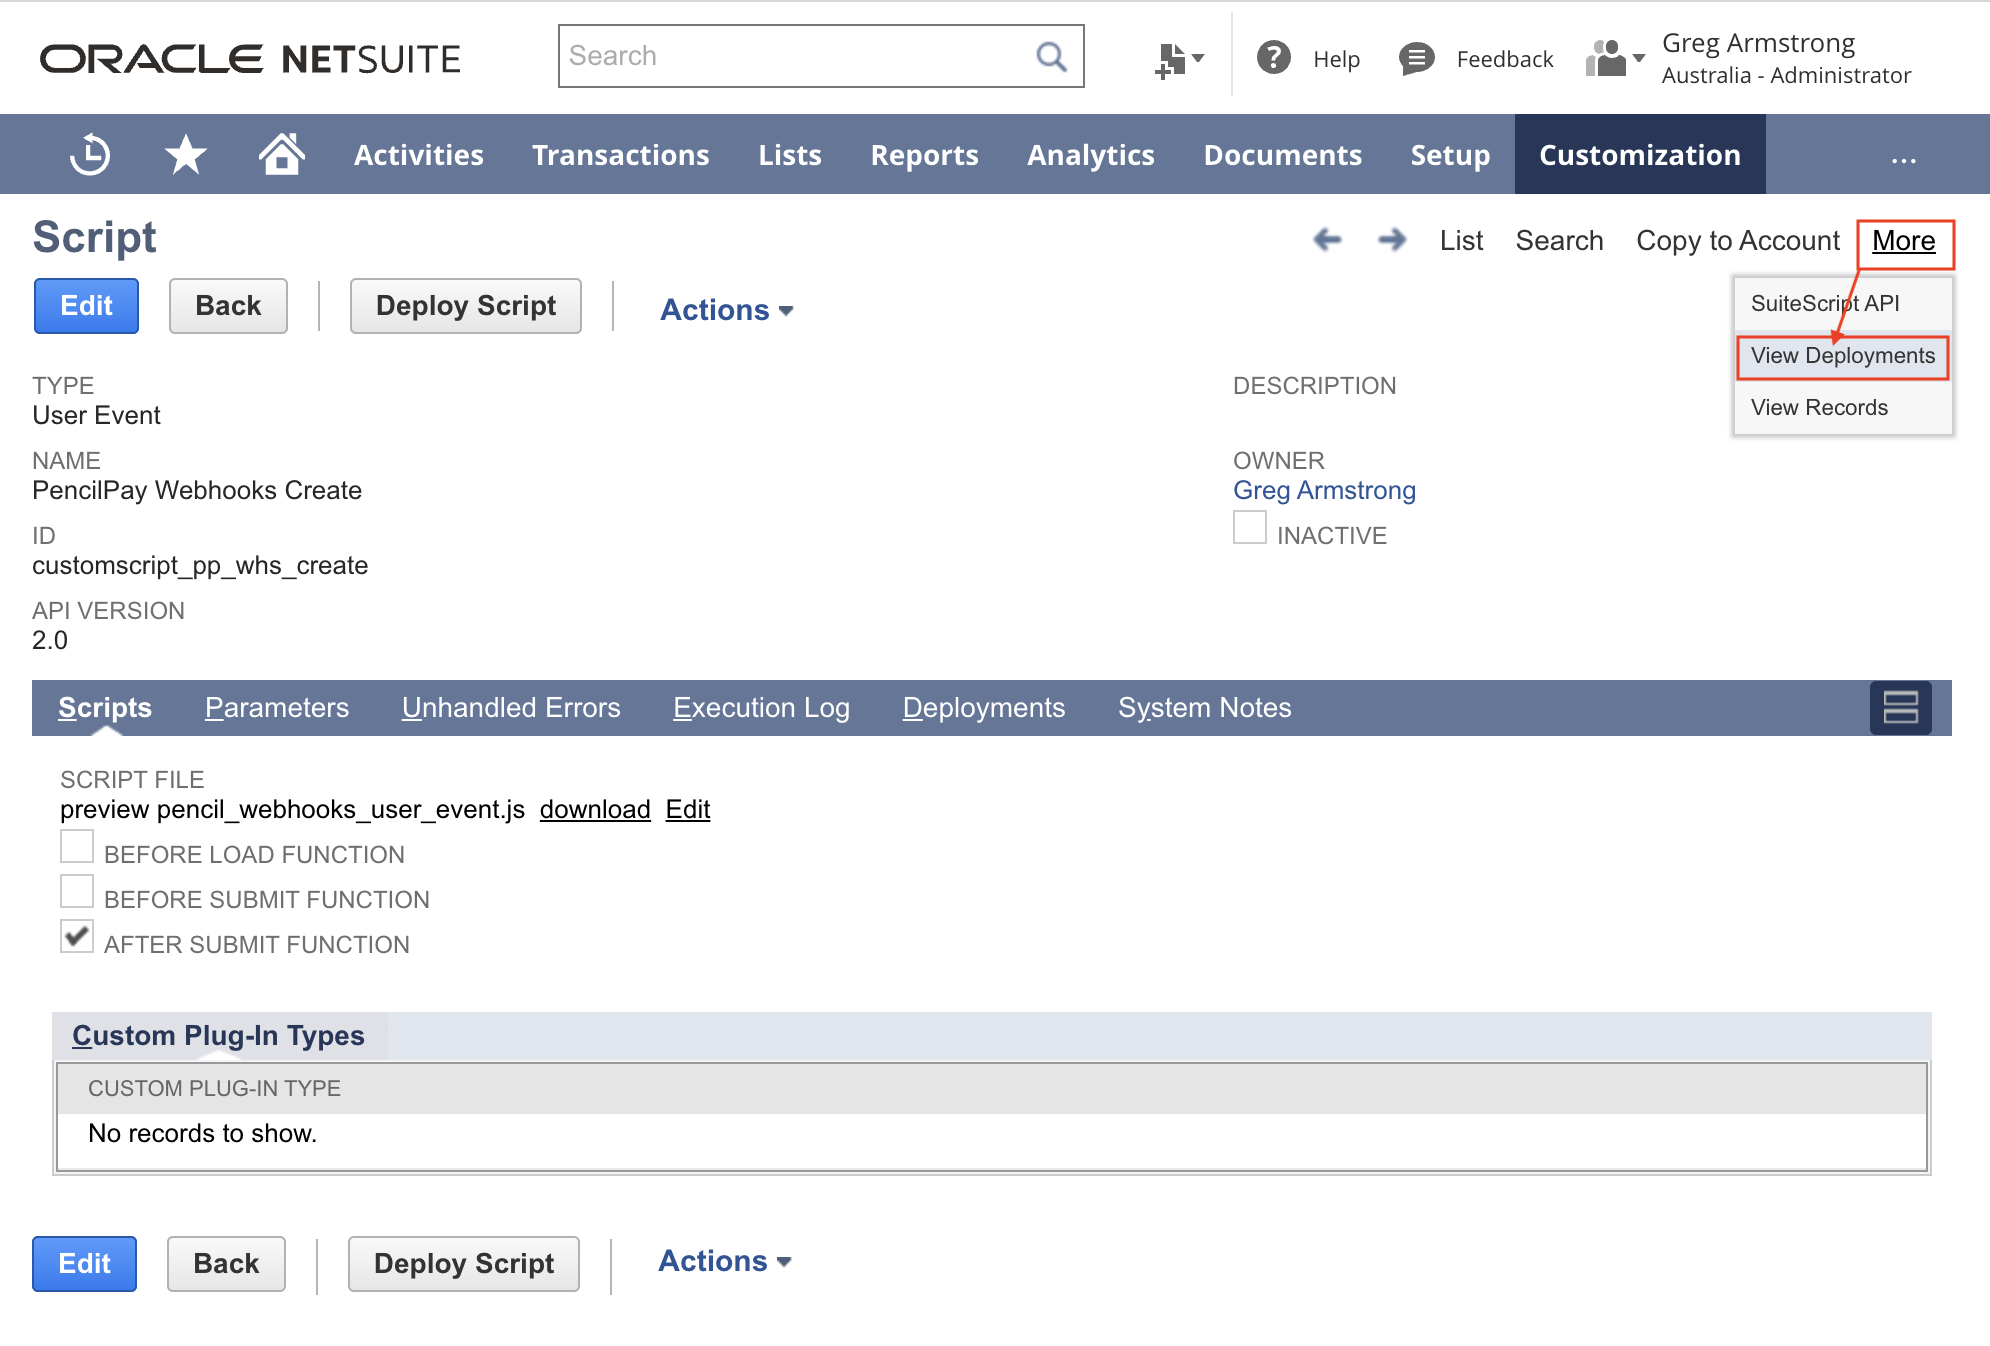
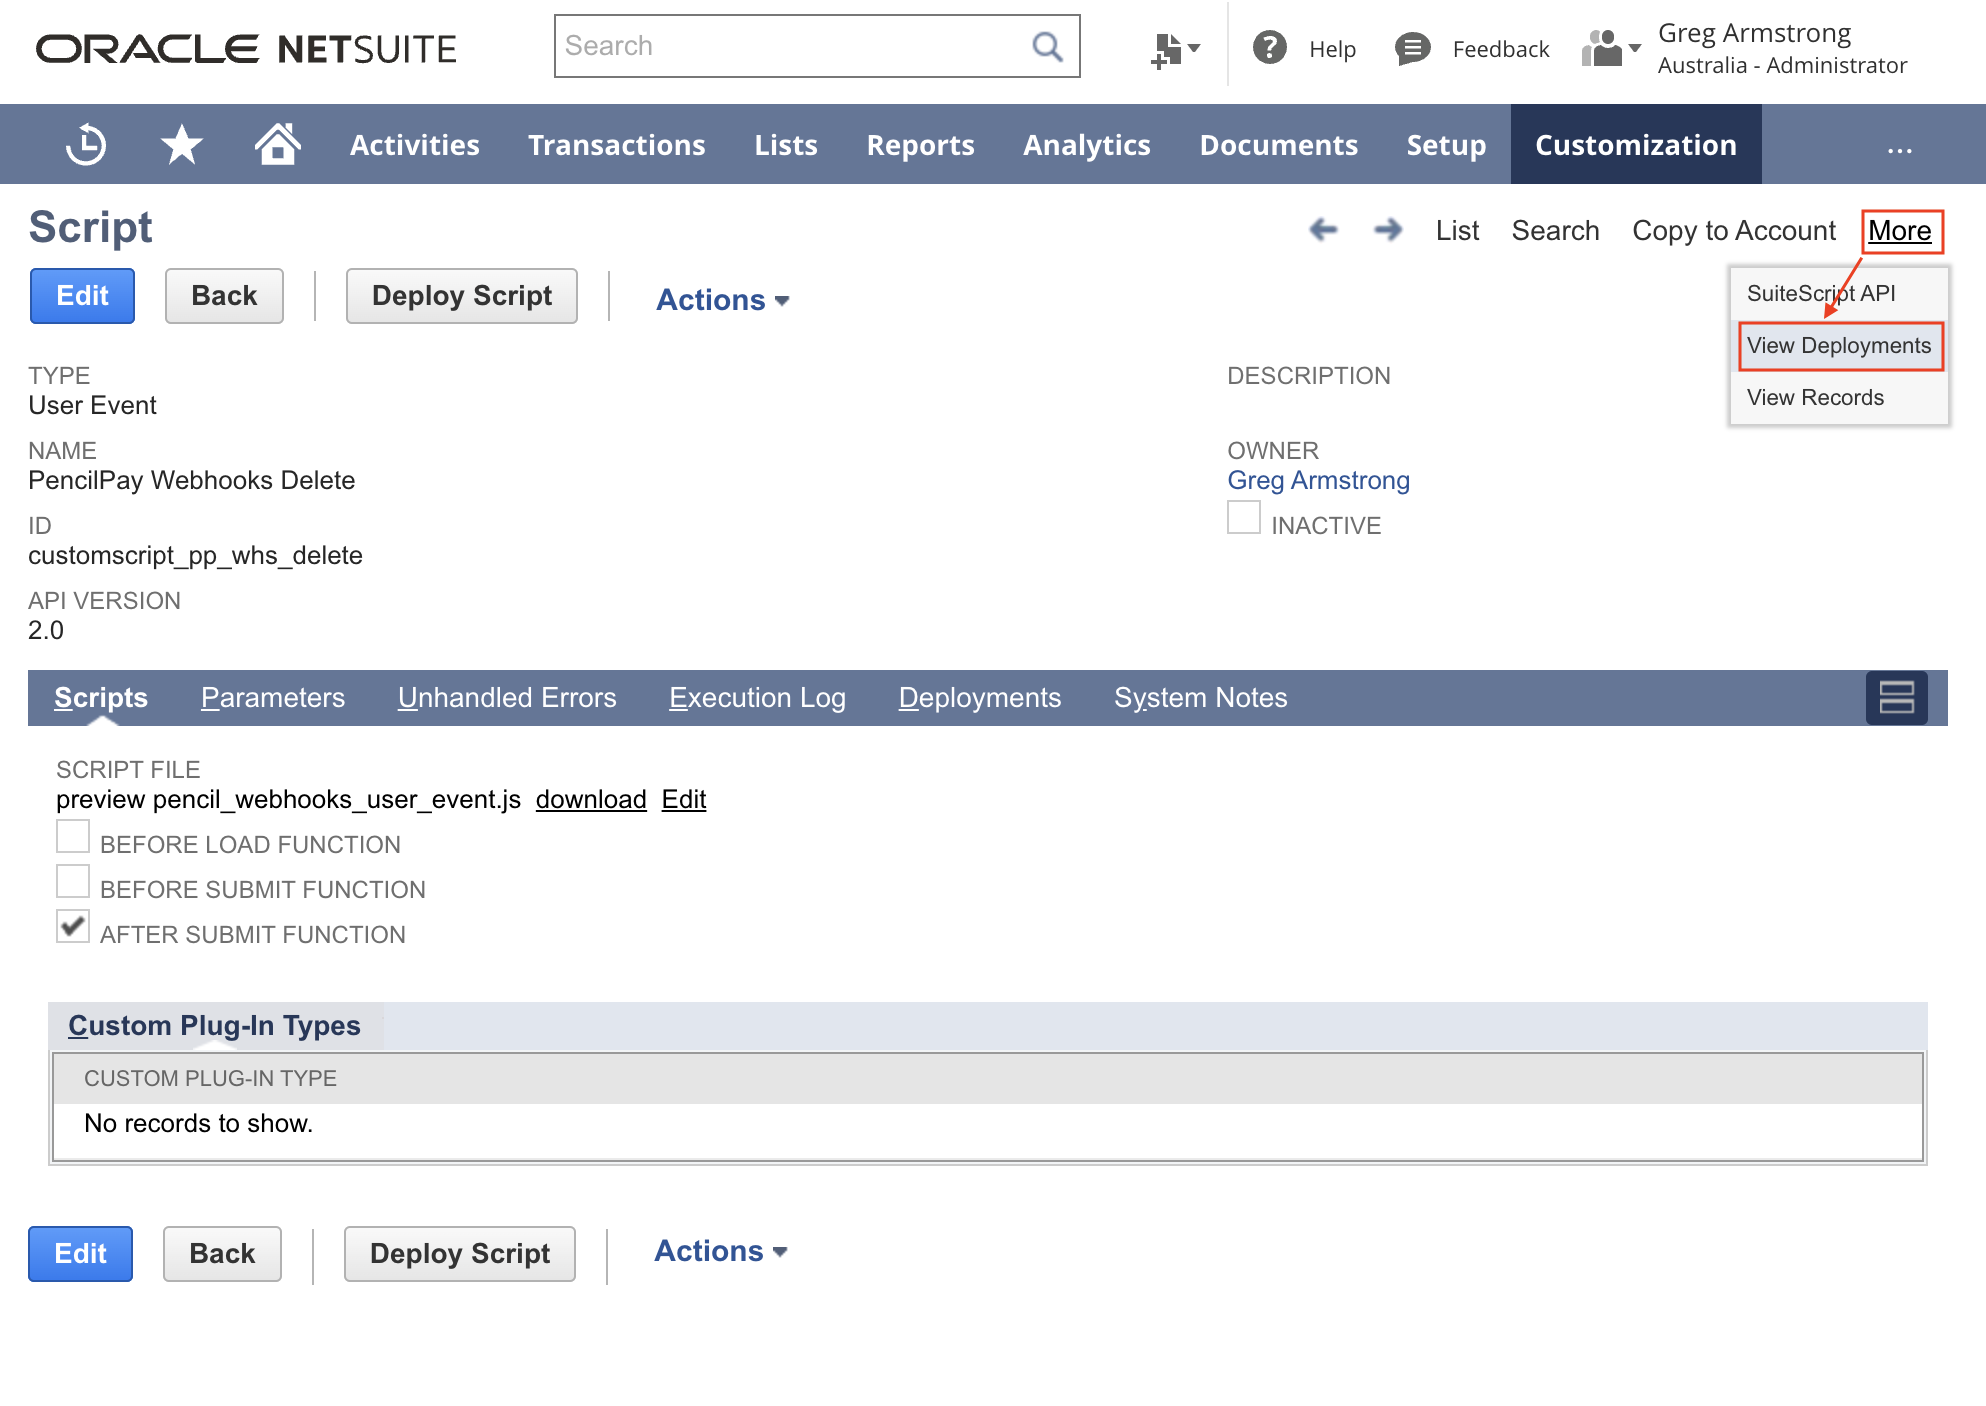
- In the top right corner click on: More -> View Deployments
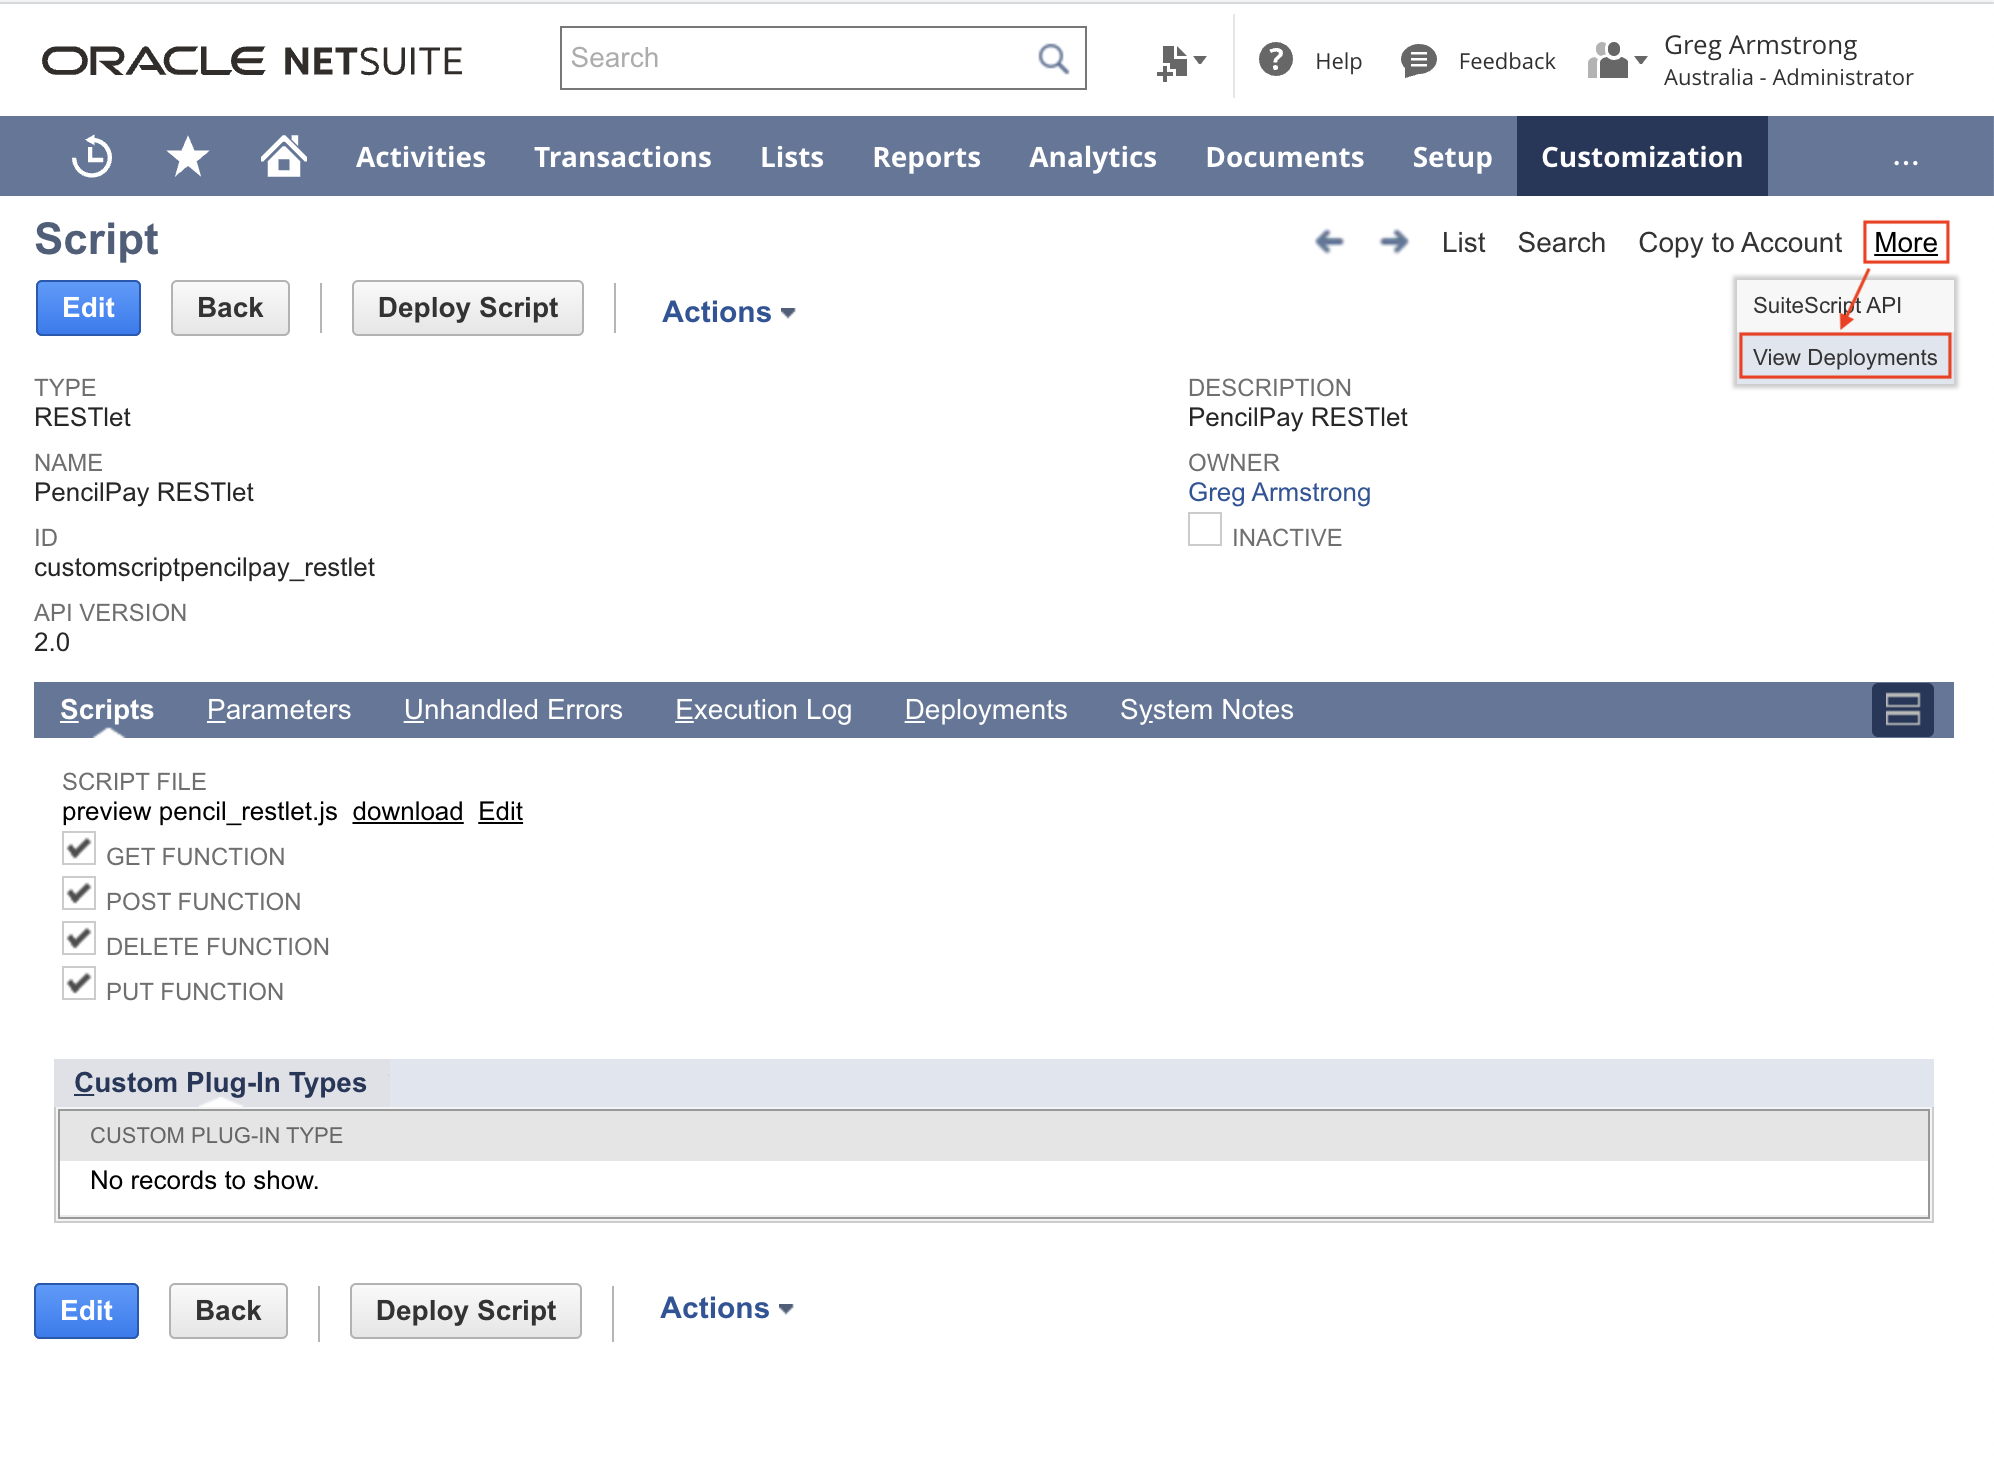
- Click Edit.
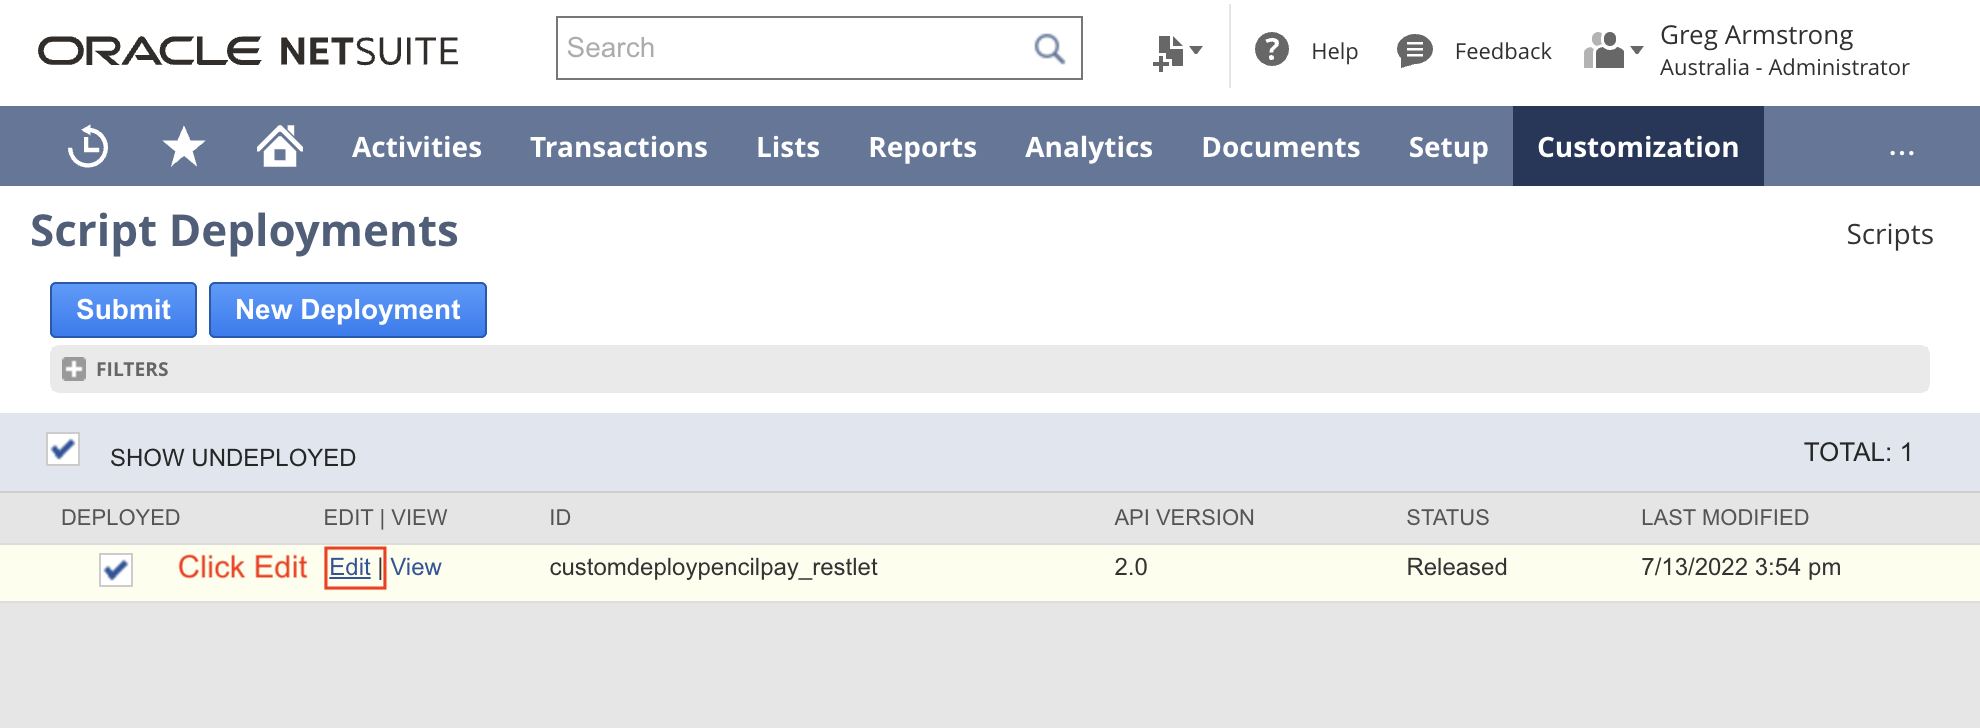
- Update the Audience:
- Select Role: All or ‘PencilPay API’ and any other roles you would like the users with these roles to push customer and invoice data from NetSuite to Pencil immediately via the web hook (otherwise you may wait up to 3 hours for the data to sync); OR
- Select Employees: All or ‘PencilPay API’ and any other Employees you would like the users with these roles to push customer and invoice data from NetSuite to Pencil immediately via the web hook (otherwise you may wait up to 3 hours for the data to sync);
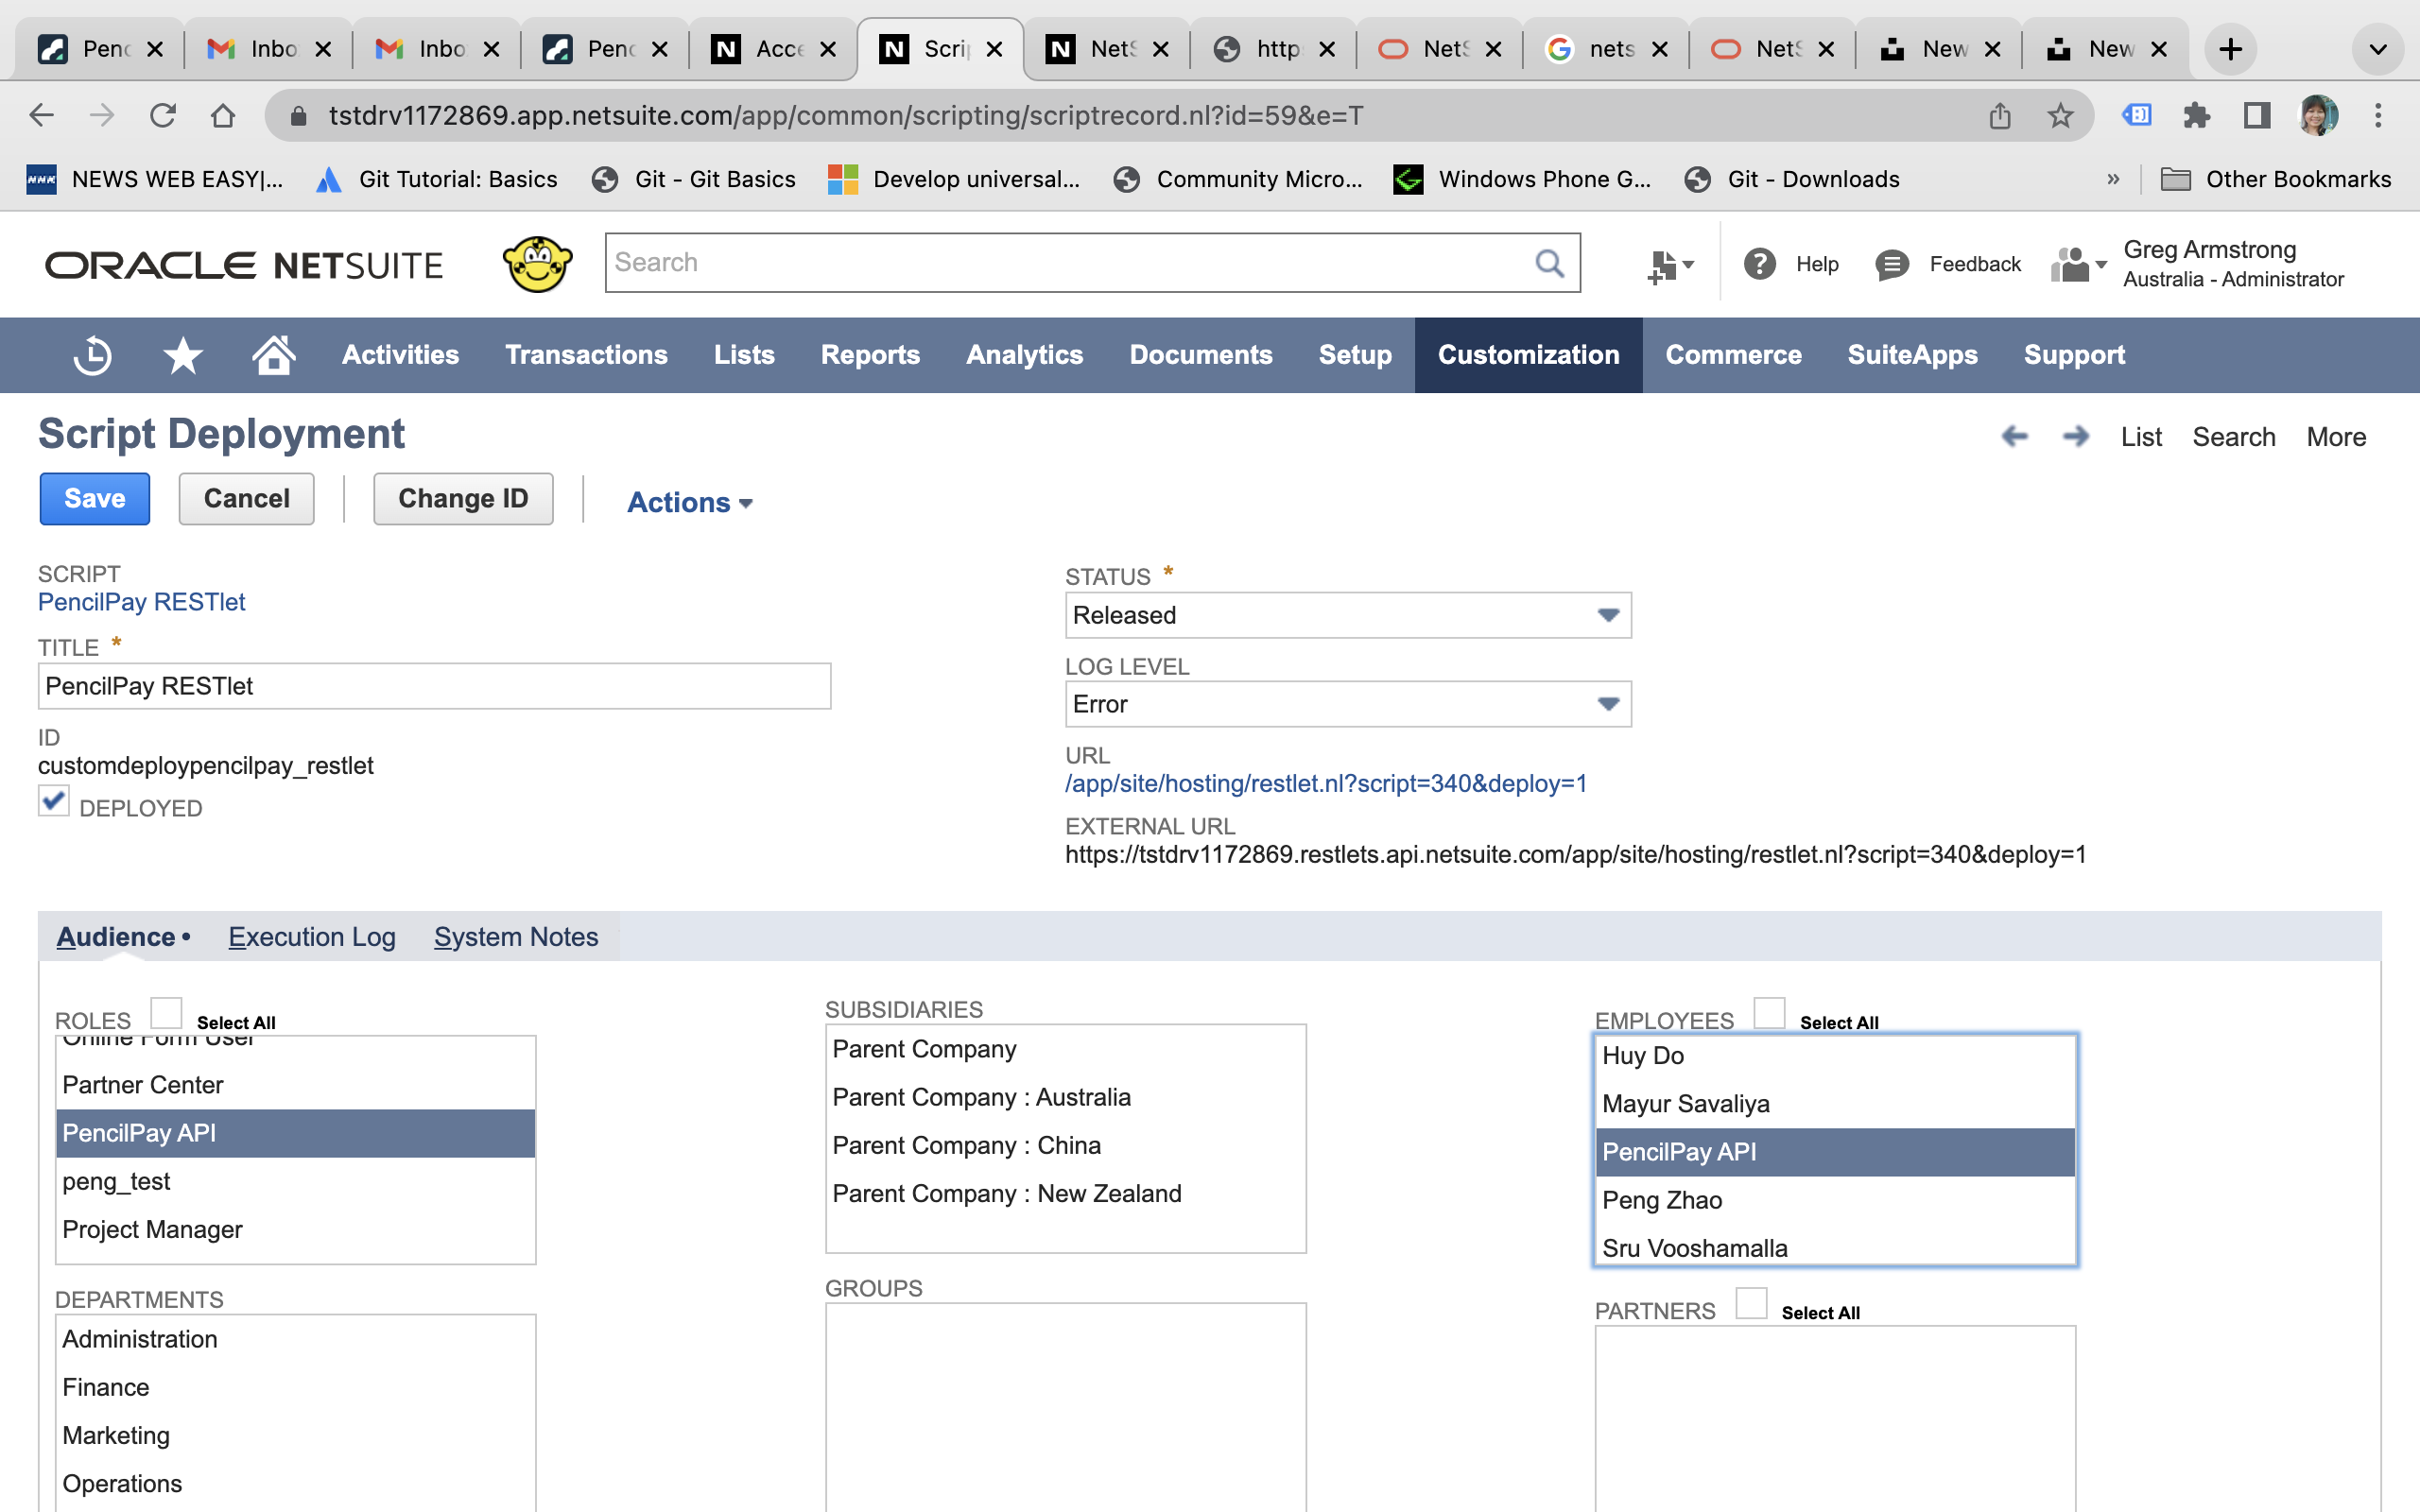
- Please copy down the External URL and save it securely as you will use it on the configuration page in PencilPay's NetSuite integration page.
- To do this go to: Customisation > Scripting > Scripts
- Now we need to create a User Event script
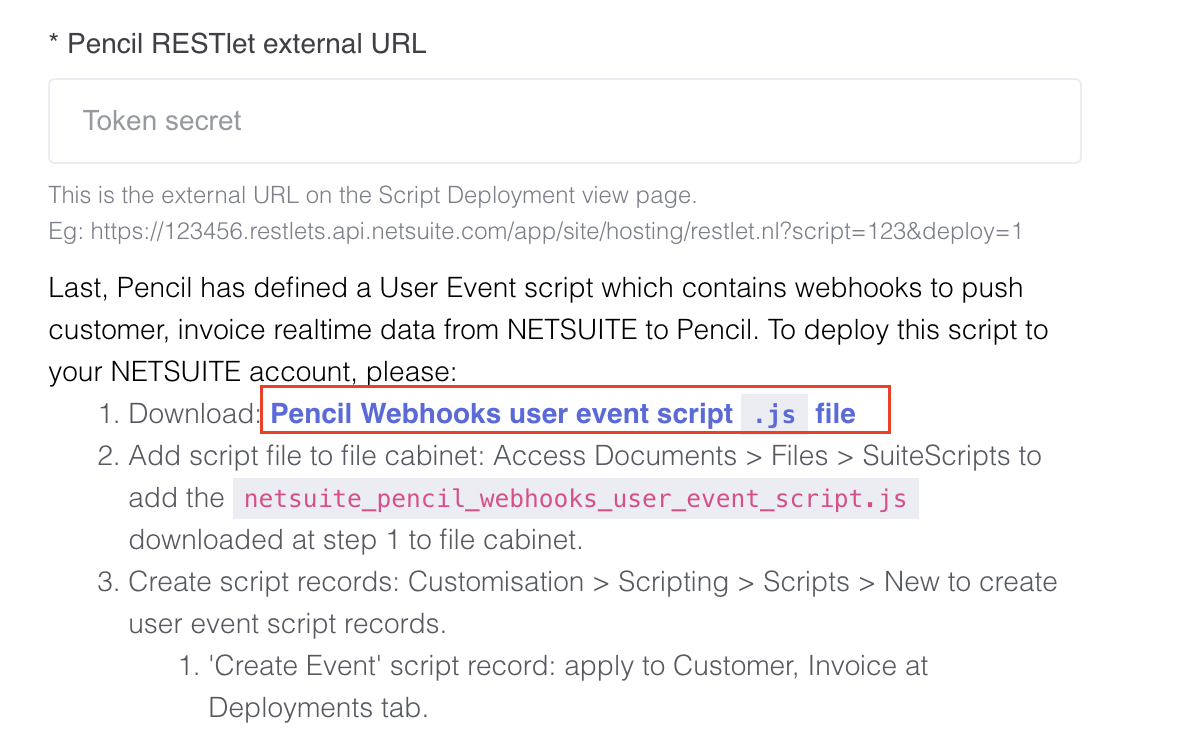
- To do this log in to PencilPay and go to: Integrations -> NetSuite -> scroll down to the bottom and download this JS file: netsuite_pencil_webhooks_user_event_script.js
- Next we need to add the script file to file cabinet:
- To do this go to: Documents > Files > SuiteScripts > New
- Click "Add File" -> select the file and click the "Open" button to add the file.
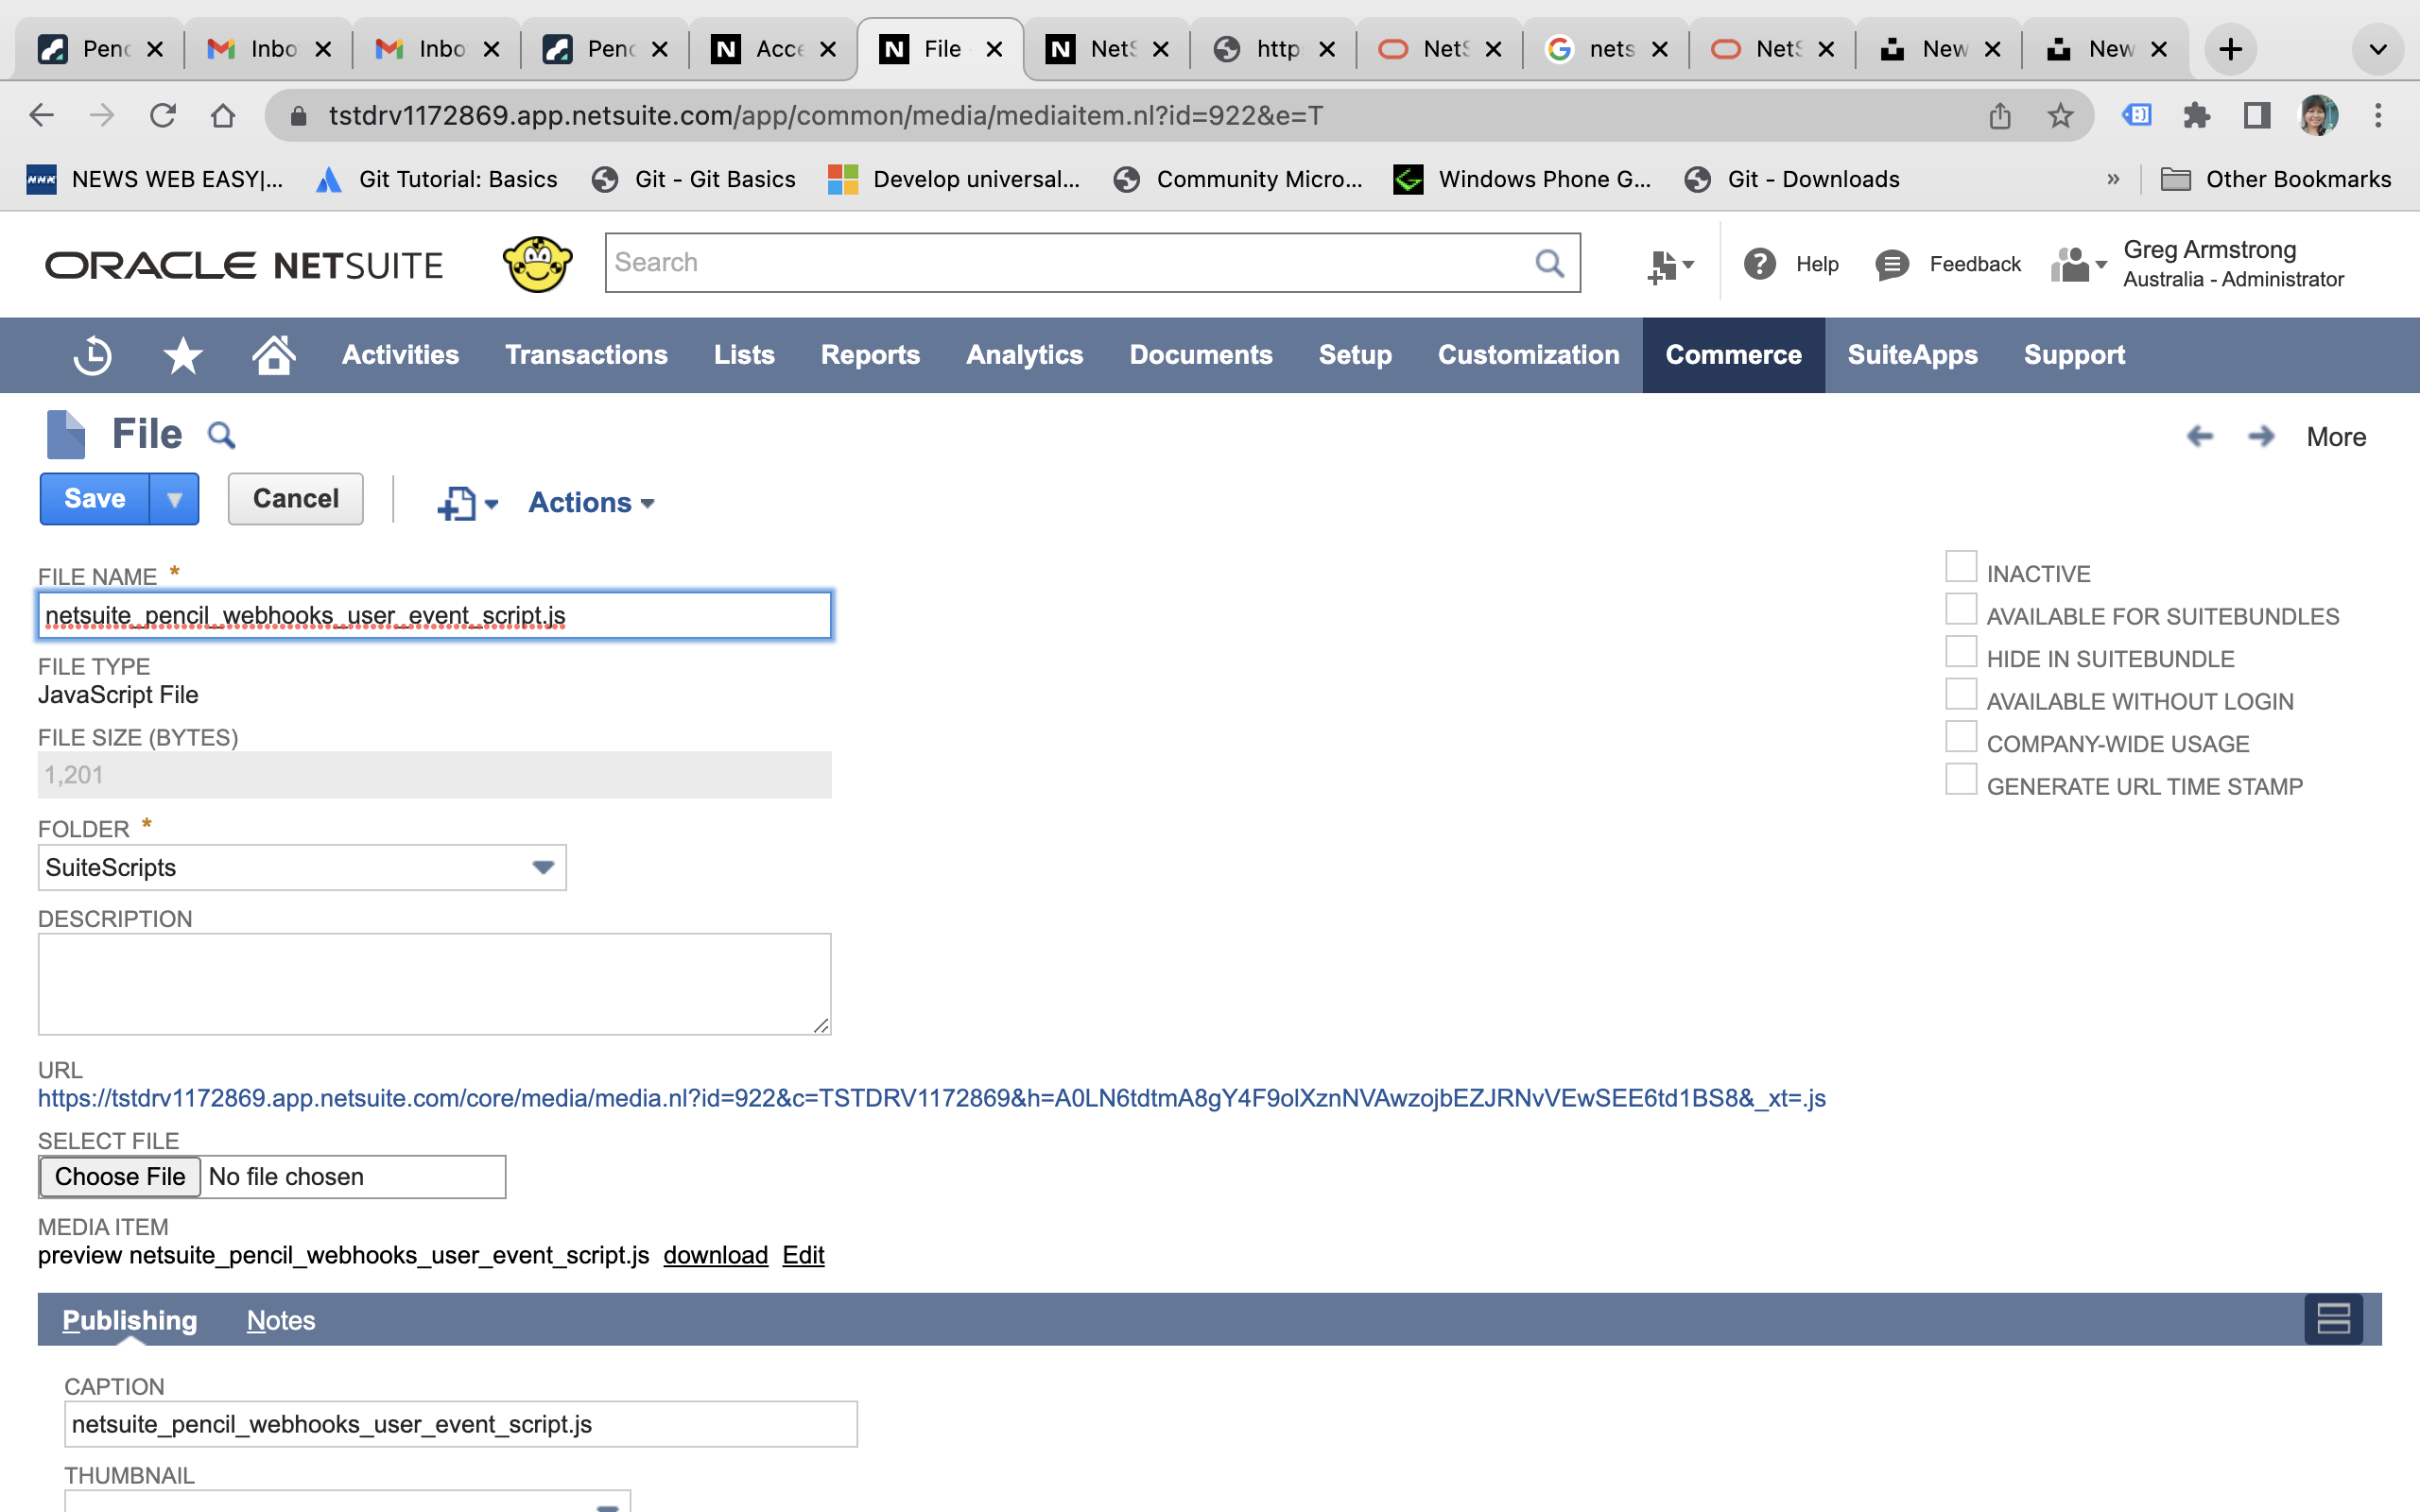
- Click on Save.
- Then we need to create three script records; one each for the Create, Edit and Delete events:
- To set up the first "Create" script, go to: Customisation > Scripting > Scripts > New
- In the "File Name" field type: "netsuite_pencil_webhooks_user_event_js" or type the start of this file name and then select it.

- Click "Create Script Record"
- On the next page copy and paste these details:
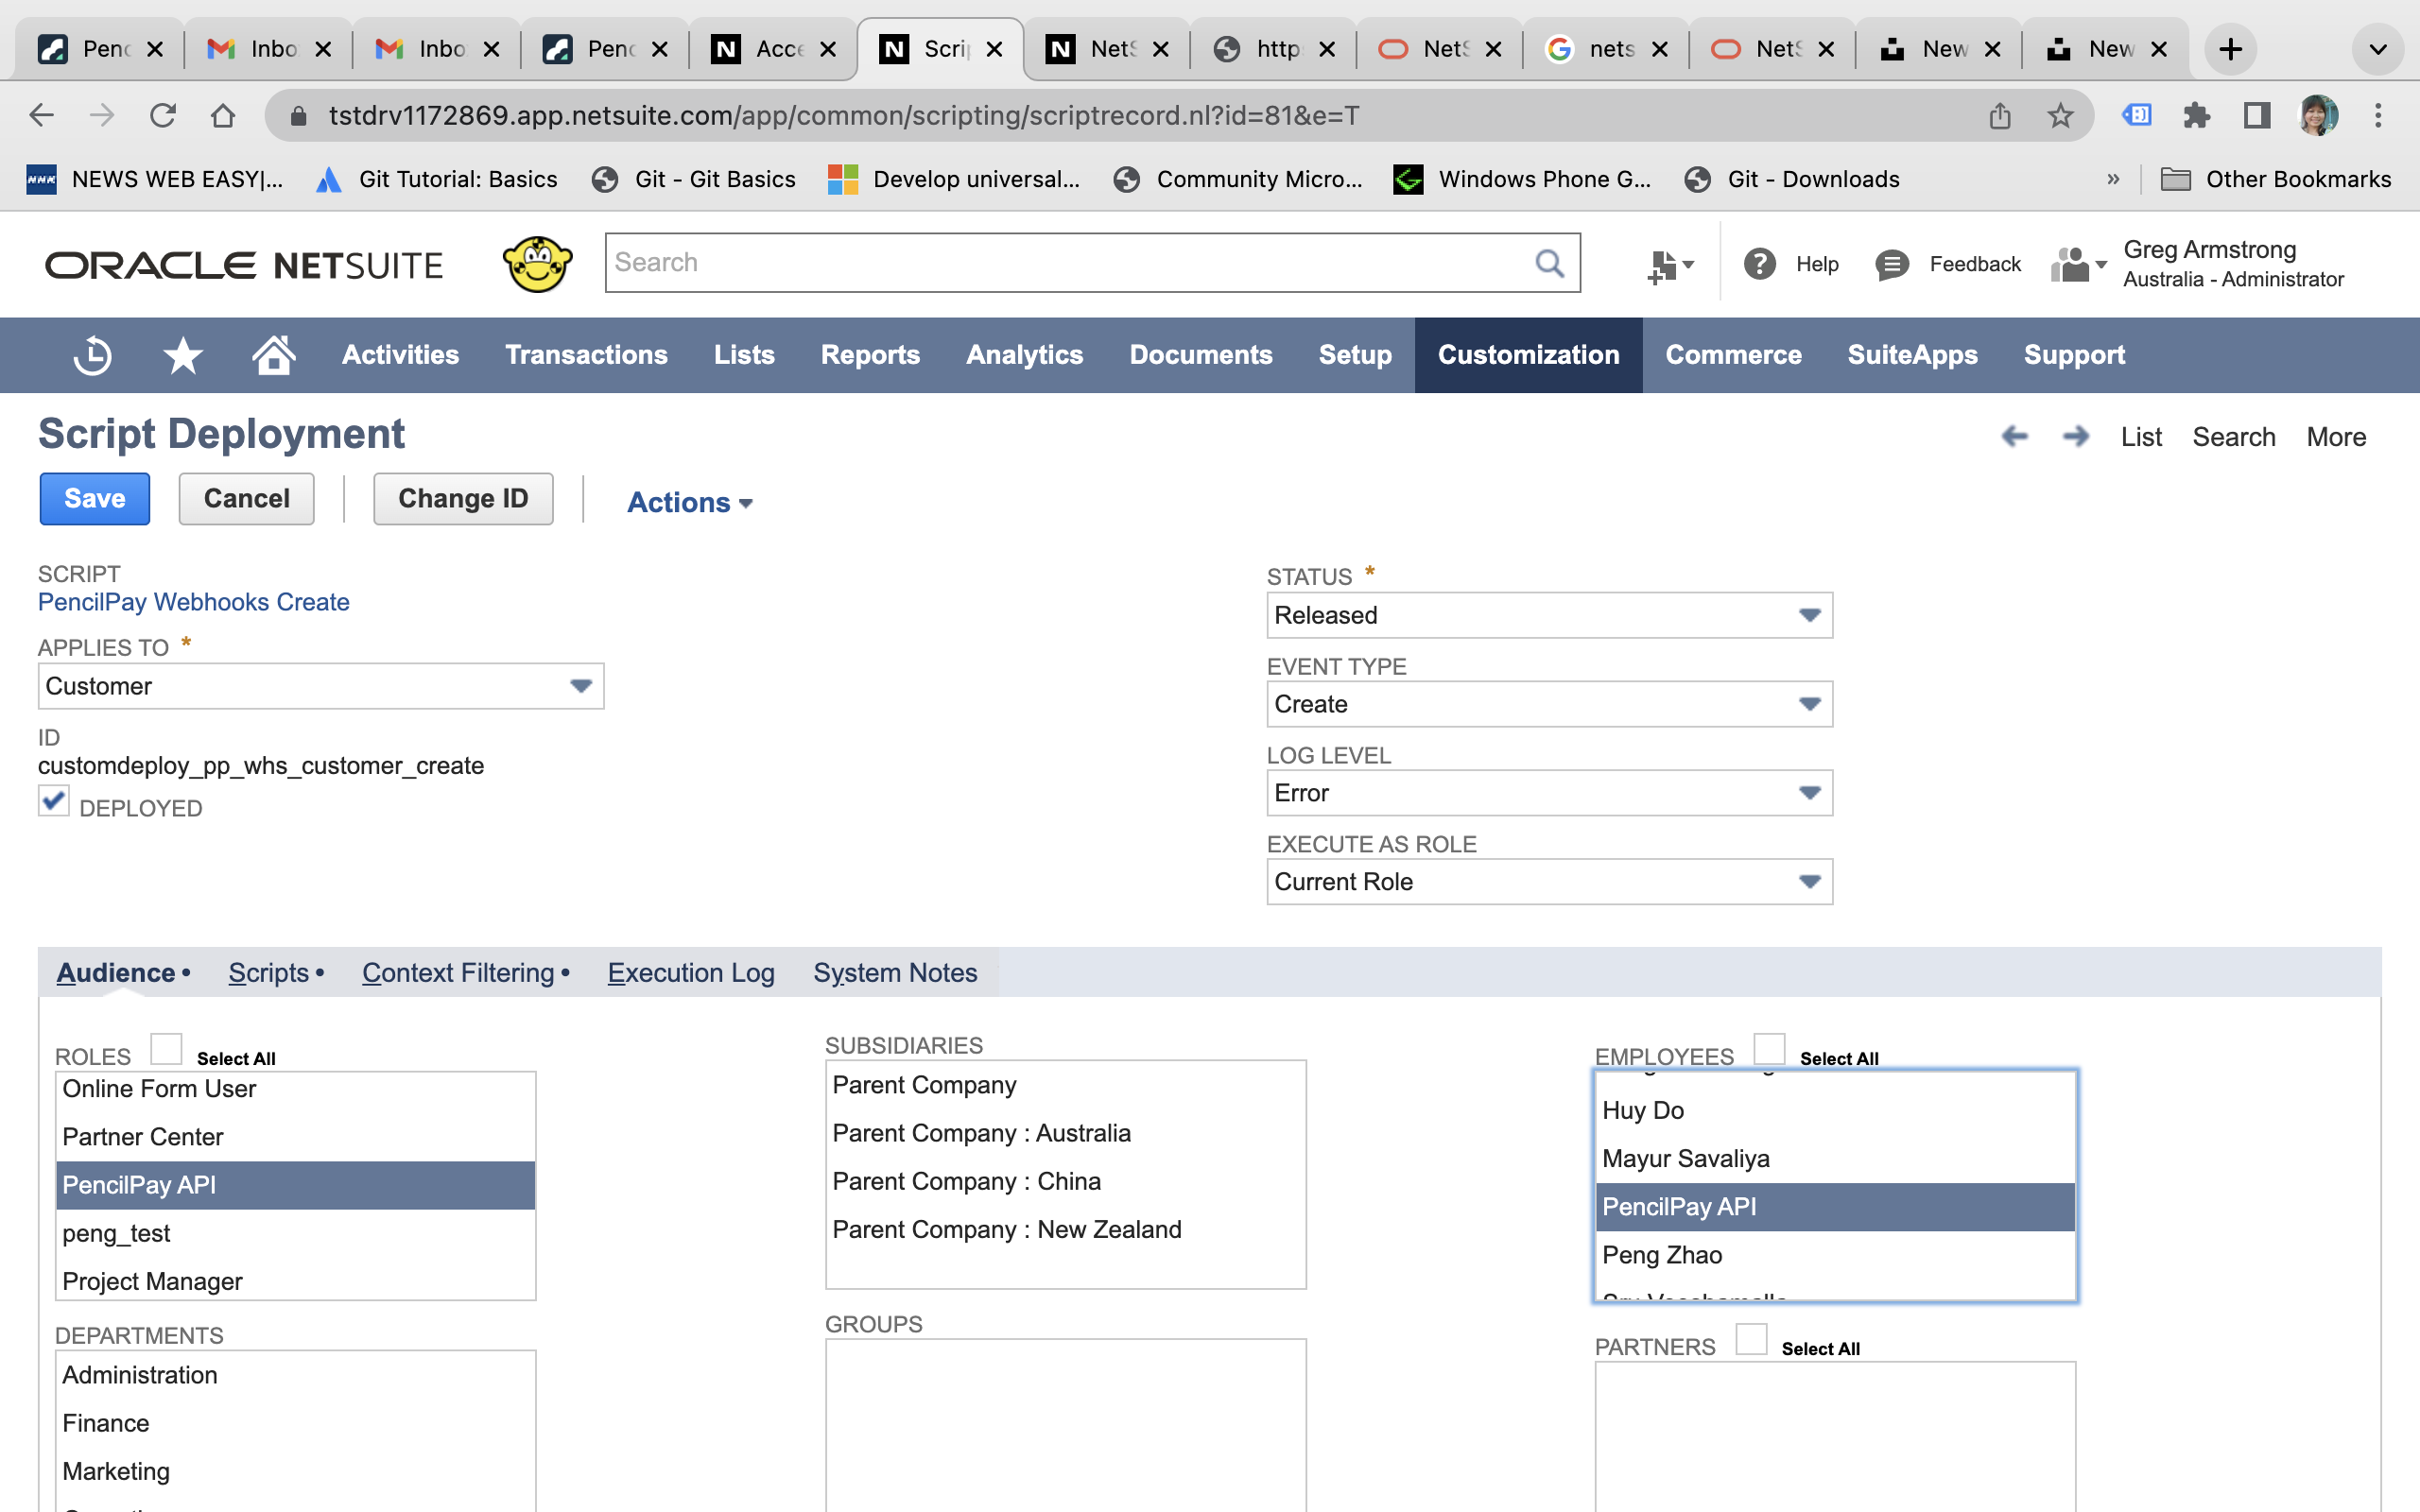
- Name: PencilPay Webhooks Create
- ID: pp_whs_create
- Customer
- ID: pp_whs_customer_create
- Deployed: Yes
- Status: Released
- Event Type: Create
- Log Level: Error
- Invoice
- ID: pp_whs_invoice_create
- Deployed: Yes
- Status: Released
- Event Type: Create
- Log Level: Error
- Customer
- To do this log in to PencilPay and go to: Integrations -> NetSuite -> scroll down to the bottom and download this JS file: netsuite_pencil_webhooks_user_event_script.js
- Option 1: Use Pencil's custom build script.
-
-
-
-

- Click Save.
- Then we need to create the 'Edit Event' script record. To do this go to: Customisation > Scripting > Scripts > New
- In the "File Name" field type: "netsuite_pencil_webhooks_user_event_js" or type the start of this file name and then select it.

- Click "Create Script Record"
- On the next page copy and paste these details:
- In the "File Name" field type: "netsuite_pencil_webhooks_user_event_js" or type the start of this file name and then select it.
-
-
-
-
-
-
-
-
- Name: PencilPay Webhooks Edit
- ID: pp_whs_edit
- Customer
- ID: pp_whs_customer_edit
- Deployed: Yes
- Status: Released
- Event Type: Edit
- Log Level: Error
- Invoice
- ID: pp_whs_invoice_edit
- Deployed: Yes
- Status: Released
- Event Type: Edit
- Log Level: Error
- Customer

- Click Save.
-
- The third one is the "Delete" script, go to: Customisation > Scripting > Scripts > New
- In the "File Name" field type: "netsuite_pencil_webhooks_user_event_js" or type the start of this file name and then select it.

- Click "Create Script Record"
- On the next page copy and paste these details:
- PencilPay Webhooks Delete
- ID: pp_whs_delete
- Customer
- ID: pp_whs_customer_delete
- Deployed: Yes
- Status: Released
- Event Type: Delete
- Log Level: Error
- Invoice
- ID: pp_whs_invoice_delete
- Deployed: Yes
- Status: Released
- Event Type: Delete
- Log Level: Error
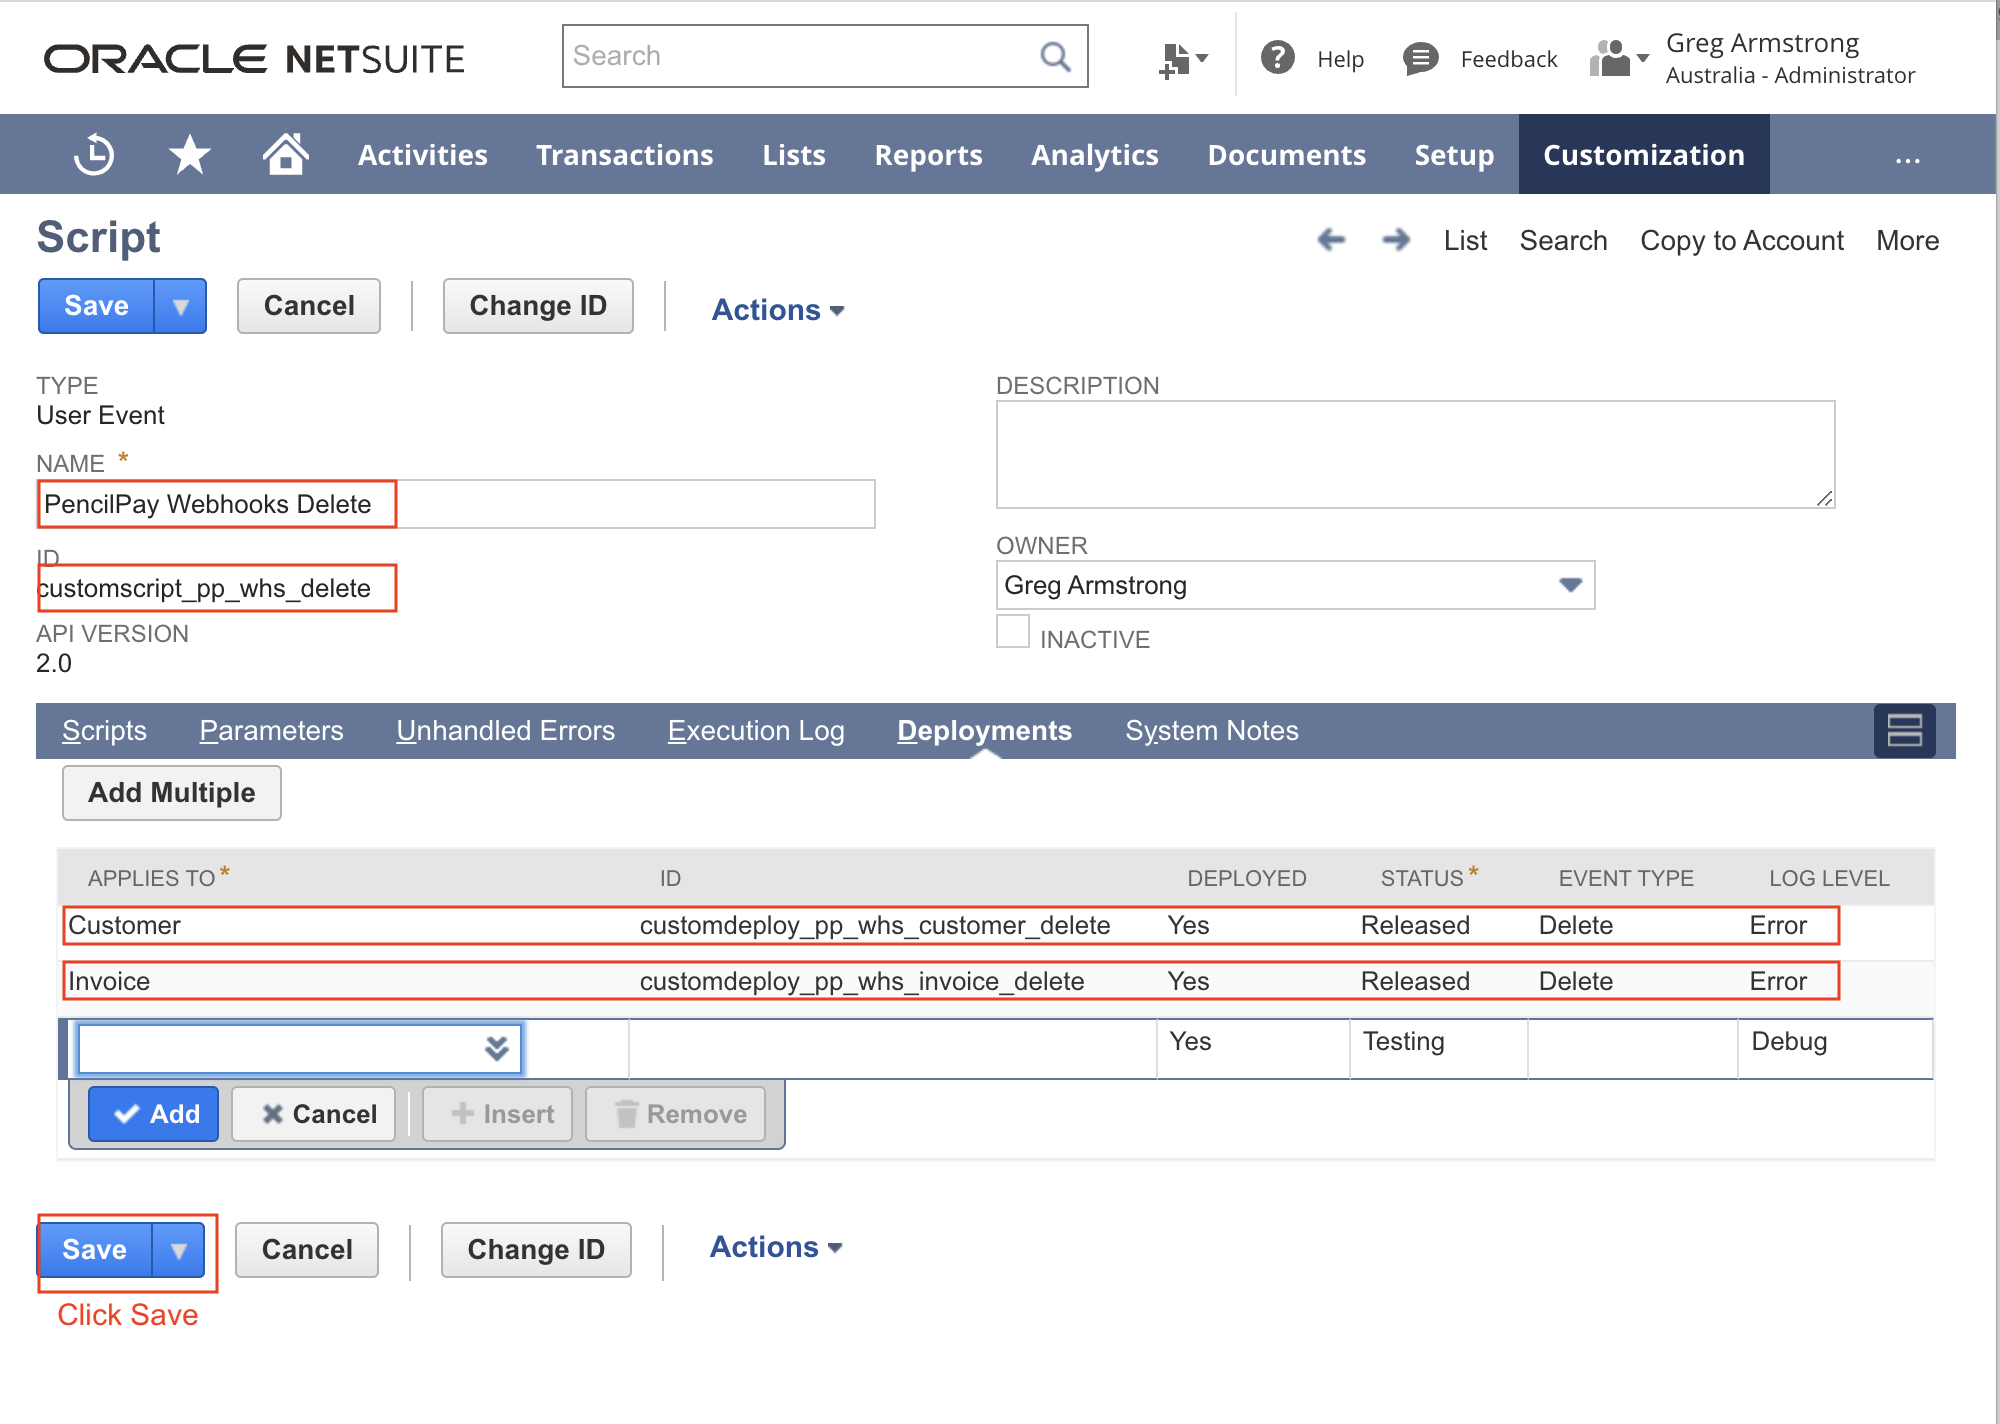
- Customer
- Click Save.
- In the "File Name" field type: "netsuite_pencil_webhooks_user_event_js" or type the start of this file name and then select it.
-
- Then we need to update the 'Audience' for ALL all three script deployment records created above by following the steps below.
- To do this, go to: Customisation > Scripting > Scripts
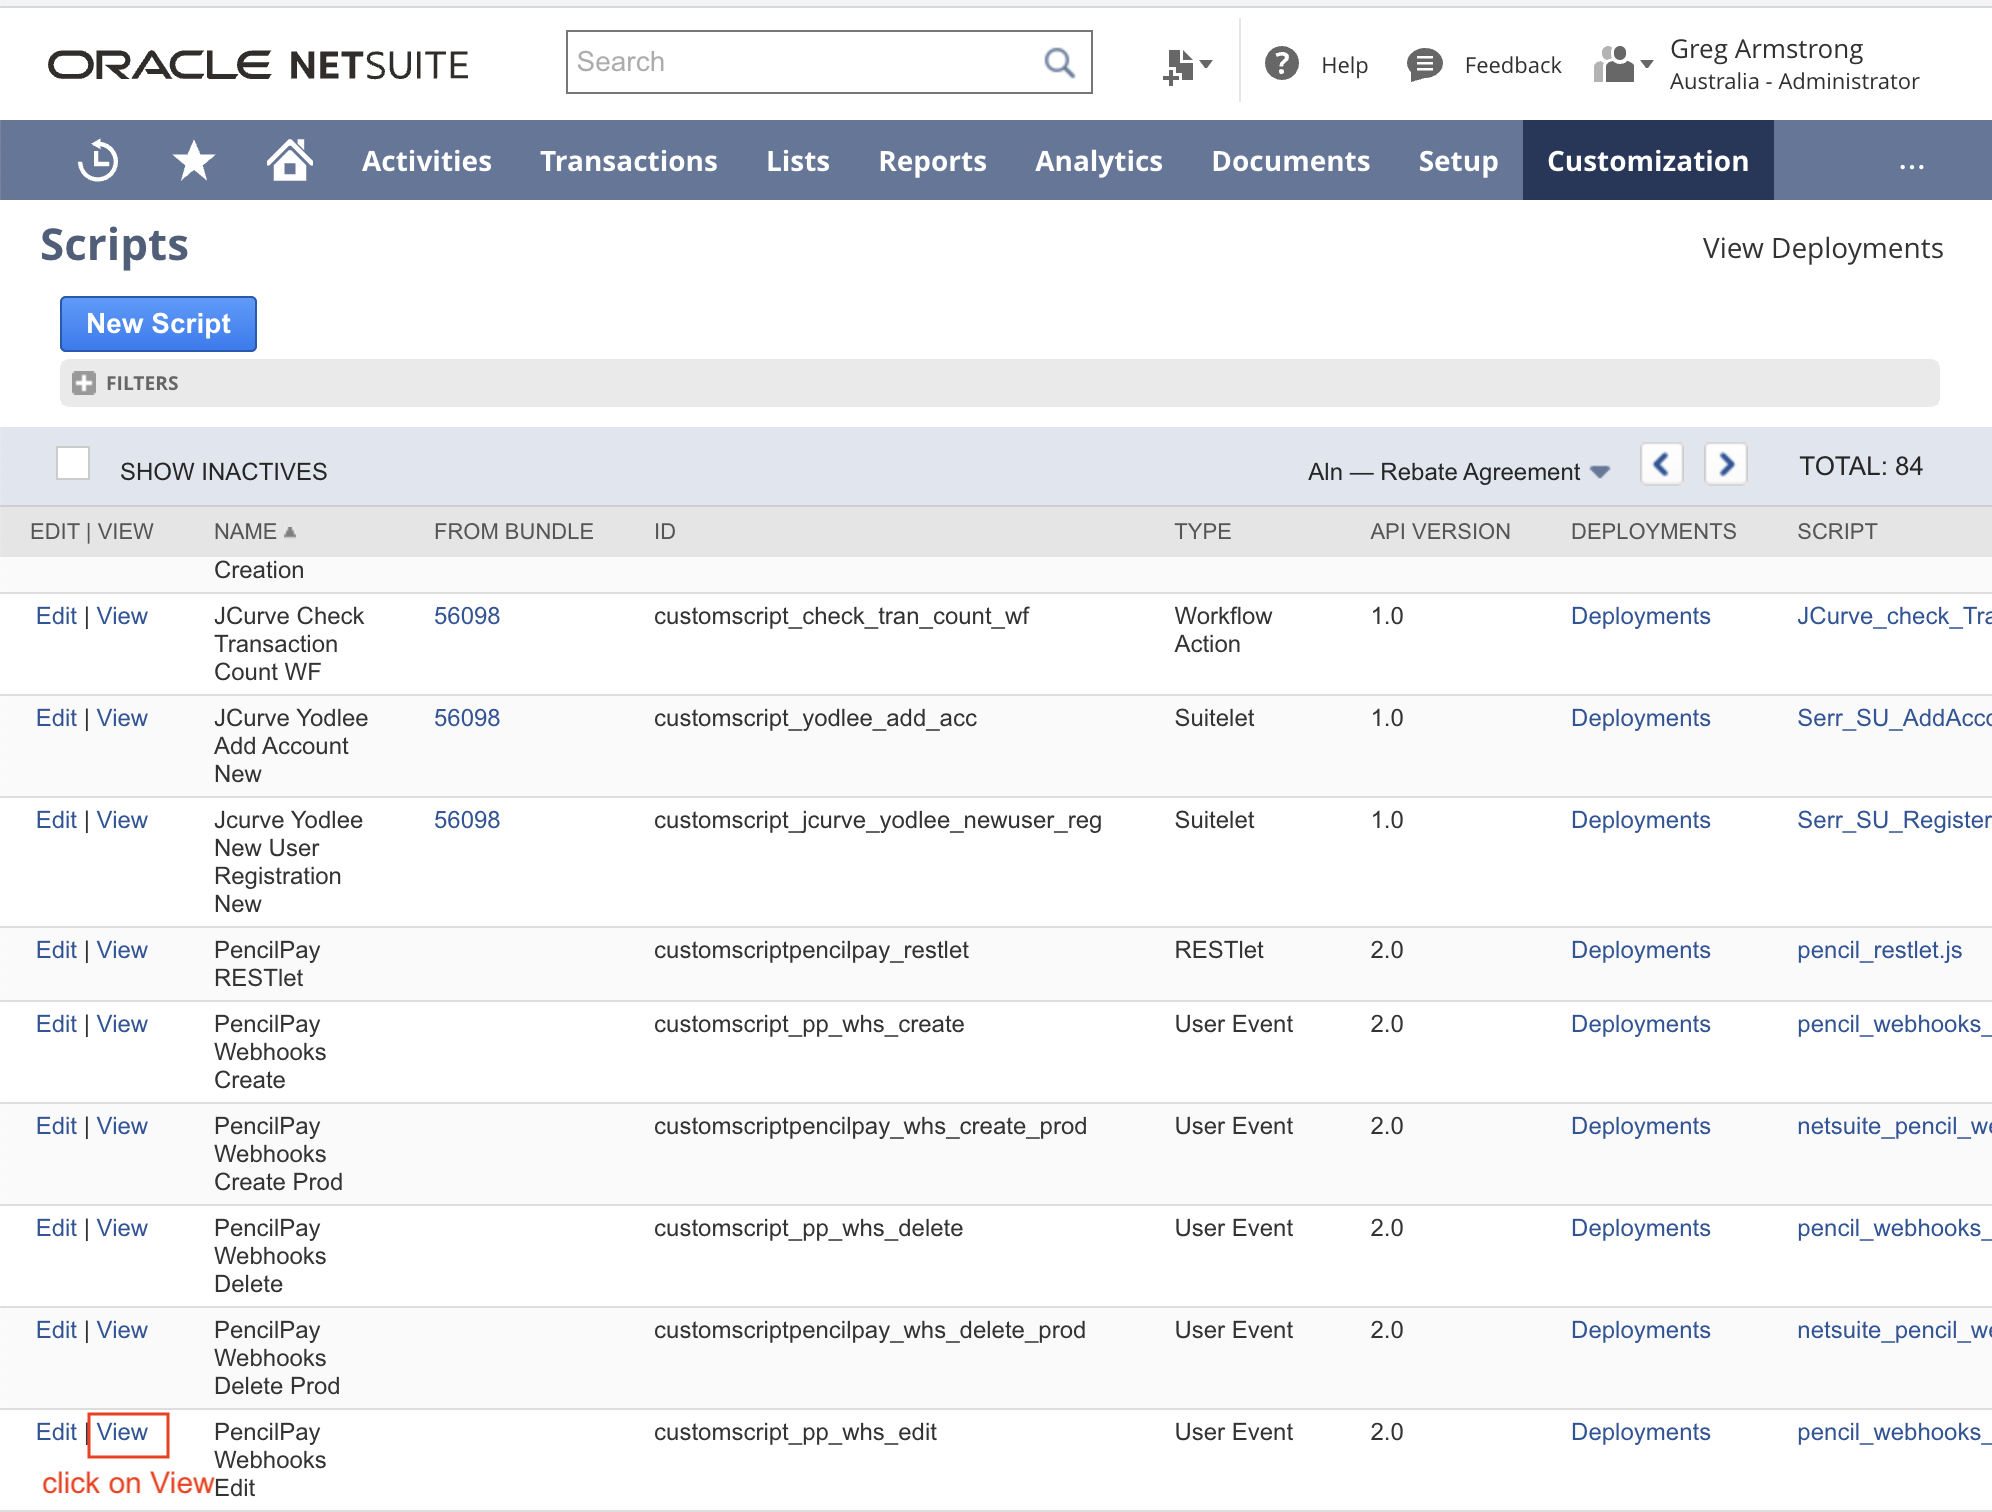
- Then find the first script called: PencilPay Webhooks Create and click on the "View" link.

- On Script review page in the top right corner click on More > 'View Deployments' to update 'Audience' script deployment records.
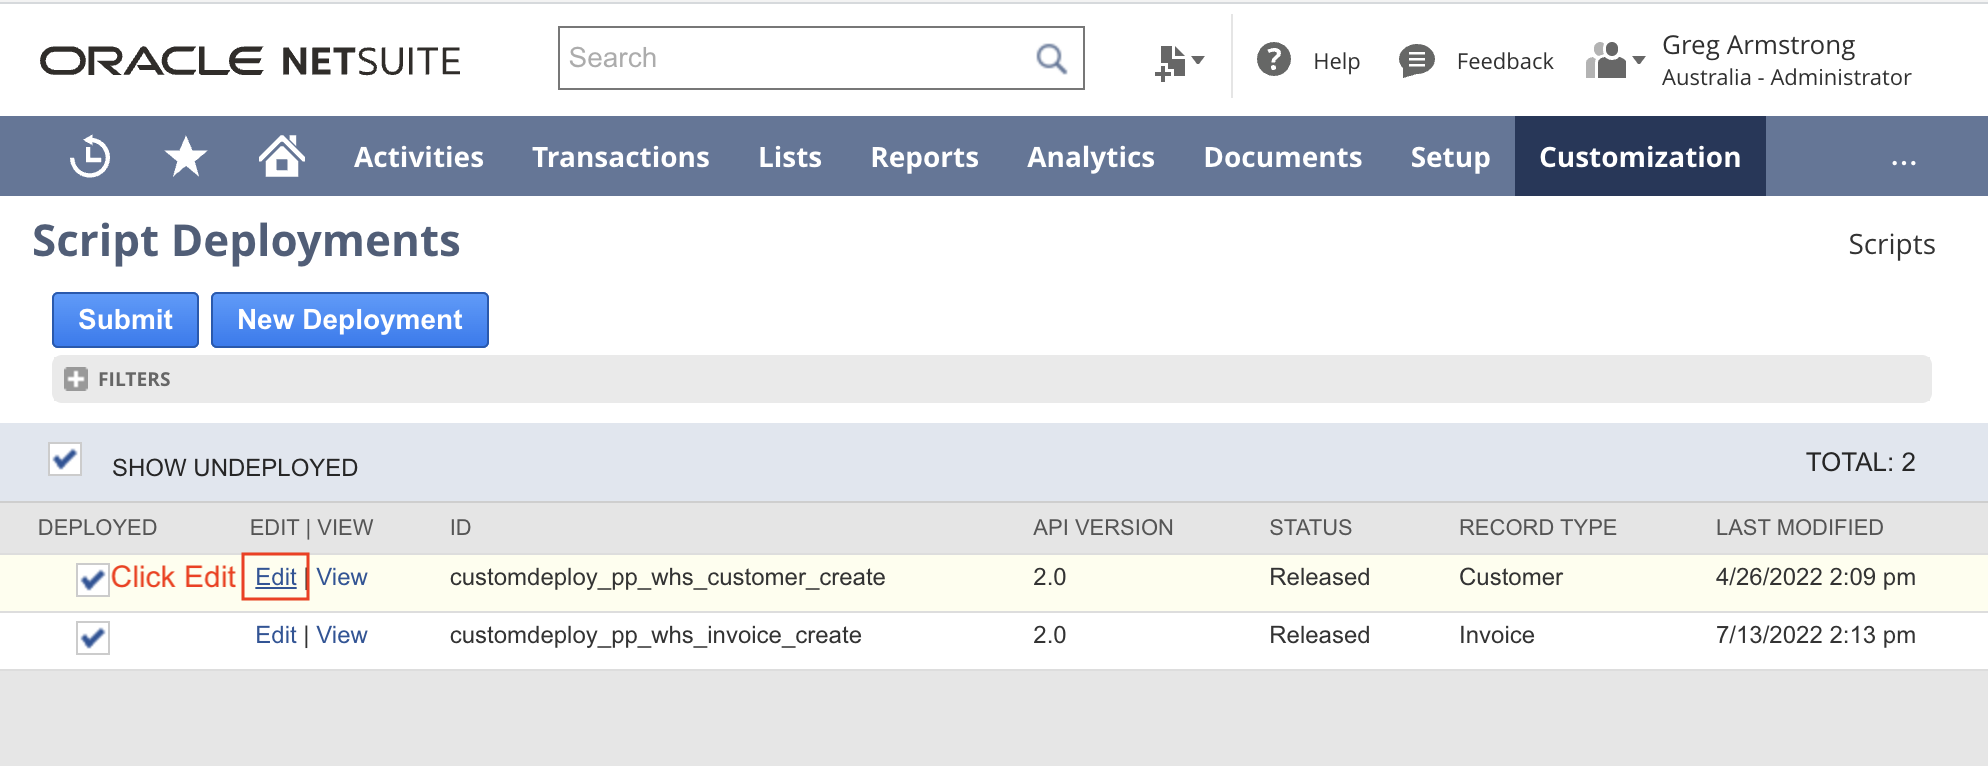
- You will see two "Script Deployments".
- customdeploy_pp_whs_customer_create
- Click on the Edit link.
- Update the Role to include: 'PencilPay API' and any other roles you would like the users with these roles to push customer and invoice data from NetSuite to Pencil immediately via the web hook (otherwise you may wait up to 3 hours for the data to sync); OR
- Employee: 'PencilPay API' user account and any other roles you would like the users with these roles to push customer and invoice data from NetSuite to Pencil immediately via the web hook (otherwise you may wait up to 3 hours for the data to sync).
- Click on the Edit link.
- customdeploy_pp_whs_invoice_create
- Click on the Edit link.

- Update the Role to include: 'PencilPay API' and any other roles you would like the users with these roles to push customer and invoice data from NetSuite to Pencil immediately via the web hook (otherwise you may wait up to 3 hours for the data to sync); OR
- Employee: 'PencilPay API' user account and any other roles you would like the users with these roles to push customer and invoice data from NetSuite to Pencil immediately via the web hook (otherwise you may wait up to 3 hours for the data to sync).
- Click on the Edit link.
- customdeploy_pp_whs_customer_create
- On Script review page in the top right corner click on More > 'View Deployments' to update 'Audience' script deployment records.
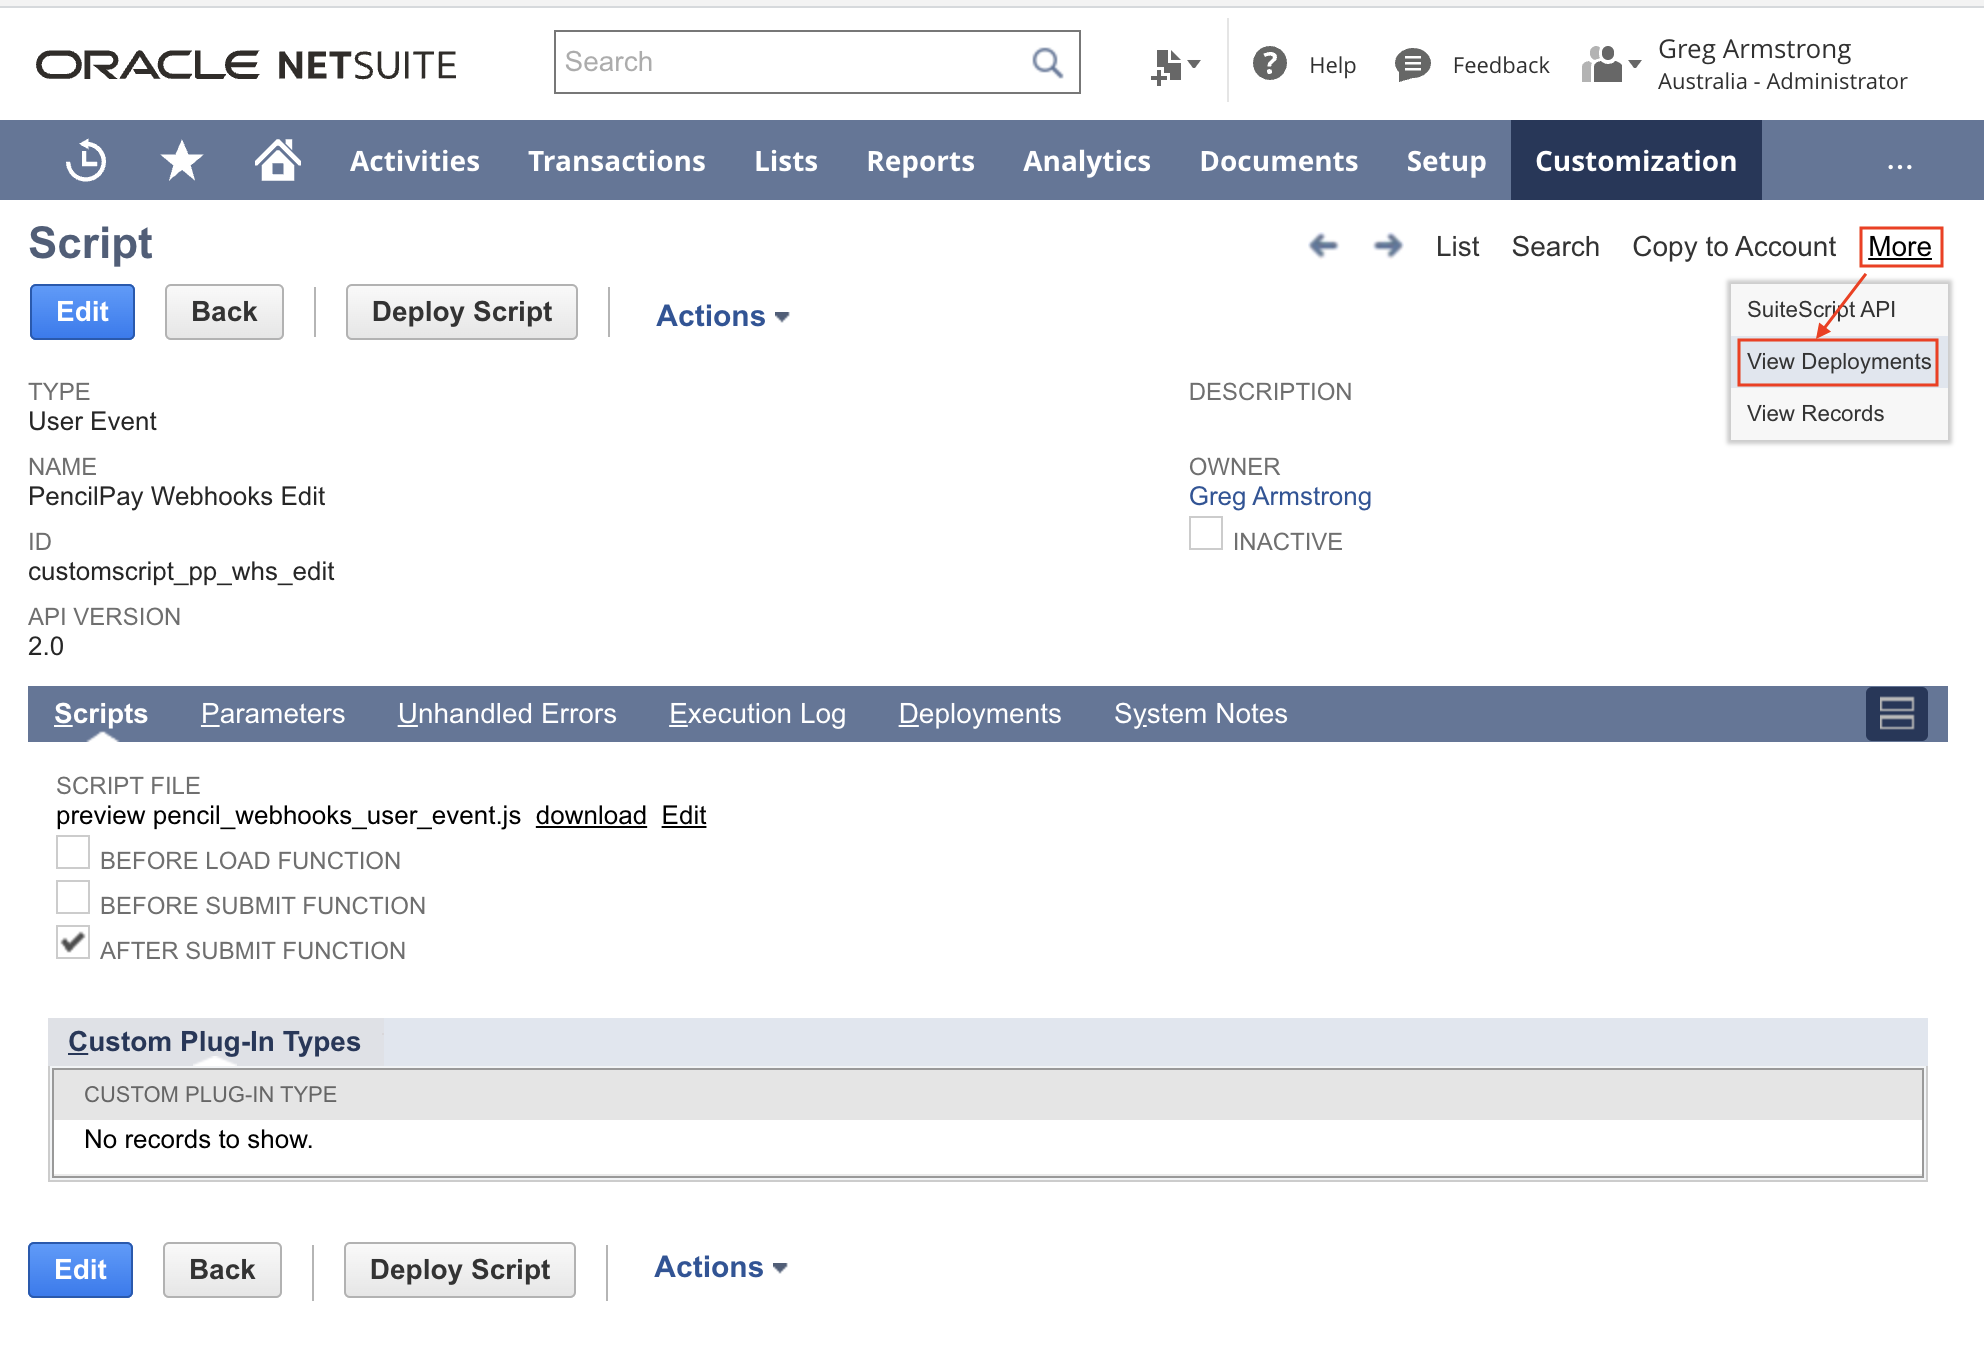
- Then find the second script called: PencilPay Webhooks Edit and click on the "View" link.
- On Script review page in the top right corner click on More > 'View Deployments' to update 'Audience' script deployment records.
- You will see two "Script Deployments".
- customdeploy_pp_whs_customer_edit
- Click on the Edit link.
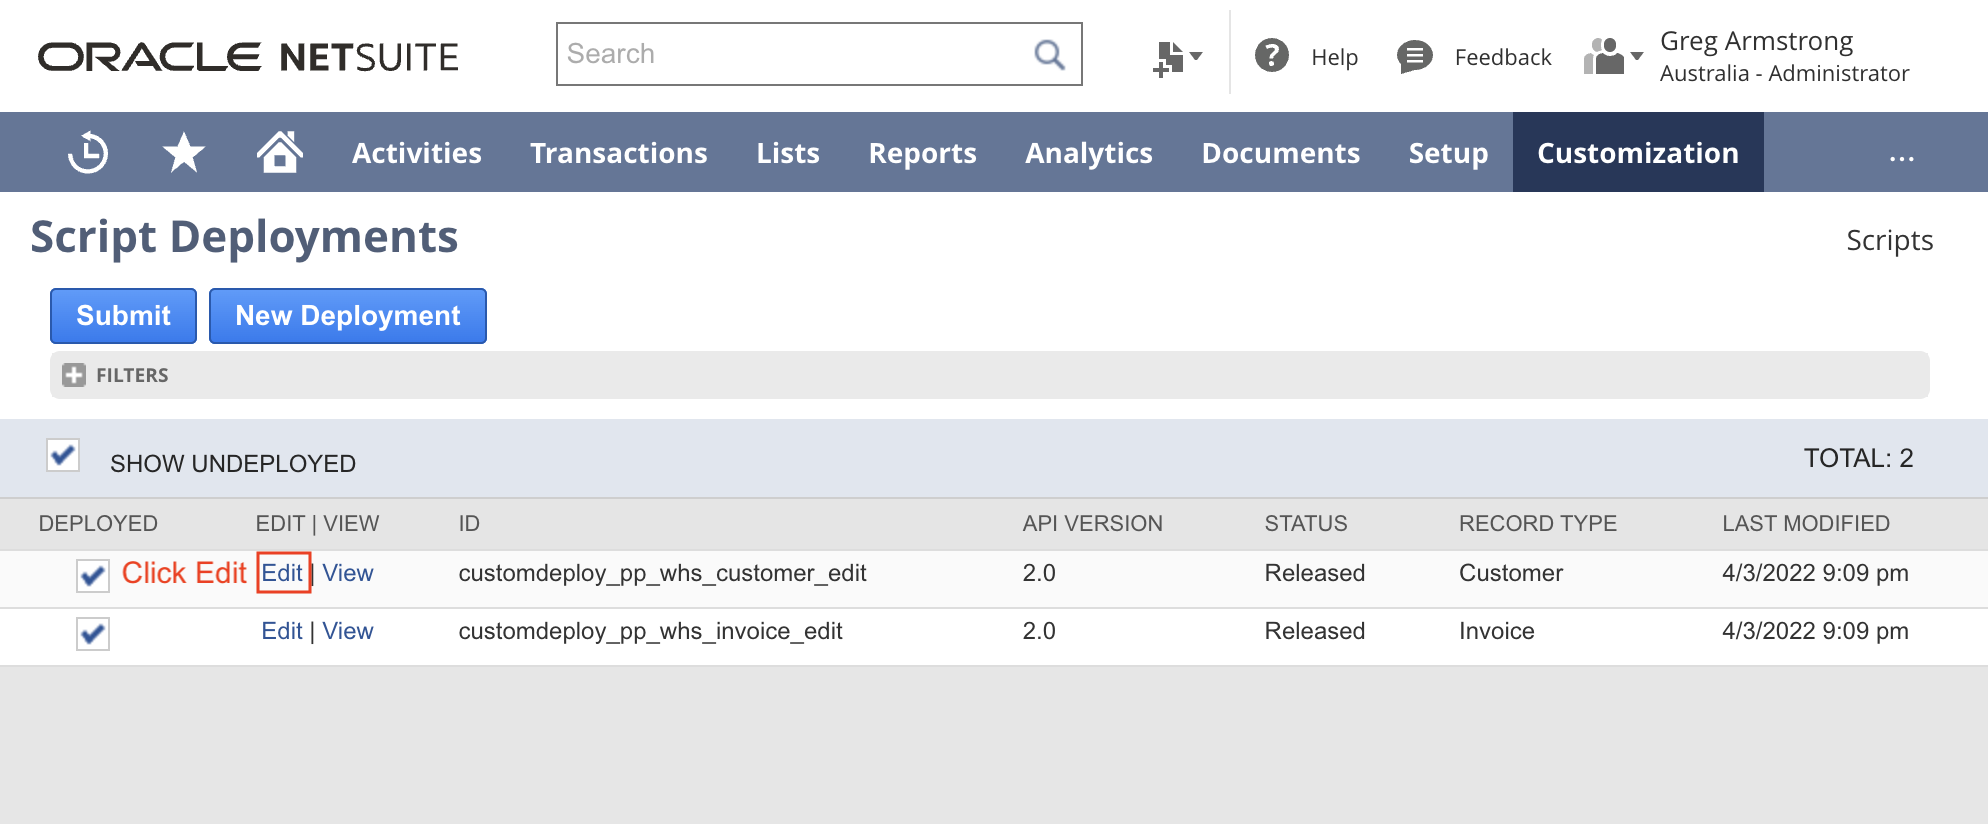
- Update the Role to include: 'PencilPay API' and any other roles you would like the users with these roles to push customer and invoice data from NetSuite to Pencil immediately via the web hook (otherwise you may wait up to 3 hours for the data to sync); OR
- Employee: 'PencilPay API' user account and any other roles you would like the users with these roles to push customer and invoice data from NetSuite to Pencil immediately via the web hook (otherwise you may wait up to 3 hours for the data to sync).
- Click on the Edit link.
- customdeploy_pp_whs_invoice_edit
- Click on the Edit link.
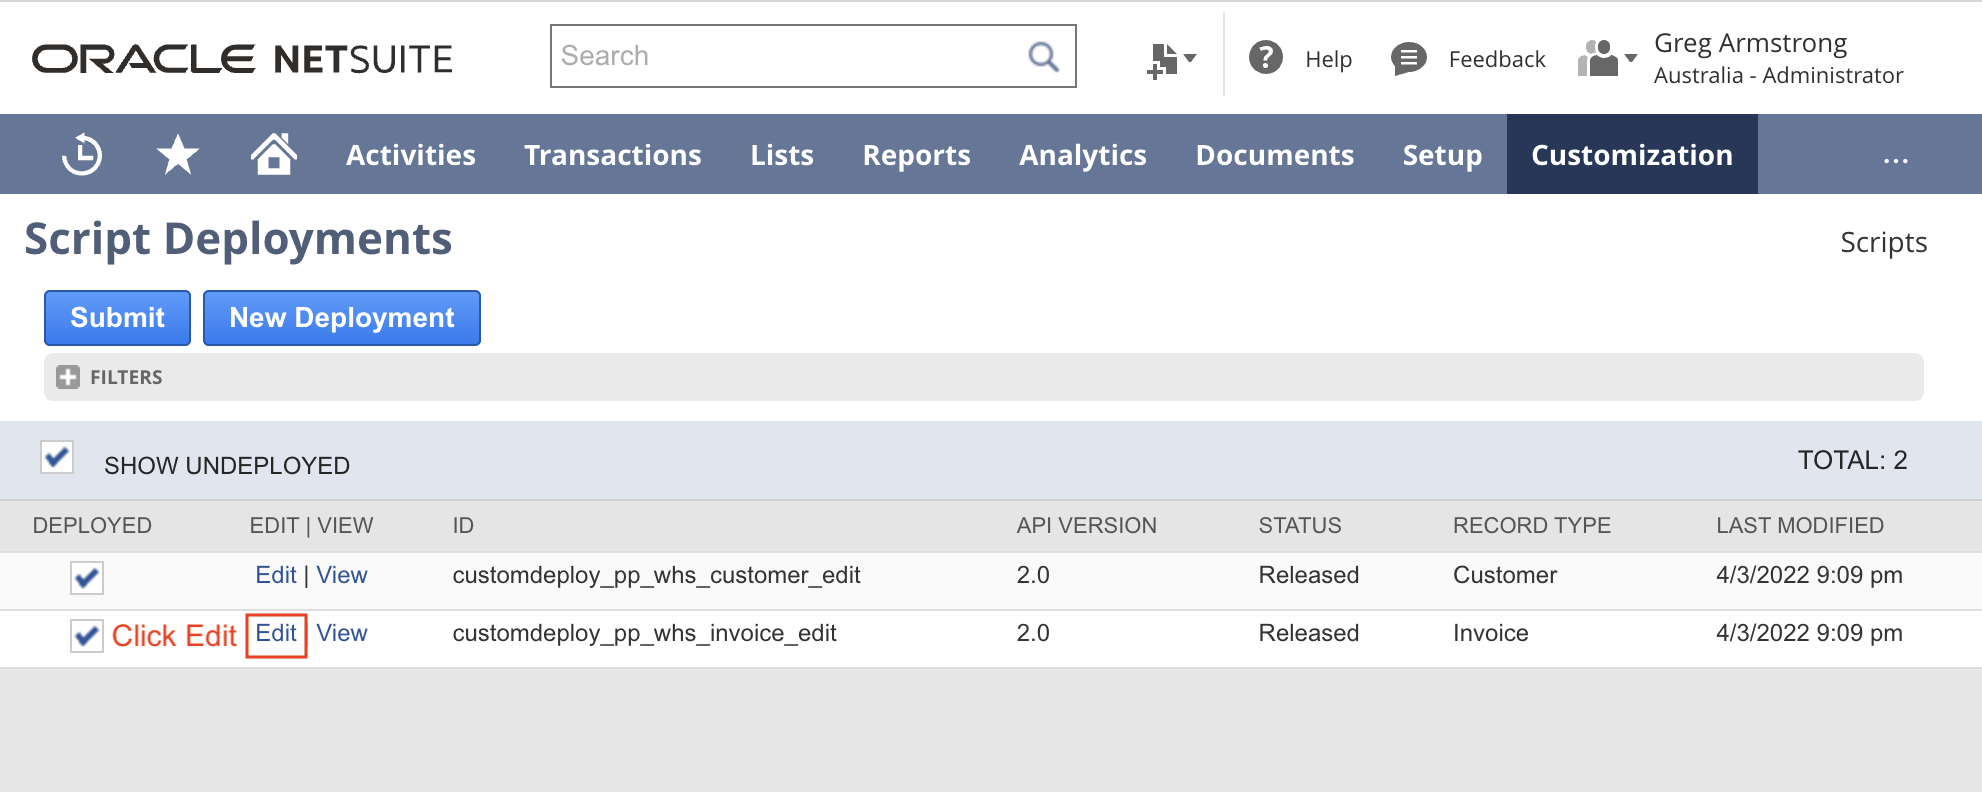
- Update the Role to include: 'PencilPay API' and any other roles you would like the users with these roles to push customer and invoice data from NetSuite to Pencil immediately via the web hook (otherwise you may wait up to 3 hours for the data to sync); OR
- Employee: 'PencilPay API' user account and any other roles you would like the users with these roles to push customer and invoice data from NetSuite to Pencil immediately via the web hook (otherwise you may wait up to 3 hours for the data to sync).
- Click Save.
- Click on the Edit link.
- customdeploy_pp_whs_customer_edit
- On Script review page in the top right corner click on More > 'View Deployments' to update 'Audience' script deployment records.
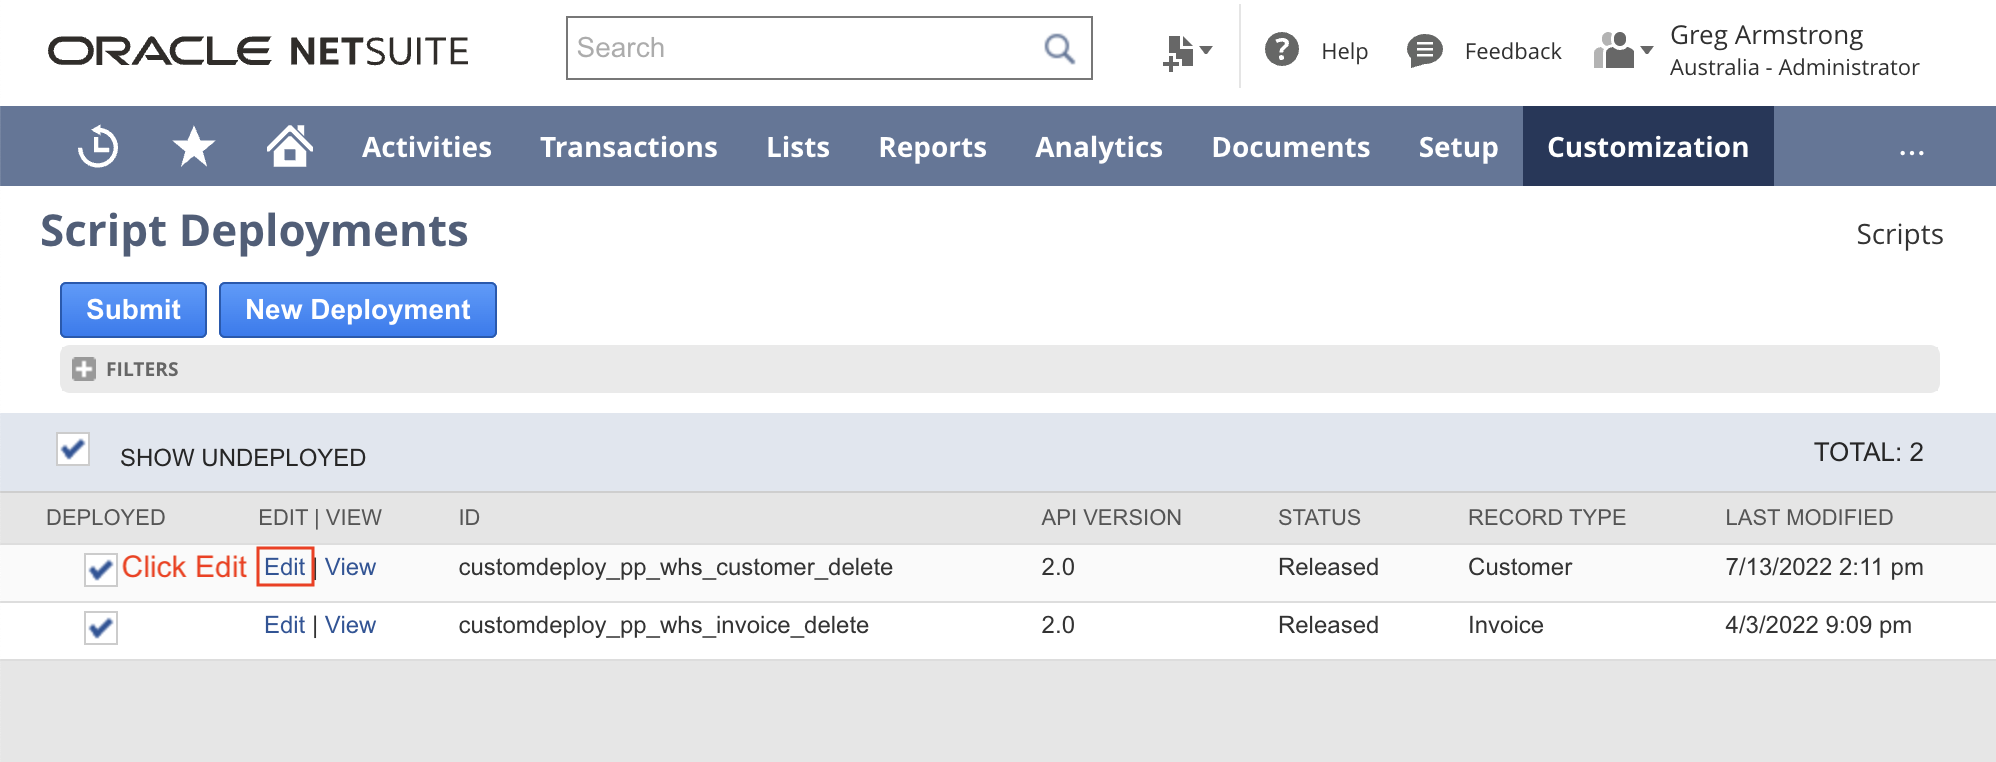
- Then find the third script called: PencilPay Webhooks Delete and click on the "View" link.
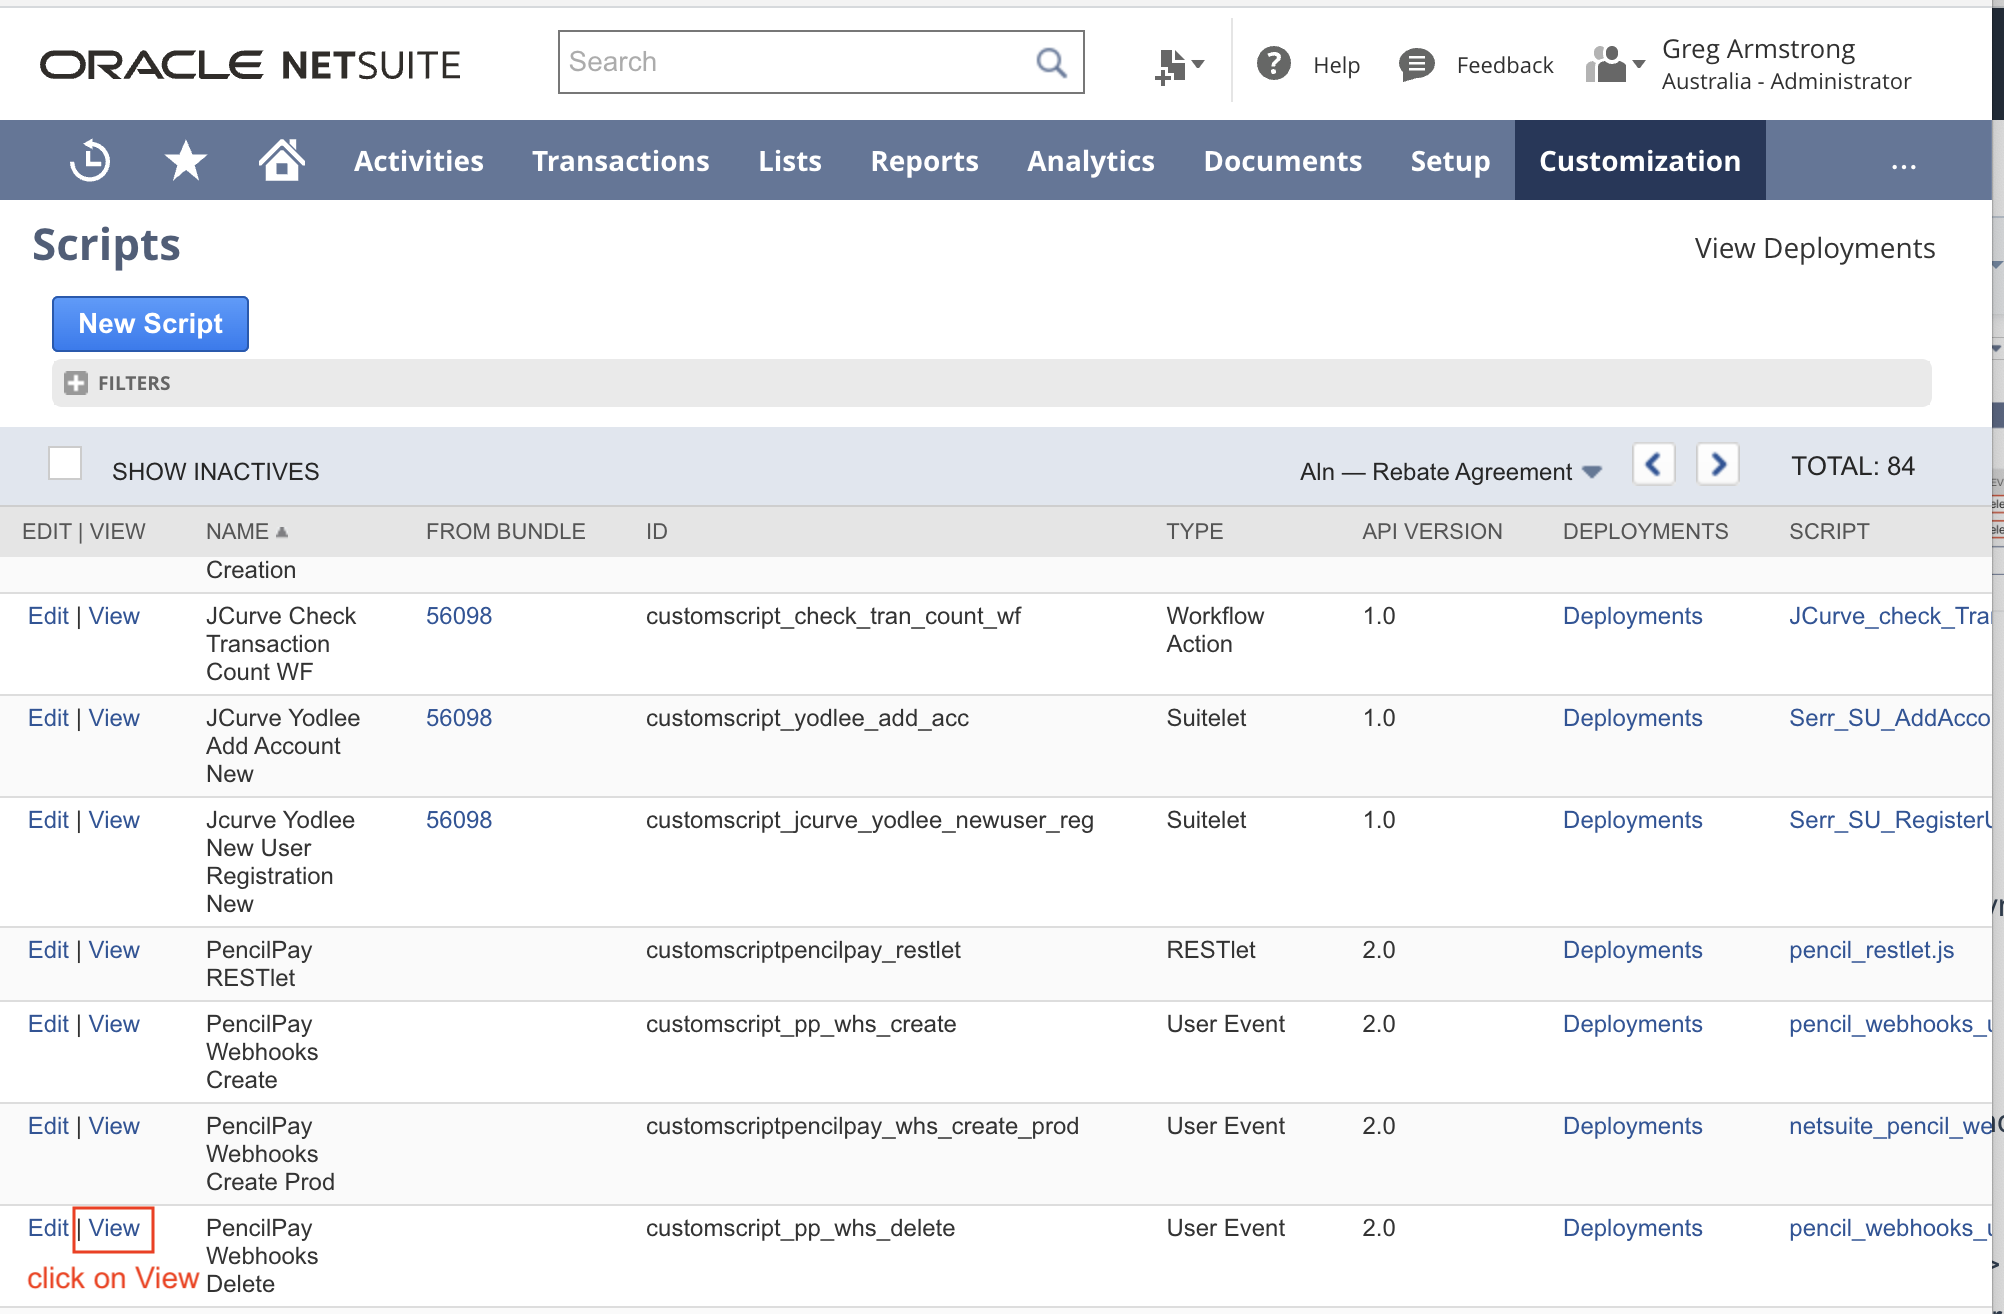
- On Script review page in the top right corner click on More > 'View Deployments' to update 'Audience' script deployment records.
- You will see two "Script Deployments".
- customdeploy_pp_whs_customer_delete
- Click on the Edit link.
- Update the Role to include: 'PencilPay API' and any other roles you would like the users with these roles to push customer and invoice data from NetSuite to Pencil immediately via the web hook (otherwise you may wait up to 3 hours for the data to sync); OR
- Employee: 'PencilPay API' user account and any other roles you would like the users with these roles to push customer and invoice data from NetSuite to Pencil immediately via the web hook (otherwise you may wait up to 3 hours for the data to sync).
- Click Save.
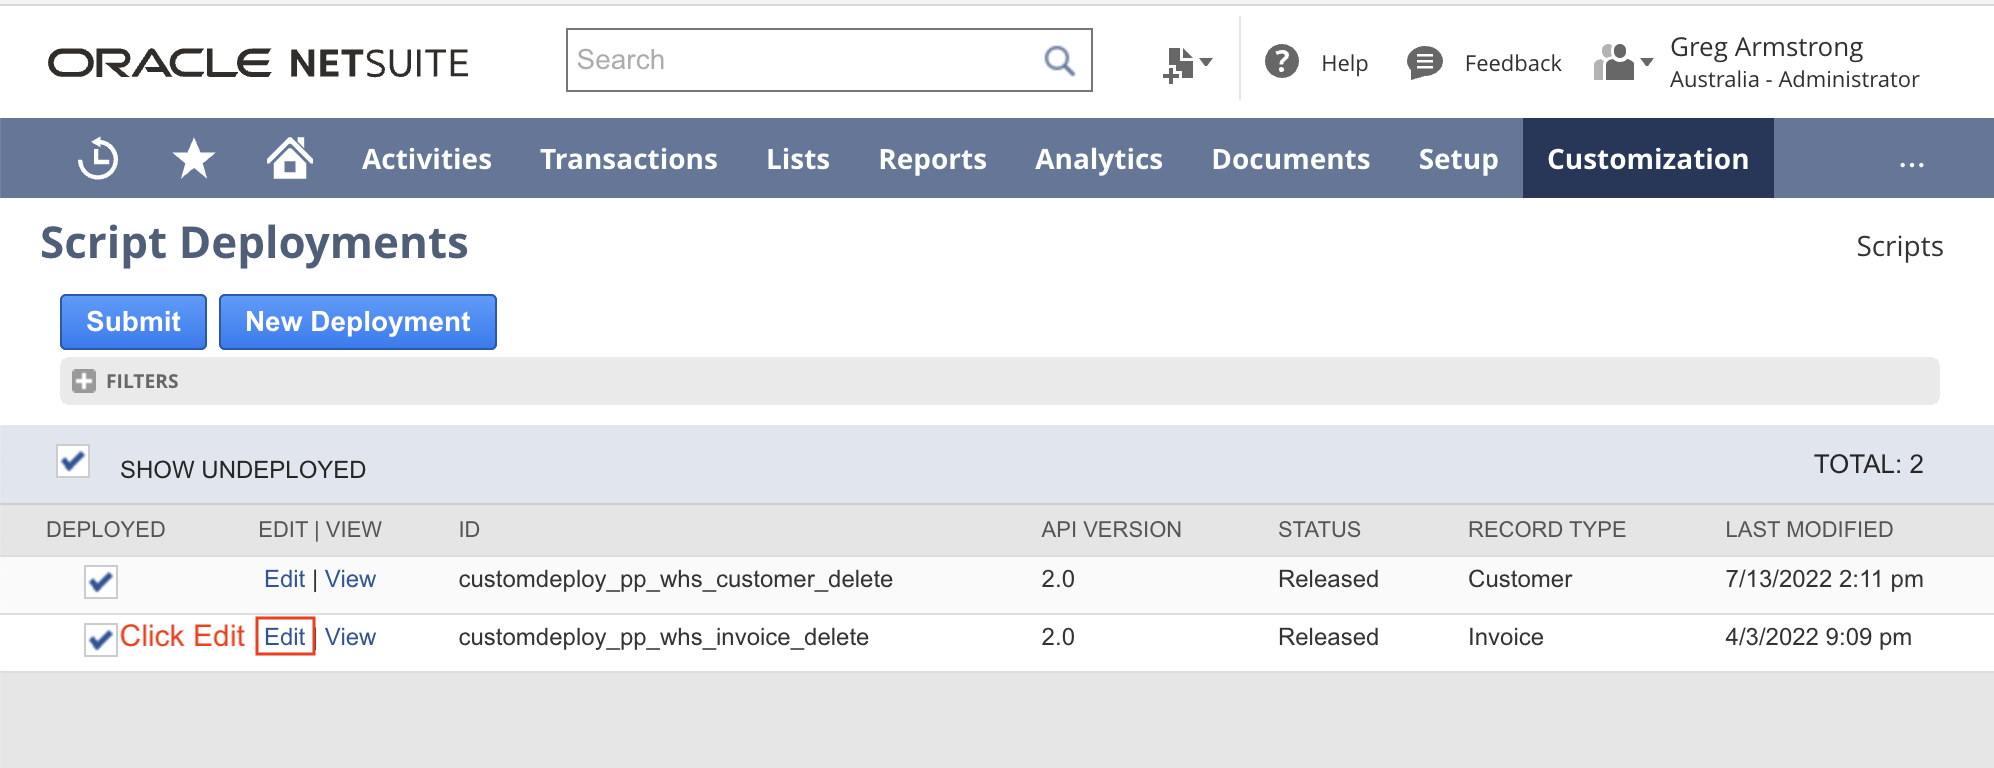
- Click on the Edit link.
- customdeploy_pp_whs_invoice_delete
- Click on the Edit link.
- Update the Role to include: 'PencilPay API' and any other roles you would like the users with these roles to push customer and invoice data from NetSuite to Pencil immediately via the web hook (otherwise you may wait up to 3 hours for the data to sync); OR
- Employee: 'PencilPay API' user account and any other roles you would like the users with these roles to push customer and invoice data from NetSuite to Pencil immediately via the web hook (otherwise you may wait up to 3 hours for the data to sync).
- Click Save.
- Click on the Edit link.
- customdeploy_pp_whs_customer_delete
- On Script review page in the top right corner click on More > 'View Deployments' to update 'Audience' script deployment records.
- To do this, go to: Customisation > Scripting > Scripts
- Role: 'PencilPay API' and any other roles you would like the users with these roles to push customer and invoice data from NetSuite to Pencil immediately via the web hook (otherwise you may wait up to 3 hours for the data to sync); OR
- Employee: 'PencilPay API' user account and any other roles you would like the users with these roles to push customer and invoice data from NetSuite to Pencil immediately via the web hook (otherwise you may wait up to 3 hours for the data to sync).
- Then find the first script called: PencilPay Webhooks Create and click on the "View" link.
-
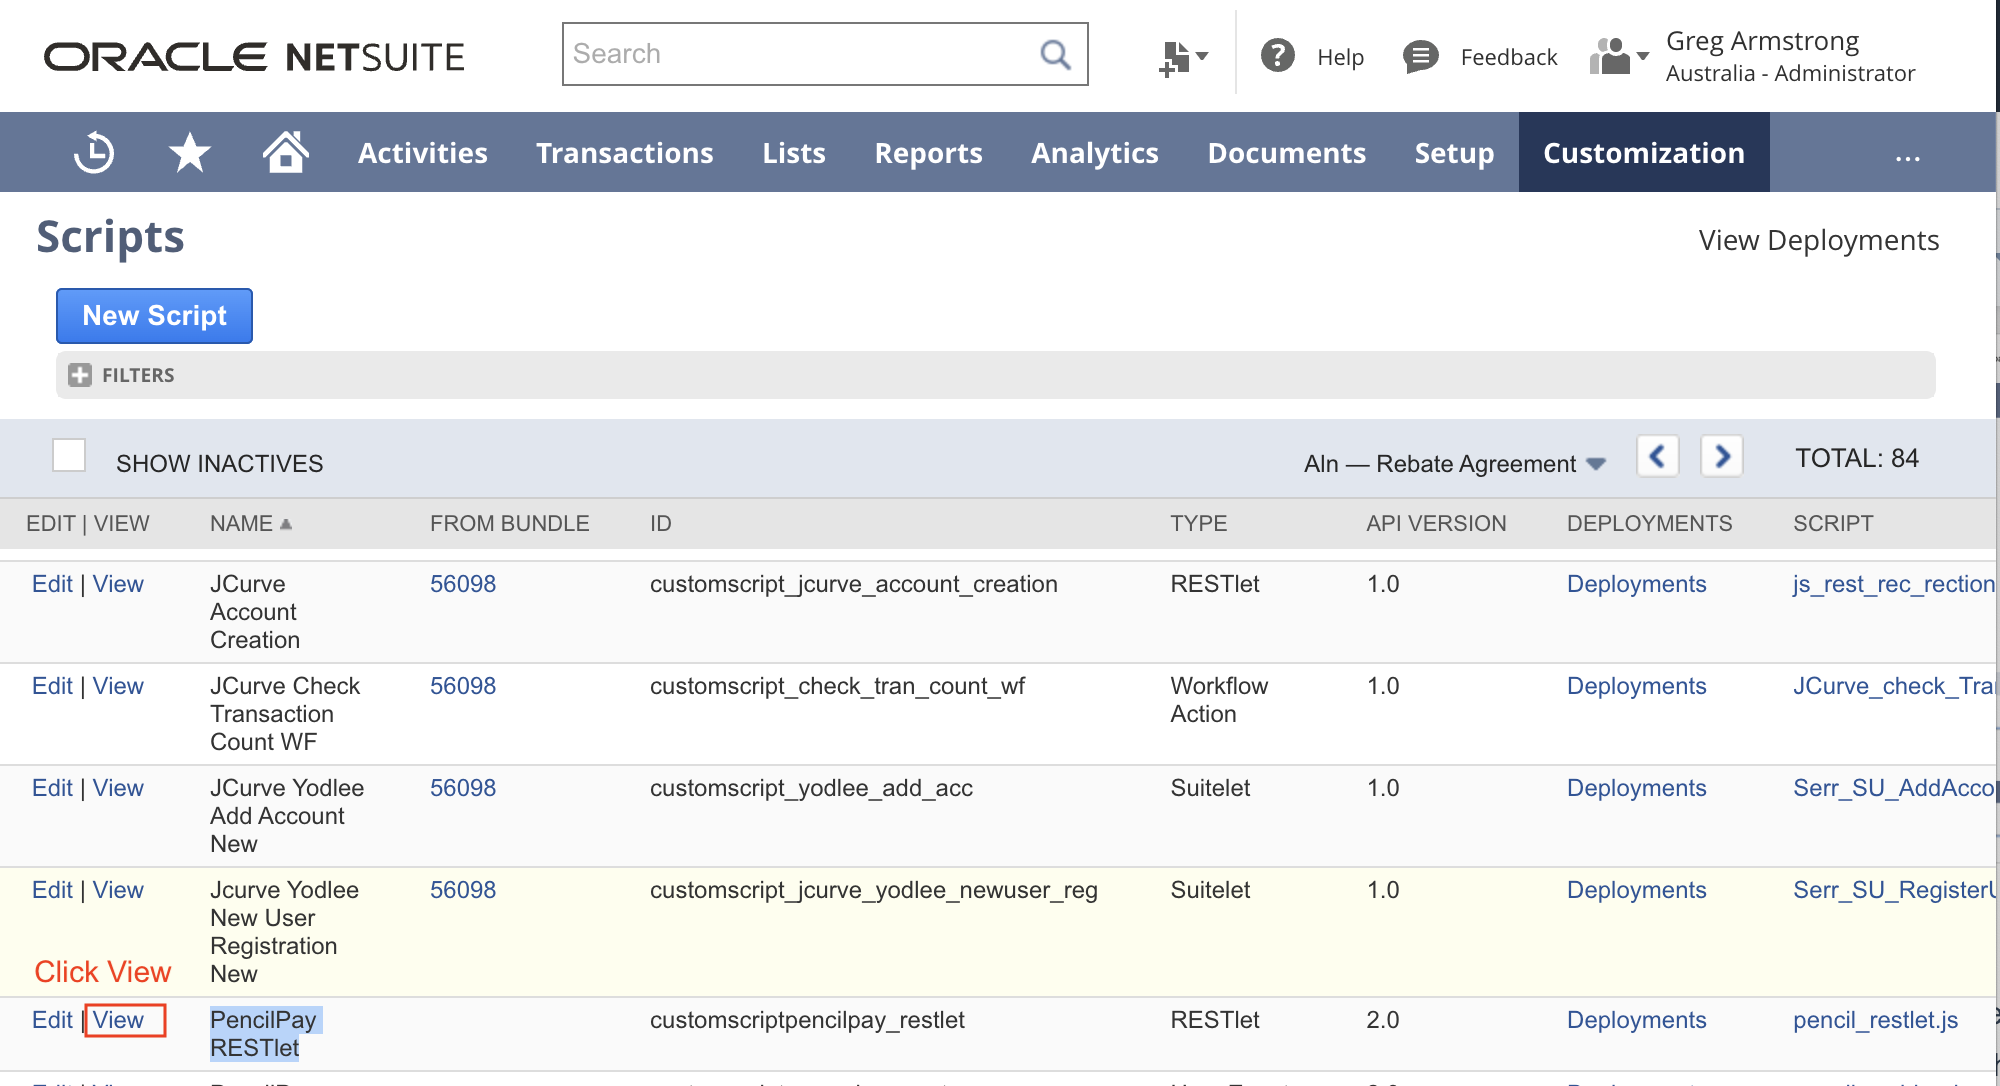
- The last is to update or check the "PencilPay RESTlet" script. To do this follow these steps:
-
Go to Customization -> Scripting -> Scripts.
- Find "PencilPay RESTlet" and click "View".
-
In the top right corner of the newly loaded page click on: More -> View Deployments.

-
You will see one entry, click on "Edit".
-
You now need to add permissions to either the Roles or Employees to allow updates to push instantly from NetSuite to Pencil or wait for the 3 hour automated process.
-
Under Roles, Select All.
-
If you want to manage by Roles, select all the roles (you need to include the PencilPay API role) that you want to push data to Pencil from NetSuite if anyone in these roles updates Invoices/Customers.
-
-
Under Employees, Select All.
-
If you want to manage by Employees, select all the Employees that you want to push data to Pencil from NetSuite if anyone in these roles updates Invoices/Customers.
-
-
- Click Save.
-
-
-
- Log in to your PencilPay Account.
- Go to: Integrations -> NetSuite (if you have another accounting integration already connected you will need to disconnect)
- Then complete the following information:
- Enter your "NETSUITE Account ID"
- Enter your "Pencil Client ID" from step 5.d above
- Enter your "Pencil Client Secret" from step 5.d above
- Enter your "Token ID" from step 6.e above
- Enter your "Token Secret" from step 6.e above
- Enter your "Pencil RESTlet external URL" from step 7.c.iv above
- Click Authorise.
- In the "Reconcile configuration" page select your "Primary subsidiary" and click Next.
- Then select the following settings:
- Primary location
- Bank account (set the bank account you want monies to be disbursed to)
- Pencil clearing account (the integration will add this as part of the auto-reconciliation feature)
- Secondary Pencil clearing account (the integration will add this as part of the auto-reconciliation feature)
- Transaction fee account (select an account to assign the Pencil transaction fees).
- Pencil Vendor Tax Code.
- Customer Price Level.
- Customer Tax Item.
- Customer Category.
- Customer Status (This status will be applied to approved customers who on board through Pencil platform).
- Enable pushing payments as customer deposits (Toggle ON to allow Pencil push payments as customer deposits or toggle OFF to set as Disabled).
- Enable resyncing inactive customers (Toggle ON to allow Pencil resync customers and invoices that are set as Inactive in Pencil or toggle OFF to set as Disabled.)
- Enable pushing payments on checkout (Direct debit payments take 3 business days to process and sometimes they fail. This setting allows you to choose if you want to push the direct debit payment immediately to your accounting system (toggle this setting ON). If you run your business on statements and only want the payment to be updated in your accounting system on successful disbursement of the funds; then toggle this setting OFF).
- Click Save.