Please follow the steps below:
-
Prerequisites
-
You need an active PencilPay account. If you don’t have one, please go to Onboard Customers, Save Time and Get Paid Faster | PencilPay and register for a 30 day trial. Alternatively contact us via email at support@pencilpay.com and we’ll arrange a 20 minute demo of PencilPay.
-
You need an active Xero account that is integrated with PencilPay. If you don’t have a Xero account, please go to Try Xero for Free and sign up for a free 30 day account.
-
An active Wordpress and WooCommerce site that is in production mode as this extension is connected to our production environment. If you would like to test the extension and features on a development environment, please email support@pencilpay.com and we’ll arrange a time to demo Pencil and, if required, provide you with access to a demo environment for testing.
-
You need an active DEAR Systems account Cloud ERP System Software | Automate your Business | DEAR with the following extension installed and connected: DEAR | WooCommerce Integration
-
-
Installation Method
-
Plugin Installation (upload zip plugin)
-
In Wordpress, go to Plugins -> click “Add New” -> choose the PencilPay WooCommerce plugin zip file from your computer and click “Install Now”.
-
Plugin Installation (via FTP or console)
-
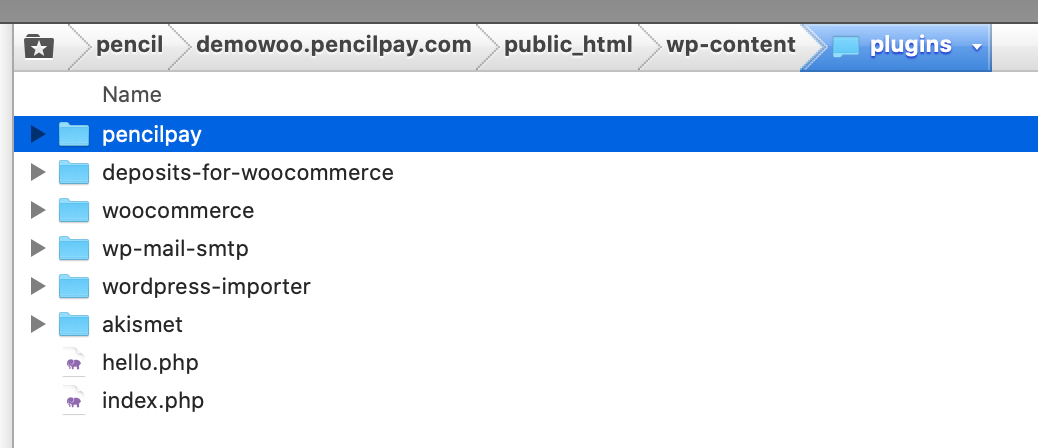
Extract the plugin package and upload to your-wordpress/wp-content/plugin/
-
-
-
-
Activate the plugin at Admin Dashboard -> Plugins -> Installed Plugins -> WooCommerce PencilPay Payment Gateway

-
PencilPay Configuration
-
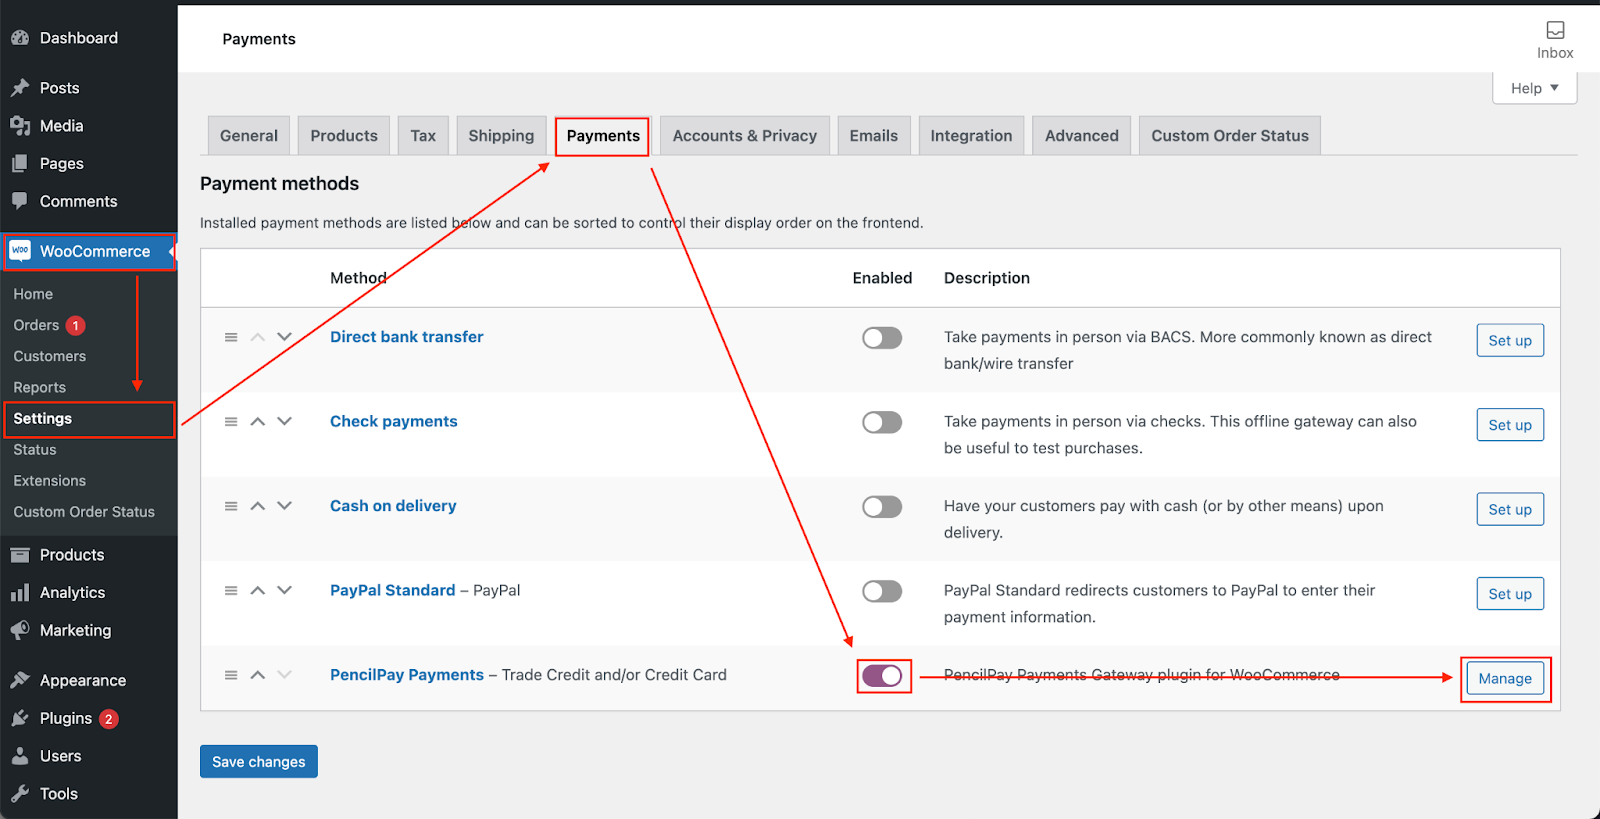
The settings in Admin Dashboard -> WooCommerce -> Settings -> Payments
-
Enable the method
-
Click on Manage button to update the settings by following the instructions
-
-
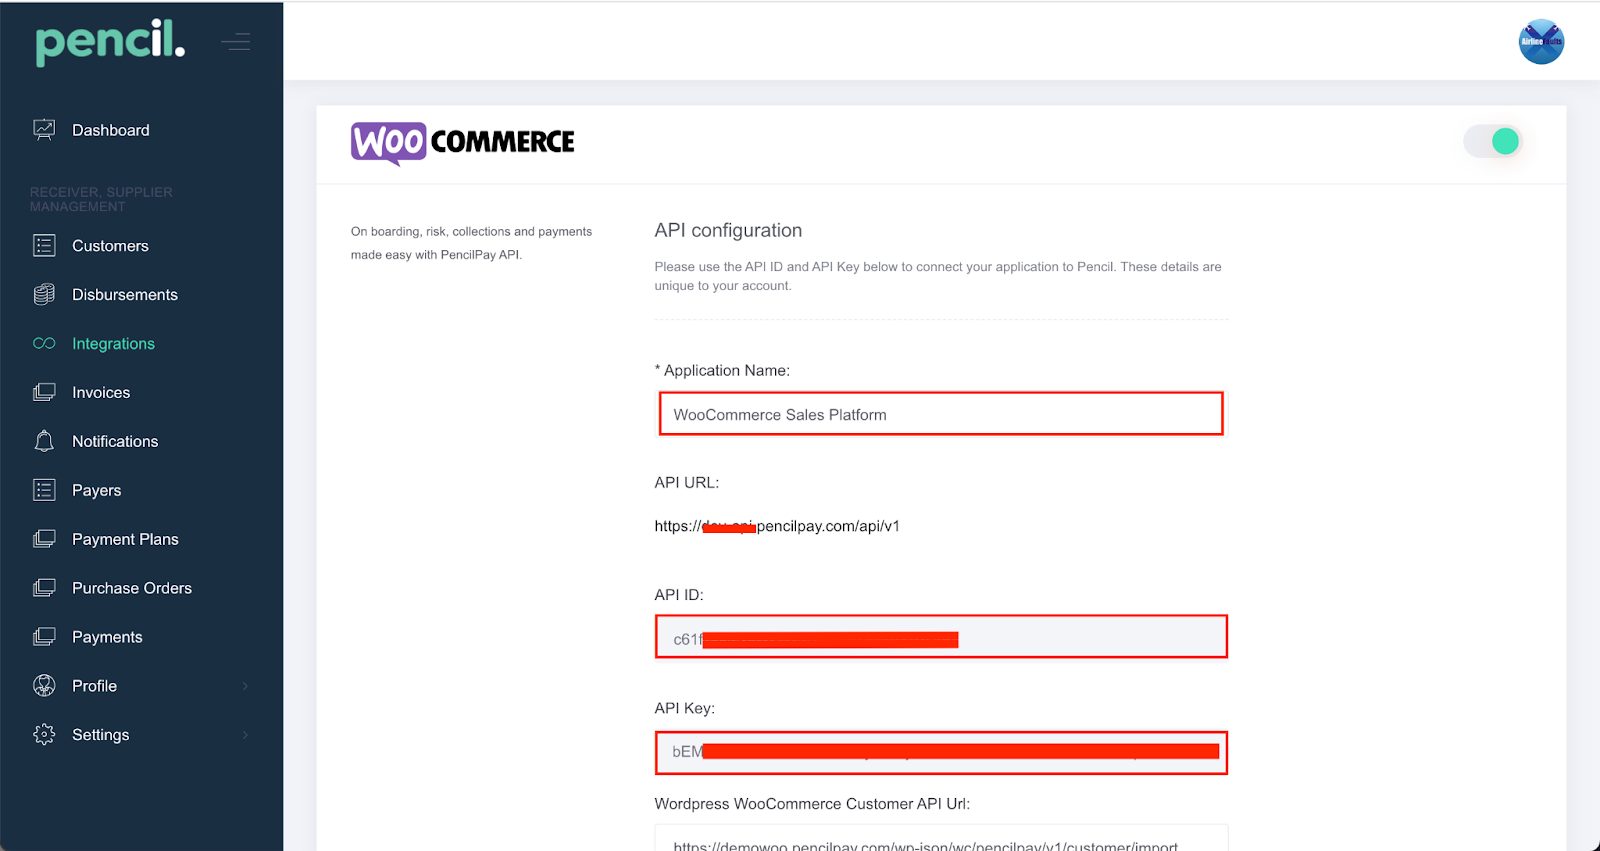
In a separate tab, login to PencilPay -> Integrations -> WooCommerce -> so you can get PencilPay API details
-
Update Customer import endpoint
https://your-wordpress-website/wp-json/wc/pencilpay/v1/customer/import -
Copy these from Pencil to enter into your WooCommerce settings:
-
API Endpoint Url for production mode: https://api.pencilpay.com/api/v1
-
PencilPay API ID
-
PencilPay API Key
-
- Then add the following:
-
Wordpress WooCommerce Customer API Url: https://WWW.YOURDOMAIN.COM/wp-json/wc/pencilpay/v1/customer/import
-
Wordpress WooCommerce Payment Methods Available -> you can select from:
-
Trade Credit: use this setting if you want your customers who are signed up in Pencil with a saved credit card and they have a credit limit you will allow them to check out with.
-
Credit Card: This one is required and mandatory.
-
-
Push Customers to WooCommerce -> if you want new customers to be automatically pushed to WooCommerce and have the Wordpress account creation email sent to the customer so they can set a password and log in to place orders.
-
Enable Credit Card Pre-Authorisation -> If you want to pre-authorise the payment and then capture the amount once the order is complete in your inventory/accounting system (by default we recommend this to be OFF).
-
Instant Payment Notifications Url: https://WWW.YOURDOMAIN.COM/wp-json/wc/pencilpay/v1/purchase-order/payment-status

-
-
In “Wordpress WooCommerce Payment Methods Available” click in here and select if you want your customers to checkout using their available trade credit limit and/or credit card.
-
If you don’t want your B2B customers to be pushed to WooCommerce when you approve their credit application in Pencil, toggle “Push Customers to WooCommerce” off, otherwise toggle on.
-
Click on the Save button in your Pencil account.
-
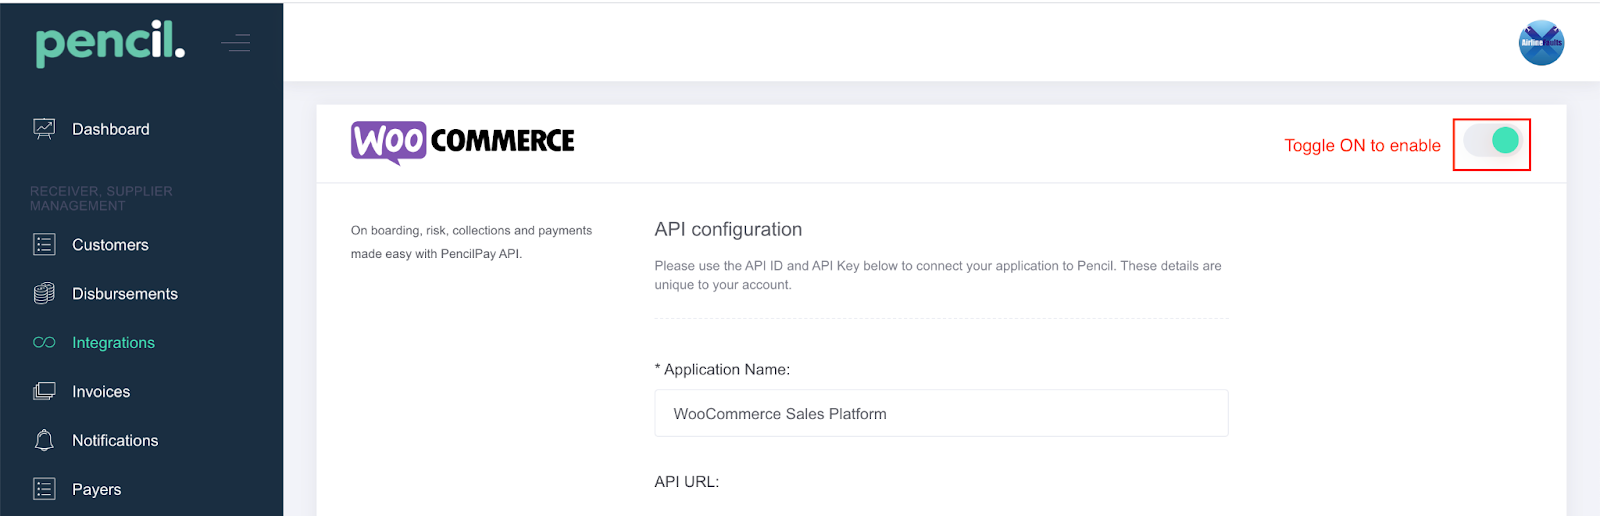
In the top right corner toggle WooCommerce ON.
-
-
Next go back to the WooCommerce tab and paste the settings from: API Endpoint Url for production mode, PencilPay API ID and the PencilPay API Key in their related fields as detailed below:
-
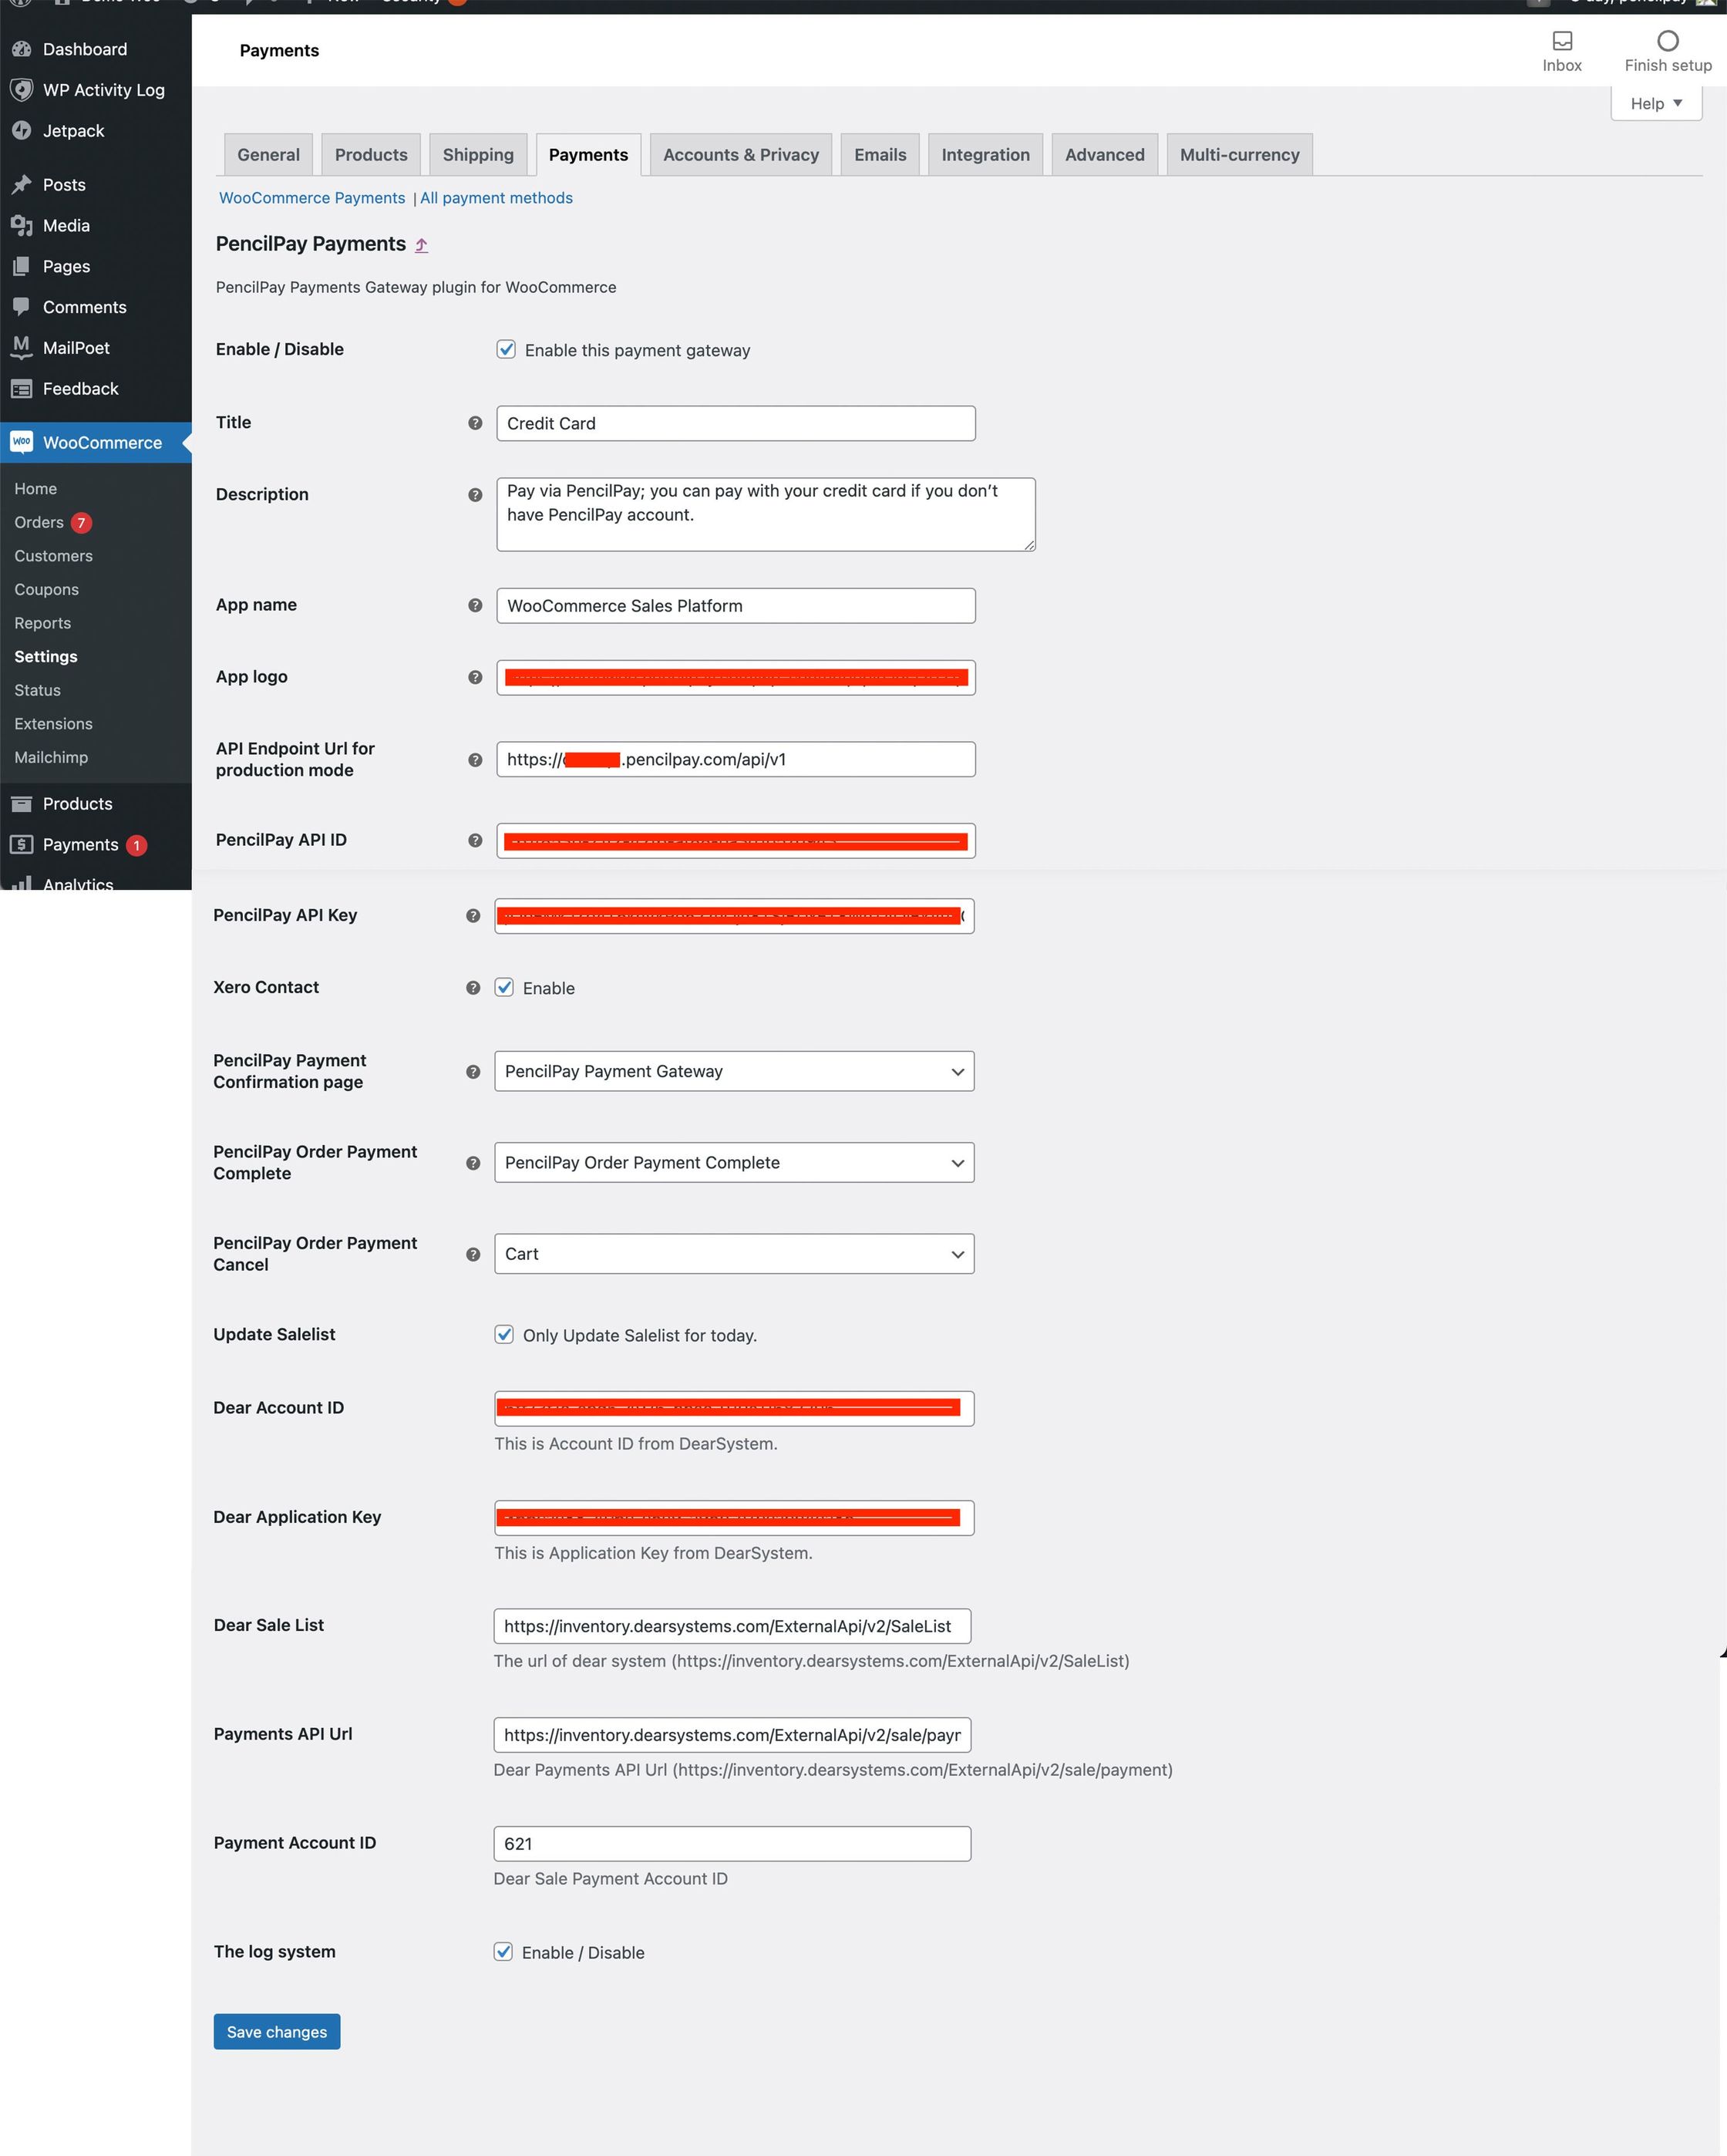
Xero Contact → check the “Enable” box.
-
Title → this will be the name displayed as the payment method option in the check. Eg. “Credit Card”
-
Description → enter a description of the payment method
-
App Name → enter the name you want to display in Pencil → Purchase Orders so you can distinguish which sales platform the order/sale came from.
-
App Logo → this will show on the payment page. You can use your own logo or https://app.pencilpay.com/assets/pencil-logo-dark-d5187d34c5df11b8c3a4b390e89258b3f155428cc31f36923fcc9a2372c9a72e.png
-
API Endpoint Url for production mode: https://api.pencilpay.com/api/v1
-
PencilPay API ID → use from what you copied from 5.b.ii above
-
PencilPay API Key → use from what you copied from 5.b.iii above
-
Xero Contact → Enable this
-
PencilPay Payment Confirmation page -> set as “PencilPay Payment Gateway”
-
PencilPay Order Payment Complete -> set as “PencilPay Order Payment Complete”
-
PencilPay Order Payment Cancel -> if an order is cancelled on the payment page, we will redirect back to this page. We suggest selecting “Cart”.
-
Update Saleslist → Enable this
-
Dear Account ID → copy from DEAR API settings (you may need to add a new DEAR API or use an existing one)
-
Dear Application Key → copy from DEAR API settings (you may need to add a new DEAR API or use an existing one)
-
Dear Sale List → https://inventory.dearsystems.com/ExternalApi/v2/SaleList
-
Payments API Url → https://inventory.dearsystems.com/ExternalApi/v2/sale/payment
-
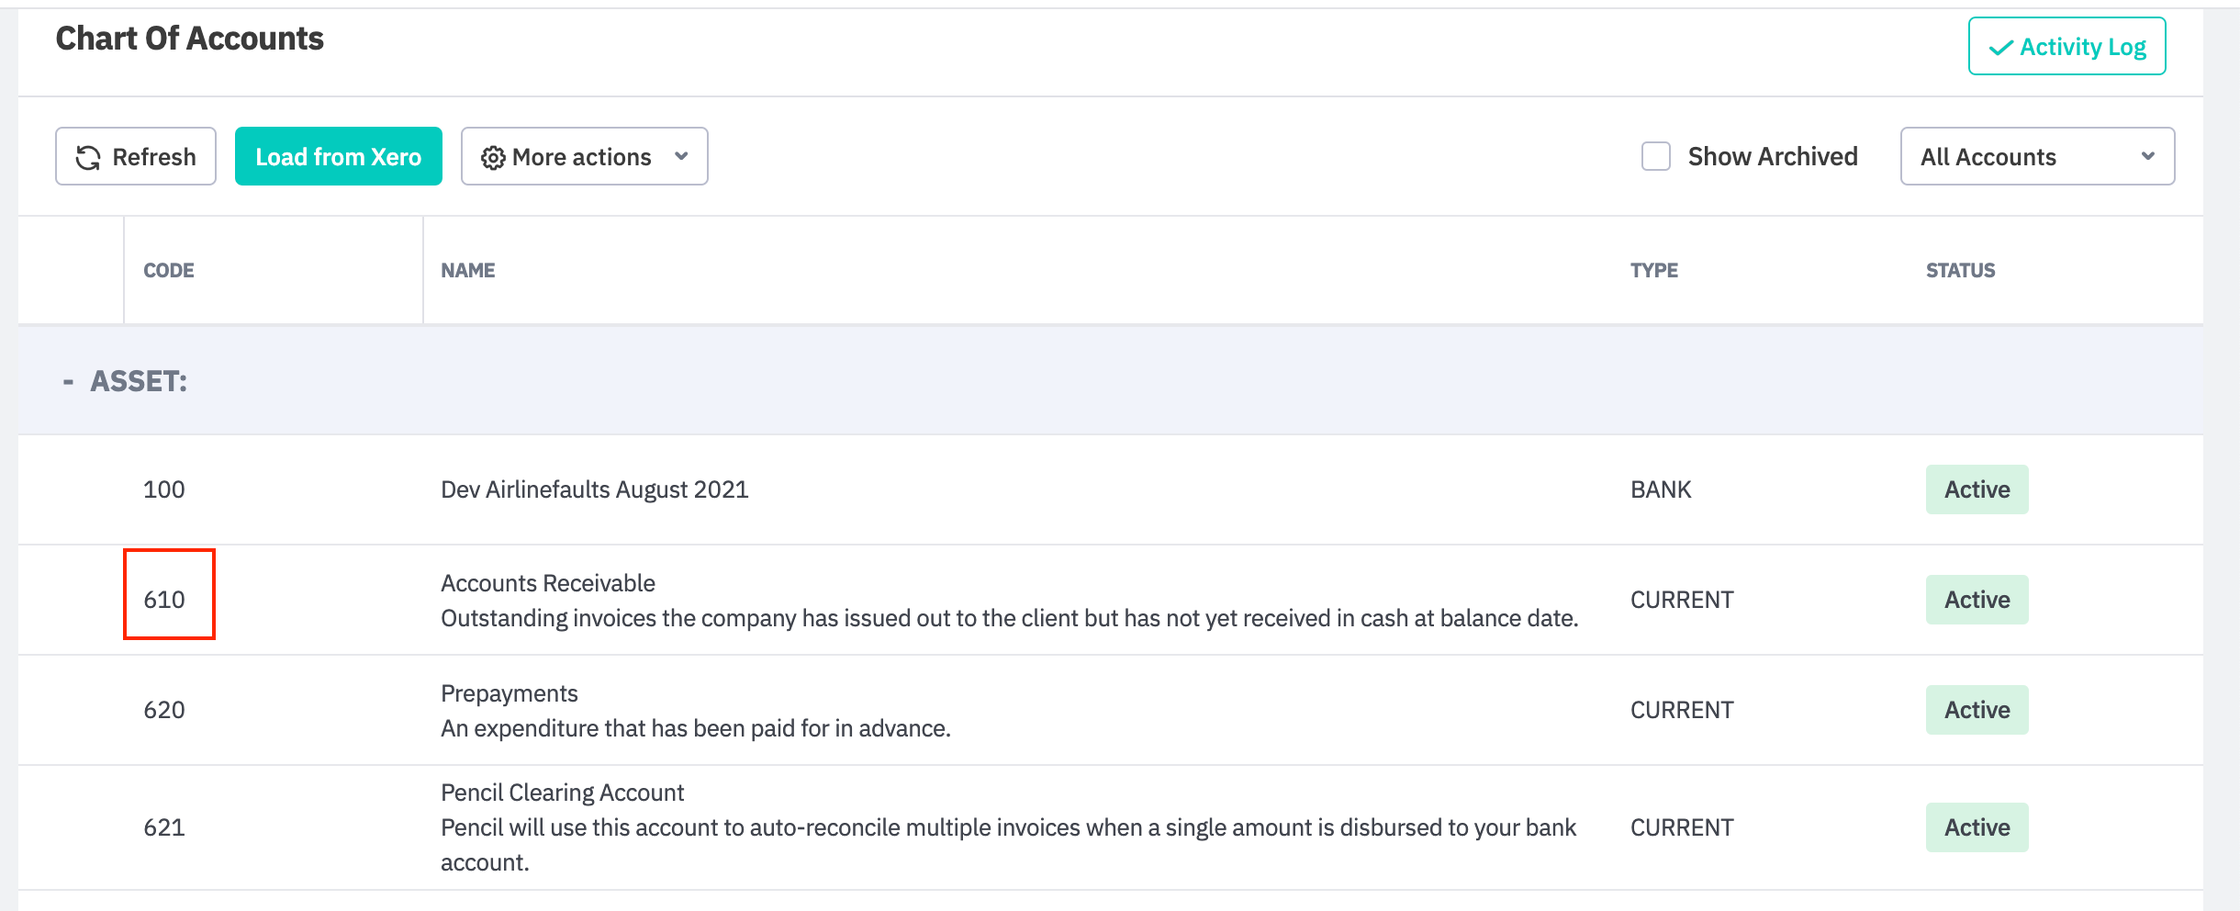
Payment Account ID → Go into your DEAR account: Settings → Reference Books → Chart of Accounts (https://inventory.dearsystems.com/ChartOfAccounts) and check the Asset → Accounts Receivable ID and enter here.

-
The log system → Enable only for testing (disable once in Production/Live)
-
For the DEAR settings follow the steps below, but first click on “Save Changes”
-
-
Dear Inventory API Connection:
-
Login to Dear Inventory, click on Integration on left menu
-
Select WooCommerce under eCommerce category
-
Add New Connection by click on + icon

-
Provide the Name and Website url
-
Follow the instructions, enter your WP admin username and password to finish the connection.
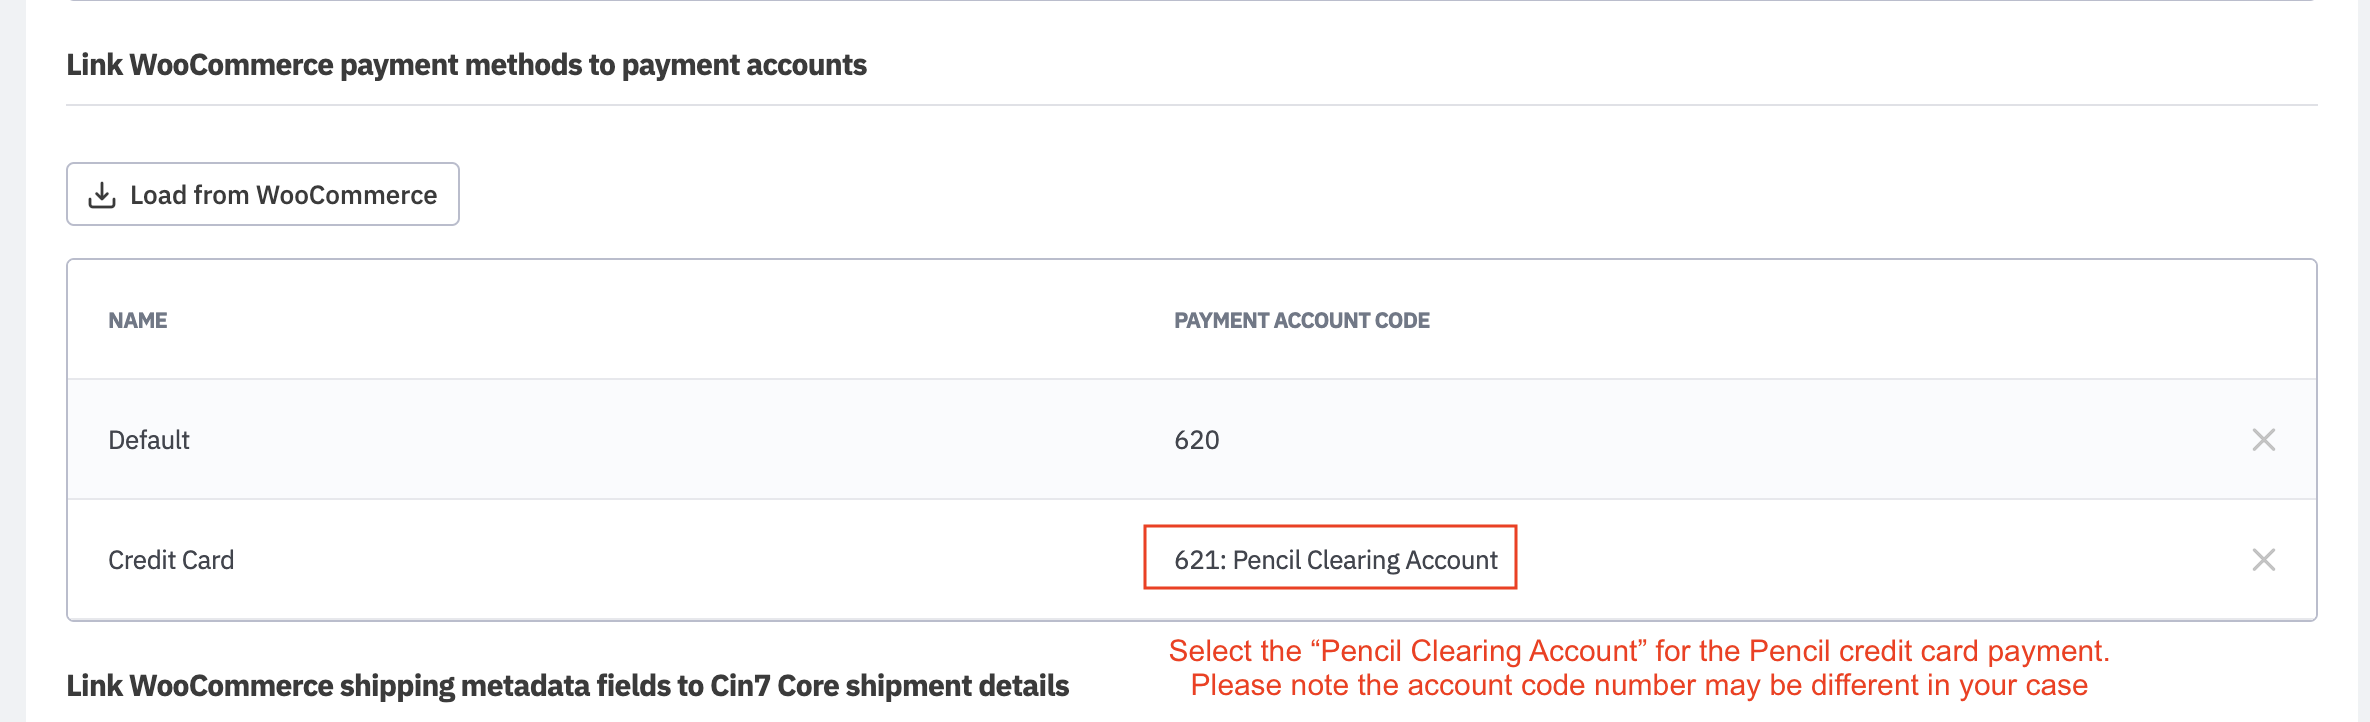
- Please check that you have also updated the PencilPay credit card payment method in "Link WooCommerce payment methods to payment accounts" and set the "Payment Account Code" to the "Pencil Clearing Account".
- For more information see: https://support.dearsystems.com/support/solutions/articles/11000048209-woocommerce-integration
-